
Related Manuals for LENCO L-3866 USB


Summary of Contents for LENCO L-3866 USB
-
Page 1: User Manual
L-3866 USB / L-3867 USB TURNTABLE WITH USB CONNECTION AND BUILT-IN PRE AMPLIFIER User manual For information and support, www.lenco.com Lenco_UM_L-3866_USB_GB Lenco_UM_L-3867_USB_GB V2.0... -
Page 2: Table Of Contents
Table of content What’s in the box? ....................3 IMPORTANT SAFETY INSTRUCTIONS - READ CAREFULLY BEFORE USE..3 Exploring the device....................5 Installing the device ....................6 Where to install? ......................6 How to install? ......................6 Maintenance ......................6 Basic operation ...................... -
Page 3: What's In The Box
Dear customer, Thank you for purchasing this Lenco product. Quality and usability is our top priority. In order to let you fully enjoy this product, we manufactured this product using high quality standards, materials, components and care. Note: This user manual is printed prior to the product development. When a part of the product specification must be changed to improve operability or other functions, priority is given to the product specification itself. - Page 4 Keep these instructions in mind: Clean only with a slightly damp cloth. Do not cover or block any ventilation openings. When placing on a shelf leave 5 cm (2”) free space around the whole unit. Protect the power cord from being walked on or pinched, particularly at plugs, and the point where it exits the unit.
-
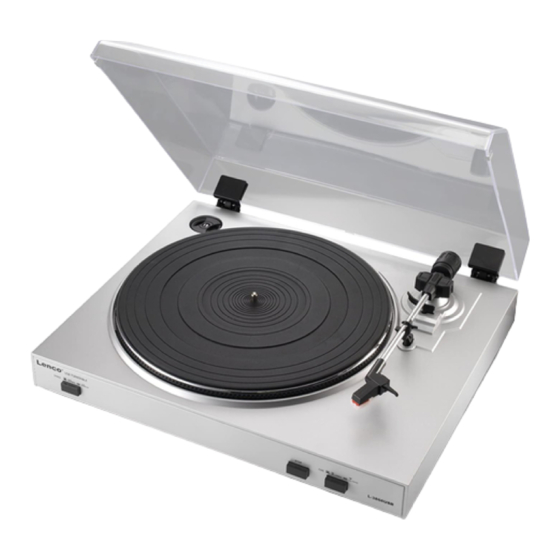
Page 5: Exploring The Device
Exploring the device... -
Page 6: Installing The Device
1. Adaptor holder, use the adaptor in this holder for 45 RPM records. 2. Platter, place the records on the platter. 3. Tone arm 4. Tone arm lock, use this to lock the tone arm. 5. Dust cover, open or remove the dustcover while operating. 6. -
Page 7: Basic Operation
To install a new cartridge Connect the three link wires as shown in figure. Push the cartridge into headshell Re-position the stylus To adjust the needle pressure Remove the dustcover. At the back side of the arm there is a “crosshead screw”, turn it in right direction to increase the needle pressure and turn it in left direction to decrease the needle pressure. -
Page 8: Digitizing Records
Remark: While the record is playing and if you wish to stop the record while its playing: Press the stop button; the cartridge comes up and returns to it’s rest; the turntable stops turning. Replace the protective cap on the stylus Close the tone-arm lock. - Page 9 4. Select the “Edit” menu and then “Preferences” 5. Select the USB audio device under the “Recording” selection as shown. 6. Select “Software Playthrough” to hear the audio while recording. 7. Press okay to save the settings. 8. The software is now ready to start recording.
-
Page 10: Software Installation & Configuration (Windows 7)
Software Installation & Configuration (Windows 7) 1. Connect the turntable with the AC power outlet. 2. Connect the turntable with a USB socket on your computer and wait for several seconds until below pop-up screen appears. 3. Click on Close. 4. - Page 11 13. Go to the taskbar and click on "Edit" and then on "Preferences". Below screen will appear: 14. Select in the pull-down menu “Recording”, “Device” the option Microphone (USB- audio device). 15. Select in the pull-down menu “Channels” the option 2 (stereo) 16.
-
Page 12: How To Digitize The Records
How to digitize the records How to digitize the records 1. Turn on the computer 2. Turn on the turntable and connect it with the computer turntable and connect it with the computer Note: Before connecting the turntable to the PC, disconnect the turntable from Before connecting the turntable to the PC, disconnect the turntable from Before connecting the turntable to the PC, disconnect the turntable from your audio-system. -
Page 13: Track Pop-Down Menu
Pause - temporarily Fit selection in window Fit selection in window - zooms until the stops playback selection just fits inside the window. selection just fits inside the window. recording until you press pause again. Fit project in window Fit project in window - zooms until all of the audio just fits inside the window. -
Page 14: [Menu]
left speaker, and the bottom track representing create a file called "Composition.aup" and a the right speaker. When tracks are joined into folder called Composition_data. Audacity a stereo pair, all edits automatically apply to project files are not meant to be shared with both the left and right channel. -
Page 15: Edit Menu
Split - Moves the selected region into its own format using the "Import Labels..." command in Project Menu. track or tracks, replacing the affected portion of the original track with silence. See the figure below: Export Multiple... - lets you split your project into multiple files all in one step. -
Page 16: View Menu
Snap-To ... > Snap On - Enable Snap-To Redo many times in a row. You can also mode. When Snap-To mode is enabled, the discard Undo history to save disk space. The selection will be constrained to the nearest history window can be kept open while you interval on the time scale, by default the work. -
Page 17: Generate Menu
Align Tracks... - All the Align functions work some other possible encodings. At the beginning of your imported track(s), you on whole tracks or groups of tracks, not on may notice a little bit of noise. This is probably selections, even if they span across multiple the file's header, which Audacity was not able tracks. -
Page 18: Effect Menu
Change Tempo - changes the tempo (speed) Any items which appear after these three built- ins are VST, Ladspa, or Nyquist plug-ins. It is of the audio without changing the pitch. This possible for a poorly written plug-in to crash will change the length of the selection. -
Page 19: Analyze Menu
using a powerful functional programming window that displays the Power Spectrum of language. See the Nyquist section of the the audio over that region, calculated using the Audacity website for more information. Fast Fourier Transform. The graph represents how much energy is in each frequency. As you move the mouse over the display, it shows you Phaser - the name "Phaser"... -
Page 20: Service And Support
The helpdesk is accessible from Monday till Friday from 9 AM till 6 PM. When contacting Lenco, you will always be asked for the model and serial number of your product. The serial number can be found on the back of the device. Please write down the...
Need help?
Do you have a question about the L-3866 USB and is the answer not in the manual?
Questions and answers