Table of Contents
Advertisement
Quick Links
Advertisement
Table of Contents

Related Manuals for Wadia 151PowerDAC mini


Summary of Contents for Wadia 151PowerDAC mini
- Page 1 manual 151PowerDAC mini...
-
Page 2: Thank You
Thank You. All of us at Wadia Digital would like to say thank you, and congratulations for purchasing the Wadia 151PowerDAC mini Digital Integrated Amplifier. We sincerely believe that your Wadia 151PowerDAC mini is an intelligent investment that will bring you many years of musical enjoyment and satisfaction. -
Page 3: Table Of Contents
Table of Contents Wadia Digital – a Brief History Optimizing Performance Installation Getting Started Features Unpacking Accessories Installing Battery in Remote Control ◆Connecting to AC Power ◆Using Line Conditioners ◆Using Surge Protectors Connections Back Panel ◆Speaker Outputs ◆Connecting the Digital Inputs... -
Page 4: Wadia Digital - A Brief History
Since the Wadia 2000, new generations of industry-leading designs have been introduced and embraced by listeners around the world. Each step of the way, Wadia has consistently raised the standard for performance of Digital Audio playback. - Page 5 Wadia’s intuitive designs are born of a delicate balance of technology shaped by a passion for music. Wadia continues to re-define the limits of digital music playback. We are proud to introduce the Wadia 151PowerDAC mini – a breakthrough in sonic performance...
-
Page 6: Optimizing Performance
Optimizing Preformance To get the best performance from your 151PowerDAC mini, and for your own safety, please read and follow these important safety instructions. • Before operating the 151PowerDAC mini please read all operating and safety instructions. • Never place the 151PowerDAC mini near heat sources such as radiators, fireplaces, stove, or other appliances that produce heat. - Page 7 Never apply water, or any other cleaner, directly to the chassis. • If you smell smoke, or an abnormal smell, immediately unplug the 151PowerDAC mini from the power supply and contact your Wadia dealer. • Unplug unit if it becomes wet.
-
Page 8: Installation
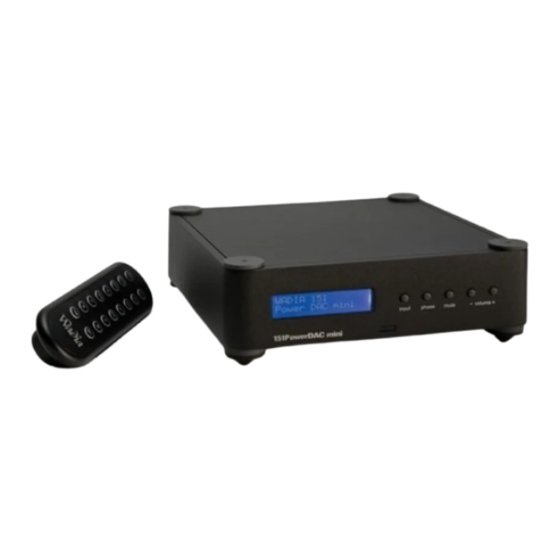
Installation Getting Started The Wadia 151PowerDAC mini is an integrated amplifier with 4 digital inputs with upsampling to 24-bit/384kHz. Despite its small size the 151PowerDAC mini, bursting with technology to bring you the best sound possible. Features • 24-bit/384kHz upsampling •... -
Page 9: Unpacking
Use care in unpacking your Wadia 151PowerDAC mini. Inspect it for any shipping damage and call your dealer immediately if any is found. Do not plug your Wadia 151PowerDAC mini into an AC outlet if you find shipping damage. We advise saving all packing materials so that the unit can be easily and safely shipped if the need arises. -
Page 10: Installing Battery In Remote Control
◆Connecting to AC Power Check to make sure that the power cord shipped with your Wadia 151PowerDAC mini has been manufactured for operation at your AC line voltage. Damage caused by improper operation is not covered by Wadia warranty. If the included cable... -
Page 11: Using Ac Line Conditioners
The Wadia 151PowerDAC mini employs extensive power-line filtering and noise suppression technology so fine performance is available with the Wadia 151PowerDAC mini plugged directly into a wall outlet using the AC power cord provided. However many users report gains in sound quality when using power conditioners or after-market power cords. -
Page 12: Connections
Connections Avoid static discharge to the inputs or outputs. To prevent static shocks, touch any grounded surface, such as the chassis of any component that uses a grounded 3-prong plug, before connecting or removing a cable. Back Panel 1 Right speaker terminals 2 Left speaker terminals 3 Coax 1 S/PDIF (RCA) 4 Coax 2 S/PDIF (RCA) -
Page 13: Speaker Outputs
◆Speaker Outputs The speaker outputs are on the back of the Wadia 151PowerDAC mini. Connect the left speaker to the left speaker terminals and the right speaker to the right speaker terminals. Make sure you keep the Wadia 151PowerDAC mini positive terminal (red) with the positive terminal on the speaker and the negative (black) on the Wadia 151PowerDAC mini with the negative (black) on the speaker. -
Page 14: Operation
Operation Front Panel 1 LCD display 2 Input Selector 3 Phase Button 4 Mute Button 5 Volume Up 6 Volume Down... -
Page 15: Using The 151Powerdac Mini
The power switch is located on the back panel of the Wadia 151PowerDAC mini. Depress the power switch (circle) to turn the power “off”. Please make sure the Wadia 151PowerDAC mini is turned off when making all digital and speaker connections. -
Page 16: Using The Remote Control
The Volume Down decreases the volume Volume Up The Volume Up increases the volume Track Back The Track Back button skips to the previous track on a Wadia transport Track Forward The Track Forward button skips to the next track on a Wadia transport... - Page 17 The Play button starts the playback on display on/off enter Wadia transport Eject phase mute The Eject button cause a Wadia transport to eject the disc inside the drive volume down volume up Stop track back track forward The Stop button stops the play back of a...
-
Page 18: Warranty
Warranty This Warranty covers the Wadia 151PowerDAC mini. Wadia Digital warrants that this product shall be free from defects in materials and workmanship for: 1 year for all parts of the product (excluding batteries). The warranty period begins at the date of sale and is subject to the following requirements and understandings: 1 This is a non transferable warranty. - Page 19 Wadia 151PowerDAC mini. Wadia will not pay for loss of use or inconvenience caused by the failure of a Wadia 151PowerDAC mini. Wadia will not pay for damage caused to other audio components caused by the failure of the Wadia 151PowerDAC mini within the limits allowed by State Law.
-
Page 20: Specifications
2.7 x 8 x 8 in., 6.86 x 20.32 x 20.32 cm Weight: 6 lbs, 2.72kg Accessories Included: Aluminum Remote (2 AAA batteries) Heavy Duty Power Cord 1556 Woodland Drive . Saline . MI 48176 USA . 734.786.9611 . www.wadia.com...
Need help?
Do you have a question about the 151PowerDAC mini and is the answer not in the manual?
Questions and answers