Table of Contents
Advertisement
Advertisement
Table of Contents

Related Manuals for Omega OF902X

Summary of Contents for Omega OF902X
- Page 1 OF902X upright cooker...
-
Page 2: Table Of Contents
Contents 1. INSTRUCTIONS FOR PROPER USE ..................4 2. DISPOSAL INSTRUCTIONS – OUR ENVIRONMENT POLICY ..........4 3. SAFETY PRECAUTION ......................5 4. INTENDED USE OF THE APPLIANCE ................... 6 5. BEFORE FIRST USE ......................6 6. USE OF THE HOB ........................7 6.1 Cooking zone .............................. -
Page 3: Instructions For Proper Use
Instructions for proper use 1. INSTRUCTIONS FOR PROPER USE THIS MANUAL IS AN INTEGRAL PART OF THE APPLIANCE AND THEREFORE MUST BE KEPT IN ITS ENTIRETY AND IN AN ACCESSIBLE PLACE FOR THE WHOLE WORKING LIFE OF THE COOKER. WE ADVISE READING THIS MANUAL AND ALL THE INSTRUCTIONS THEREIN BEFORE USING THE COOKER. -
Page 4: Safety Precaution
Safety instruction 3. SAFETY PRECAUTION ELECTRICAL CONNECTION: PLEASE REFER TO INSTALLATION INSTRUCTION FOR THE GAS & ELECTRICAL SAFETY REGULATIONS AND THE VENTILATION REQUIREMENTS. IN YOUR OWN INTEREST, AND THAT OF SAFETY, IT IS THE LAW THAT ALL GAS APPLIANCES BE INSTALLED AND SERVICE BY COMPETENT PERSONS, WHO WILL COMPLY WITH THE RELEVANT STANDARDS AND REGULATIONS. -
Page 5: Intended Use Of The Appliance
Instructions for the user 4. INTENDED USE OF THE APPLIANCE THE APPLIANCE HAS BEEN BUILT TO CARRY OUT THE FOLLOWING FUNCTIONS: COOKING AND HEATING-UP OF FOOD. ALL OTHER USES ARE CONSIDERED IMPROPER. The manufacturer declines all responsibility for damage to persons or things caused by non- observance of the above prescriptions or by interference with any part of the appliance or by the use of non-original spares. -
Page 6: Use Of The Hob
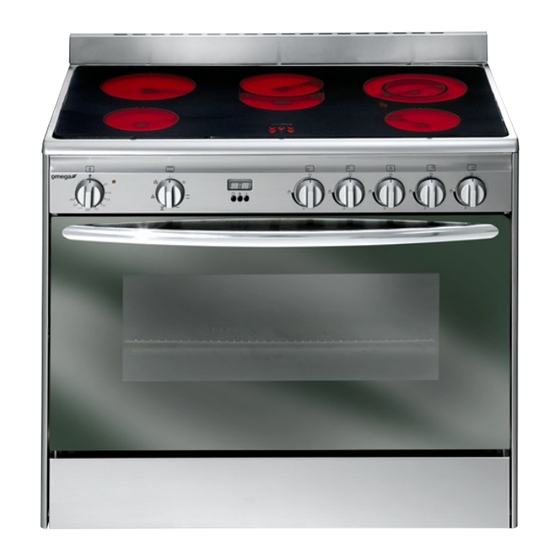
Instructions for the user 6. USE OF THE HOB 6.1 Cooking zone The appliance features 4/5 cooking zones of different diameter and power. Their position is clearly indicated by circles and the heat given off is defined by the markings on the glass surface. The 5 cooking zones are of the HIGH-LIGHT type and come on after a few seconds of being activated. -
Page 7: Front Control Panel
Instructions for the user 7. FRONT CONTROL PANEL All the cooker controls and commands are on the front panel. OVEN THERMOSTAT KNOB FRONT LEFT-HAND COOKING ZONE OVEN FUNCTION KNOB REAR LEFT-HAND COOKING ZONE CENTRAL COOKING ZONE REAR RIGHT-HAND COOKING ZONE FRONT RIGHT-HAND COOKING ZONE Before using the oven make sure that the symbol ;... - Page 8 Instructions for the user OVEN THERMOSTAT KNOB Selection of cooking temperature is carried out by turning the knob clockwise to the required temperature, between 50° and 260°C. If the appliance has an electric oven, the warning light will come on when the oven is heating up.
-
Page 9: Use Of The Oven
Instructions for the user 8. USE OF THE OVEN For the models with electronic programmer, before using the oven make sure that the display shows the symbol During and after use the accessible parts of the oven may be very hot, and children must always be kept at a distance. -
Page 10: Electronic Programmer
Instructions for the user 9. ELECTRONIC PROGRAMMER LIST OF FUNCTIONS END OF COOKING KEY DECREASE TIME KEY INCREASE TIME KEY 9.1 Clock adjustment When using the oven for the first time, or after a power failure, the display flashes regularly and indicates . -
Page 11: Cleaning And Maintenance
Instructions for the user 10.CLEANING AND MAINTENANCE Never use a steam jet to clean the appliance. 10.1 Cleaning stainless steel To maintain stainless steel in good condition clean it regularly after each use, once it has cooled down. 10.2 Ordinary daily cleaning To clean and preserve the stainless steel surfaces, always use only specific products that do not contain abrasives or chlorine-based acids. -
Page 12: Cleaning Of Oven
Instructions for the user 10.5 Cleaning of oven For best oven upkeep clean regularly after having allowed to cool. Take out all removable parts. • Clean the oven grill with hot water and non-abrasive detergent. Rinse and dry. • Do not allow residues of sugary foods (such as jam) to set inside the oven. If left to set for too long, they might damage the enamel lining of the oven. -
Page 13: Extraordinary Maintenance
Instructions for the user 11.EXTRAORDINARY MAINTENANCE The oven may require extraordinary maintenance or replacement of parts subject to wear such as seals, bulbs, and so on. The following instructions describe how to carry out these minor maintenance operations. Before any intervention, disconnect the power supply of the device. 11.1 Replacement of light bulb Remove cover A by twisting anticlockwise, replace bulb B with another similar bulb (25 W). -
Page 14: Installation Of The Appliance
Instructions for the installer 12.INSTALLATION OF THE APPLIANCE It is the law that all gas appliances are installed by competent persons. Corgi gas installers are approved to work to safe and satisfactory standards. All gas installation, servicing and repair work must be in accordance with the gas safety regulations 1984 (installation and use) as amended 1990. -
Page 15: Wall Fixing (Where Applicable)
Instructions for the installer Complete wiring up to power supply with an appropriately rated five-core plug (see data plate) or, in case of operation from a 220-240V power supply, with a three-core plug. Make sure that plug and wall socket are of the same type and are in conformity with regulations in force. - Page 17 914773157/ A...
Need help?
Do you have a question about the OF902X and is the answer not in the manual?
Questions and answers