Table of Contents
Advertisement
Advertisement
Table of Contents

Summary of Contents for Eventide Mixing Link
- Page 1 User Guide...
-
Page 2: Warnings
Complete UG Part # 159037 Contents Part # 141226 Rev 1 Cover Part # 258259 Eventide is a registered trademarks of Eventide Inc. Mixing Link is trademark of Manifold Labs, LLC. ©2013 Eventide Inc. -
Page 3: Table Of Contents
Mixing Link User Guide Introduction Contents WARNINGS ..................... II INTRODUCTION ..................3 ..................3 REATIVE ....................3 EBSITE CONTROLS AND INDICATORS ............4 INPUT GAIN K ................5 GAIN B ..................5 UTTON PK LED ....................5 20 LED ....................5 MIX K .................... - Page 4 BLOCK DIAGRAM ................12 LIMITED WARRANTY ................13...
-
Page 5: Introduction
Mixing Link can be used in many ways to fit into virtually any audio setup. Mixing Link has been designed to be equally at home on the pedal board, desktop and in studio and live environment. -
Page 6: Controls And Indicators
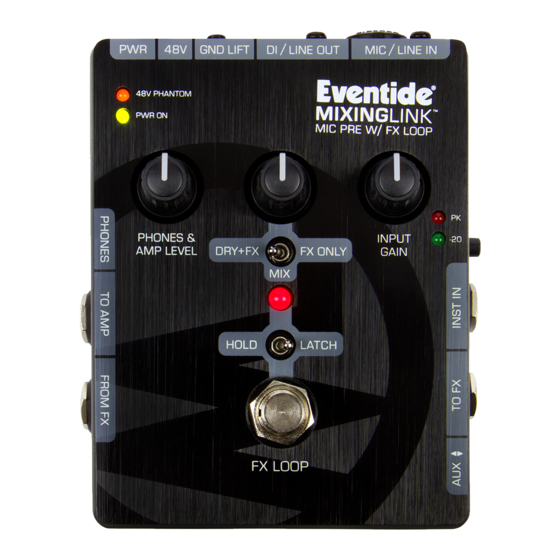
Mixing Link User Guide Controls and Indicators... -
Page 7: Input Gain Knob
INPUT GAIN knob depends on the connector the signal is attached to and the setting of the GAIN button located on the right side of the Mixing Link, just above the “INST IN” jack. Each input connector yields different ranges for the INPUT GAIN knob. The following table... -
Page 8: Mix Mode Toggle Switch
Return level increases. (6) PHONES & AMP LEVEL Knob Sets the output level for the Mixing Link’s two main output jacks: “TO AMP” and “PHONES”. This knob controls the output level whether or not the FX Loop is engaged or bypassed. -
Page 9: Phantom Power Switch
FX Loop. (9) ‘48V PHANTOM’ POWER Switch Located on the back panel of the Mixing Link, next to the PWR jack, the 3-Position toggle switch both activates the Mixing Link’s 48V Phantom Power circuit and is the battery’s power switch when powered from a 9V battery. -
Page 10: I/O Connectors
Mixing Link User Guide I/O Connectors I/O Connectors INPUTS (13) MIC/LINE IN Combo XLR Connector MIC/ LINE IN connects directly to the MIC pre-amp gain stage. This combo connector accepts balanced signals on either an XLR connector or ¼” TRS (Tip/Ring/Sleeve) plug. -
Page 11: Outputs
The “AUX” jack enables you to use your mobile device as an effects processor while keeping the rest of your effects chain signal path intact. It also allows Mixing Link to serve as an audio interface for recording directly into your mobile device. The “AUX” connector also allows for stereo playback of audio from an external source to be mixed with your mic or instrument. -
Page 12: Under The Cover
“FROM FX” signal but it will not affect the MIC pre-amp’s output level, which remains at unity. To change the Tails setting, remove the bottom cover of Mixing Link and flip the DIP switch labeled SW6, located just above the footswitch. When set to the right direction (towards “TO AMP”) Tails is set to ON. -
Page 13: Specifications
Mixing Link User Guide Specifications Specifications Analog I/O MAX I/P Levels, Input Impedance = +10dBu, 500kΩ INST IN = +24dBu, 22kΩ XLR LINE IN = +4dBu, 2kΩ XLR MIC IN = +10dB, 200kΩ FROM FX = +4dBu, 5.0kΩ AUX IN... -
Page 14: Block Diagram
Mixing Link User Guide Limited Warranty Block Diagram... -
Page 15: Limited Warranty
The warranty applies to the original purchaser of a new unit from Eventide or an Authorized Eventide Dealer. It is your responsibility to prove or to be able to prove that you have purchased the unit under circumstances which affect the warranty. A copy of your purchase invoice is normally necessary and sufficient for this. - Page 16 Mixing Link User Guide Limited Warranty You are responsible for getting the unit to our door at no cost to us. We cannot accept collect or COD shipments. We will return the unit to you prepaid, at our expense, using an expeditious shipping method, normally United Parcel Service.
Need help?
Do you have a question about the Mixing Link and is the answer not in the manual?
Questions and answers