Table of Contents
Advertisement
Quick Links
READ THIS
Instruction Manual
The Heritage
BH-421-SG-5
This Is A Revolutionary Gas Grill!
American Gas Association Design Certified
Canadian Gas Association Design Certified
L.P. Tank
not included.
L.P. NOTICE: This grill shall
be connected only to a 20 lb.
L.P. cylinder that is equipped
with a Sherwood Valve
#PV3349 AND an overfill
protection device (OPD).
Heritage 07/99
PN SG5-002
BARBECUE INDUSTRY
ASSOCIATION MEMBER
BOOK FIRST
®
The only Grill
GUARANTEED
not to flare up!
Advertisement
Table of Contents

Related Manuals for Holland The Heritage BH-421-SG-5


Summary of Contents for Holland The Heritage BH-421-SG-5
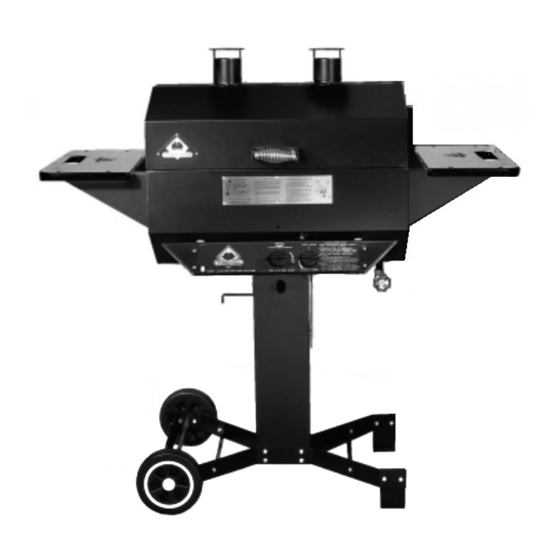
- Page 1 READ THIS BOOK FIRST ® Instruction Manual The Heritage BH-421-SG-5 This Is A Revolutionary Gas Grill! American Gas Association Design Certified Canadian Gas Association Design Certified L.P. Tank not included. L.P. NOTICE: This grill shall be connected only to a 20 lb. L.P.
- Page 2 Dear Friend, I wish to personally thank your for purchasing one of my Holland Grills. It’s my goal that you, your family and friends enjoy your grill for many years to come. It’s important that you are aware that the Holland is unlike any other grill. By design, it allows you to grill, steam or smoke, without the fear of flare-ups commonly associated with competitive brands.
-
Page 3: The Fuel System
VEHICLES AND/OR BOATS The items in the fuel system are designed leak testing the entire length of hose and fit- for operation with the Holland Grill.They tings. (See final assembly instructions for must not be replaced with any other brand. -
Page 4: Lp Gas Regulator
The N.G. Holland Grill is set to operate at 7 cylinder supply system must be arranged for Make certain adequate ventilation is avail- inches water column pressure, using an ori- vapor withdraw.The cylinder shall include a... -
Page 5: Tools Needed For Assembly
2. 7/16” WRENCH SHELVES 3. PHILLIPS SCREWDRIVER 4. 3/8” NUT DRIVER GAS VALVE KNOB The Holland Grill has been designed for easy IGNITOR KNOB SHELF SUPPORT BRACKETS assembly. Most of the main grill body com- ponents are pre-installed at the factory.The... -
Page 6: Spark Ignitor
Select the following parts for assembly: Description Grill bottom assembly Ignition electrode Bottom mount Shelf brackets (4) Figure 4a 4a. Refer to Fig. 4a Install the ignitor electrode into the grill bottom as shown using a #8-32 screw to secure. Leave the elec- trode wire loose for now. - Page 7 Figure 5a NOTICE: if your grill wobbles after putting it in place, adjust the higher of the two feet by loosening the two nuts and bolts retaining it and slide the foot down until it contacts the floor, and retightening the nuts and bolts. be sure the narrow flanges are nearest the floor and facing each other.
-
Page 8: Lighting Instructions
Using a small brush, soap all connections from tank to grill and look for bubbles. Correct all leaks NOTE: The Holland Grill uses a 2-posi- before proceeding. Turn off propane tion gas valve for burner control. Figure 6 tank valve. -
Page 9: Turning Grill Off
When grill is not in use, the gas must be Holland Grill, the area for cooking should A. Moving in your yard or deck: Make sure turned off at the supply cylinder. -
Page 10: Cooking Instructions
A. It is important to realize cooking When done, either dip or brush on cook in 15 - to 25 minutes.You may on a Holland Grill uses a different sauce. Put back on the grill for 5 to want to cook yours less or more process in order for the grill to per- 10 minutes longer. - Page 11 PARTS LIST FOR BH421 SG-4 TRADITION HOLLAND GRILL Fasteners: SG5-100 Grill Bottom, Heritage Replacements can be found at most hardware stores. SG2-201 Stacks, Black (2) SG5-202 Handle Bracket, Angled, Black SG2-803 Bolts, 1/4-20x5/8” SG2-202A Handle Spring SG2-804 Nuts, 1/4-20, Hex...
-
Page 12: Grilling Instructions
Approximately 20 minutes crab legs, etc. NOTE: Remember, the Holland Grill needs to warm up completely.Temperature will remain about 400 degrees.All grilling times approximate depending on size, weight and individual taste preference. Grill needs to remain closed at all times during grilling to be accurate with this time chart.
Need help?
Do you have a question about the The Heritage BH-421-SG-5 and is the answer not in the manual?
Questions and answers