Table of Contents
Advertisement
Instruction Manual
CONVERTIBLE CAR SEAT
CCA 2010
REARWARD-FACING
Newborn to approximately 12 months of age
FORWARD-FACING
12 months to approximately 4 years of age
Illustrations are representative only.
Design and style may vary.
IMPORTANT: KEEP THIS BOOKLET IN THE PLACE
PROVIDED ON THE CHILD RESTRAINT
Advertisement
Chapters
Table of Contents

Summary of Contents for IGC Dorel Pty Ltd CCA 2010
- Page 1 Instruction Manual CONVERTIBLE CAR SEAT CCA 2010 REARWARD-FACING Newborn to approximately 12 months of age FORWARD-FACING 12 months to approximately 4 years of age Illustrations are representative only. Design and style may vary. IMPORTANT: KEEP THIS BOOKLET IN THE PLACE...
-
Page 2: Table Of Contents
Before You Start Thank you for purchasing this child seat. This product is suitable for toddlers and older children. We welcome you as a valued customer, and trust that your child will enjoy many years of comfort and safety. No child restraint can guarantee absolute protection from a crash. However proper use of this restraint may reduce the risk of injury or death! CONTENTS... -
Page 3: Warnings
WARNING Read and follow all of the installation instructions for maximum protection. If you have any questions regarding the installation or use of this restraint, please contact IGC Dorel or agent, or a child restraint fitting station authorised by the relevant transport authority, or in New Zealand, to consult the agent for the vehicle. - Page 4 WARNING • DO NOT LEAVE CHILDREN UNATTENDED IN THE CAR. • To ensure that your child gets all the protection designed into this restraint you MUST read and:- Use the restraint exactly as shown in the instructions. Fit the restraint firmly to the car seat. Fit the harness firmly to the child.
-
Page 5: Parts List
PARTS LIST Hook Hood Attachment (if supplied) Tether Insert Strap Belt Mates (if supplied) Stabilising Arm (Design and style may vary) Instruction Manual Adjuster Belt Anchorage bag Base adjuster (3 position) Recline Arm * Design and style may vary Base Fig 1. -
Page 6: Anchorage Fitting Installation
ANCHORAGE FITTING INSTALLATION Read and follow all of the installation instructions for maximum protection. If you have any questions regarding the installation or use of this restraint, please con- tact IGC Dorel or a child restraint fitting station authorised by the relevant State Government body or in New Zealand, to consult the agent for the vehicle. - Page 7 IMPORTANT Child restraints must be used correctly to provide proper protection for your child. The new type of clip anchorage system on child restraints must be used in the correct way. Be especially careful to use the clip in the following way. RIGHT Make sure there is no slack in the top strap and the attachment clip is upright in the anchorage fitting.
- Page 8 If the car is fitted with a child restraint anchorage point. Locate the anchorage point behind the rear seating position (consult the car owner’s handbook for the location of the anchorage point). Remove the thread plug from the parcel shelf / floor / roof and install the attachment bolt as shown in Fig 7.
-
Page 9: Preparing Infant Seat To Fit Your Child
PREPARING INFANT SEAT TO FIT YOUR CHILD You MUST make these adjustments with your child before you install the child restraint in the vehicle. Please adjust harness according to the infants shoulder height prior to installation. CONFIGURING THE HARNESS BELT FOR SHOULDER HEIGHT. -
Page 10: Base Adjustment
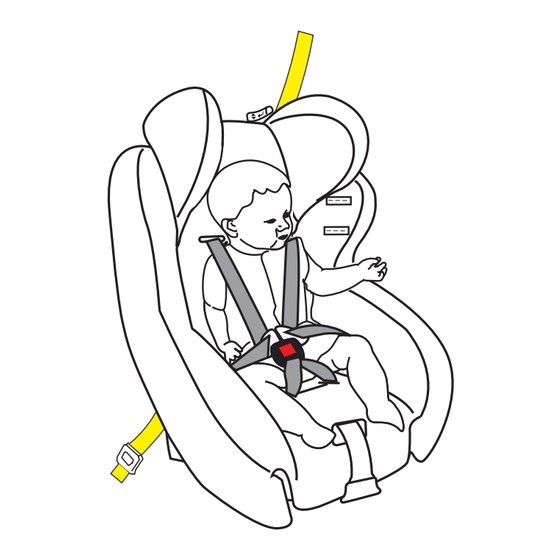
PREPARING INFANT SEAT TO FIT YOUR CHILD TO FASTEN BUCKLE ASSEMBLY Fig 12 STEP 1 STEP 2 STEP 3 Step 1 : Insert one buckle tongue as shown above. Step 2 : Insert the second buckle tongue as illustrated above. Listen for a ‘CLICK’. Step 3 : Remember to always pull up on the harness straps to make sure buckle is locked tightly. - Page 11 ADJUSTING TETHER STRAP PULL TO LOOSEN PULL BUTTON FIG A PULL TO TIGHTEN PULL BUTTON FIG B Fig 15 TO ADJUST TETHER STRAP: To loosen: Press on the adjuster button with thumb and pull strap back through to loosen anchorage strap using strap which is attached to the seat. FIG A To Tighten: Adjust anchorage strap and remove slack.
-
Page 12: Correct Rearward Facing Vehicle Position
CORRECT REARWARD FACING VEHICLE POSITION CORRECT USE Fig 18. CORRECT USE Fig 19. 390mm 640mm Fig 20. ANGLE CONFIGURATION FOR SEAT Position seat ensuring that the angle is no greater than 40˚ from horizontal plane. Angular adjustment is achieved by adjusting the base. -
Page 13: Shoulder Marker Height Rearward Facing
SHOULDER MARKER HEIGHT REARWARD FACING REARWARD FACING (Newborn to 12 months) The shoulder straps must be in the slots which are nearest to the child’s Shoulder shoulders, but not lower than the strap child’s shoulders. Fig 21 MUST BE REAR FACING WHEN SHOULDERS BELOW THIS LINE Lower label 1 Front of vehicle... -
Page 14: Rearward Facing Installation
REARWARD FACING INSTALLATION 1. Set base in position 3 (High) 2. Swing stabilising arm into position (Fig 23). 3. Place restraint facing rearwards on back seat of vehicle in line with an anchorage strap anchorage point.. 4. Thread the vehicle seat belt through the BLUE belt path at the front of the restraint and fasten buckle... -
Page 15: Correct Forward Facing Vehicle Position
CORRECT FORWARD FACING VEHICLE POSITION CORRECT USE Fig 26 CORRECT USE Fig 27 INCORRECT USE Fig 28... -
Page 16: Shoulder Marker Height Forward Facing
SHOULDER MARKER HEIGHT FORWARD FACING Strap can Fig 29. be next slot above (6 months to 4years) FORWARD FACING The shoulder straps must be in the slots which Child Shoulders are nearest to the child’s shoulders, but not more than 25 mm below the child’s shoulders Strap cannot be more than 25mm below... -
Page 17: Forward Facing Installation
FORWARD FACING INSTALLATION TODDLER 12MONTHS TO 4YEARS OLD. * PUSH base adjuster in red under front seat and rock seat to adjust the base. (3 positions) Fig 31. FORWARD-FACING Red base adjuster BELT PATH under front of seat 1. Adjust the child restraint to the forward facing position. Fold the Stabilizer Arm if the restraint has been used for rear facing. -
Page 18: The Next Seat For Your Child
THE NEXT SEAT FOR YOUR CHILD SHOULDERS MUST BE BELOW THIS LINE UPPER label Fig 32. Front of vehicle SHOULDER MARKER To be used only in a rearward-facing position until the infant’s shoulders reach the lower shoulder height marker (approximately 12 months of age). -
Page 19: Cleaning Instructions For Buckle
CLEANING INSTRUCTIONS FOR BUCKLE Follow the manufacturer’s instructions at all times. Before removal, ensure you have carefully noted the way which the various parts are attached to the seat so as to facilitate reassembly. Your child car seat is equipped with a buckle designed to give your child maximum protection during proper use. -
Page 20: Care Instructions
CARE INSTRUCTIONS • Seat trim may be removed for cleaning. Don’t forget to remove the instruction manual. • Machine wash in cold water, delicate cycle. • Tumble dry 10-15 minutes on low heat. • Do not dry clean. • All other surfaces should be cleaned with a mild soap and water. •... -
Page 21: Hood Fitment
CARE INSTRUCTIONS WARNING VERY IMPORTANT: Only use this child restraint with the cover supplied or a manufacturer-authorized replacement cover with identical shoulder height markers. HOOD FITMENT (If supplied) Hood - To fit the hood, line up the press stud with the one in the trim, press firmly. Refer to Fig 40 Repeat on the next side. - Page 22 NOTE:...
- Page 23 NOTE:...
- Page 24 Consumer Law and to other rights and remedies of the consumer under a law in relation to the goods or services to which the warranty relates. IGC Dorel Pty Ltd will provide you with your choice of a refund, repair or exchange (where possible) for this product if it becomes defective within the warranty period.
Need help?
Do you have a question about the CCA 2010 and is the answer not in the manual?
Questions and answers