Table of Contents
Advertisement
Quick Links
OWNER'S
MANUAL
MODEL NO.
QBT11544
STARTING SERIAL # L112-016001
QBT12544
STARTING SERIAL # L112-016001
Optional
Remote Control Kit
Part # 4607
IMPORTANT
Read and follow all Safety
Precautions and Instructions
before operating this
equipment.
REV 12-016
1602 CORPORATE DRIVE, WARRENSBURG MISSOURI 64093
Manufacturing quality lawn care equipment since 1945
10699
44" FINISH CUT
TRAILMOWER
Assembly
Operation
Service and Adjustment
Repair Parts
FAX 660-747-8650
PHONE 660-747-8183
Made In The
USA
Advertisement
Table of Contents

Summary of Contents for QuadBoss QBT11544
-
Page 1: Service And Adjustment
OWNER’S MANUAL MODEL NO. QBT11544 STARTING SERIAL # L112-016001 QBT12544 STARTING SERIAL # L112-016001 Optional Remote Control Kit Part # 4607 44” FINISH CUT TRAILMOWER IMPORTANT Assembly Read and follow all Safety Precautions and Instructions Operation before operating this Service and Adjustment equipment. -
Page 2: Limited Warranty
LIMITED WARRANTY The manufacturer’s warranty to the original consumer purchaser is: This product is free from defects in materials and workmanship for a period of one (1) year from the date of purchase by the original consumer purchaser. We will repair or replace, at our discretion, parts found to be defective due to materials or workmanship. -
Page 3: Safety Precautions
SAFETY PRECAUTIONS This Safety Alert Symbol indicates important messages in this manual. When you see this symbol, carefully read the message that follows and be alert to the possibility of personal injury. Read this manual completely. This machine can amputate hands, feet, and throw objects. - Page 4 • Turn off the blades when not mowing. Before leaving the machine, turn off the blades and stop the engine. • Watch for traffic when operating near or crossing roadways. • Do not operate the mower if it has been dropped or damaged in any manner or if the mower vibrates excessively.
-
Page 5: Safety Decals
SAFETY DECALS Replace decal immediately if damaged. Order by part number from Swisher OD99161-QUADBOSS Decal OD33-Speed Decal TrailMower Serial # OD55-Triangle Danger Decal (All four deck corners) OD99127-44" Deck White Decal (Not Pictured) OD99127-44" Deck White Decal (Not Pictured) Engine Serial #... - Page 6 OPERATING YOUR TRAILMOWER The operation of any mower can produce foreign objects to be thrown into the eyes, resulting in severe eye damage. Always wear certified safety glasses or wide-vision safety goggles over spectacles before staring any cutting machine and while operating such a machine. The operation of any cutter produces sound waves that are damaging to the human ear.
-
Page 7: Starting The Engine
ENGAGING BLADES The TrailMower will not start if the blade lever is in the “ENGAGED” position. • Engage blades by rotating blade lever into the “ENGAGED” position. • Rotate blade lever in opposite direction to disengage blade. • The dual braking system is applied when the blades become disengaged. It is designed to bring the blades to quick stop (approximately 7 seconds). - Page 8 MOWER HEIGHT ADJUSTMENT • Make adjustments while TrailMower is not running. • There is approximately 1 ½” to 4 ½” of height adjustment. • Rotate height adjust crank handle(s) in a clockwise direction to lift the mower deck. A counter-clockwise direction is used to lower the mower deck. •...
-
Page 9: General Troubleshooting
SUGGESTED MOWING PRACTICES • Operate mower engine at full throttle to assure the best cutting performance and maximum material discharge. • Allow wet grass to dry. Wet grass will clump and collect under the mowing deck. • Mowing should be started with tow vehicle in low gear and increased only as safe mowing conditions permit. -
Page 10: Mower Maintenance
MOWER MAINTENANCE GENERAL RECOMMENDATIONS The warranty on this TrailMower does not cover items that have been subjected to operator abuse or negligence. To receive full value from the warranty, operator must maintain unit as instructed in this manual. Some adjustments will need to be made periodically to maintain your unit properly. All adjustments in this manual should be checked at least once each season. -
Page 11: Repair Parts
BLADE CARE AND SERVICE For best results cutter blades must be kept sharp. The blades can be sharpened with a few strokes of a file or grinding wheel. Do not attempt to sharpen blades while they are on the cutter. Disconnect spark plug wire before servicing unit. Important: Replace blades that have been damaged or deeply nicked. - Page 12 Rotate Fan Plates as needed. Fig. 1 FRONT LEFT RIGHT REAR Slide plastic tube snug against Fig. 2 toggle switch. (Fig. 5 FOR DETAILS)
-
Page 13: Parts Not Shown
T44 RECOIL START T44 12 VOLT START Fig. 3 WIRING CONFIGURATIONS PARTS NOT SHOWN WIRING HARNESSES B&S ENGINE (Remote Start only) WH44CHB12V HONDA ENGINE WH1144H REMOTE OPTION WH44RCH PULL START W/ B&S ENGINE 10638 TOGGLE/GROUND WIRE ASSEMBLY 9090 BLADE ENGAGE CABLE 9074 12V B&S MANUAL BLADE ENGAGE 10235... - Page 14 SEE DETAILS 34, 35, 36 Fig. 4 SEE DETAIL SINGLE POINT HEIGHT ADJUST ITEM # DESCRIPTION PART # ITEM # DESCRIPTION PART # Roller - Anti-Scalp 1/2 AS003 Cover - Belt 10599* Nut - Jam Lock, 1/2-13 2-Way NB121 Base - Motor 4517* Bolt - Serr Flange, 5/16-18 X 3/4 NB596...
-
Page 15: Engine Set-Up
Fig. 5 Fig. 6 ENGINE SET-UP BLADE SET-UP ITEM # DESCRIPTION PART # ITEM # DESCRIPTION PART # Engine - 11.5HP 14468 Nut - Jam 3/4-16 NB175 Engine - 12.5HP 14469 Washer - Belleville .760 X 1.5 AS155 Module - Engine MOD1* Pulley - Blade 4 1/2"... - Page 16 Fig. 7 Fig. 8 STANDARD ENGAGE HEIGHT ADJUSTMENT ITEM # DESCRIPTION PART # ITEM # DESCRIPTION PART # QTY Bolt - 1/2-13 X 5 NB155 Rod - Crank ES214 Bolt - Spade, 5/16-18 X 10.5 NB260 Nut - Push, 5/16 NB117 Nut - Nyloc 5/16-18 NB181...
- Page 17 ITEM # DESCRIPTION PART # Nut - 2 Way Lock 3/8-16 NB280 Washer - 3/8 NB272 Pulley - Idler B527 Washer - 5/16 NB556 Bolt - Serr Flange 5/16-18 X1 1/4 NB253 Spring - Idler Tension 4422 Nut - Serr Flange 5/16-18 NB170 Brake - Link 4532...
- Page 18 RIGHT ASSEMBLY PART # 10590 Fig. 11 Item # Description Part # BRAKE ARM CONFIGURATIONS Arm - Brake 10589TK Eyebolt - 1/4-20 X 3/4 V139EB Nut - Nylock 1/4-20 NB180 Nut - Serr Flange 1/4-20 NB524 Bolt - HTC 1/4-20 X 1 1/2 NB162 Nut - Kep 10-24 NB172...
-
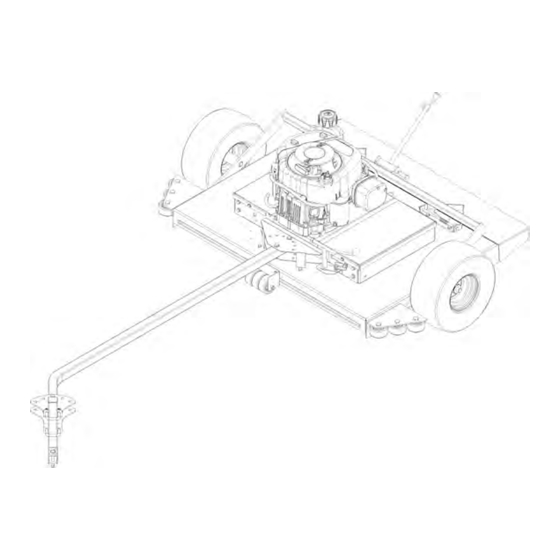
Page 19: Hitch Assembly
Fig. 12 HITCH ASSEMBLY ITEM # DESCRIPTION PART # Bolt - U, Sq 3/8-16 x 1 5/8" x 2 3/4" 9855 Weldment - "L" Hitch 18353TK Pin - Safety Hitch 3/8 X 2 1/2 Plug - L Hitch Nut - Nyloc 3/8-16 NB182 Tube - Hitch 18347*... - Page 20 Notes: ______________________________________________________________________ ______________________________________________________________________ ______________________________________________________________________ ______________________________________________________________________ ______________________________________________________________________ ______________________________________________________________________ ______________________________________________________________________ ______________________________________________________________________ ______________________________________________________________________ ______________________________________________________________________ ______________________________________________________________________ ______________________________________________________________________ ______________________________________________________________________ ______________________________________________________________________ ______________________________________________________________________ ______________________________________________________________________ ______________________________________________________________________ ______________________________________________________________________ ______________________________________________________________________ ______________________________________________________________________ ______________________________________________________________________ ______________________________________________________________________ ______________________________________________________________________ ______________________________________________________________________ ______________________________________________________________________ ______________________________________________________________________ ______________________________________________________________________ ______________________________________________________________________ ______________________________________________________________________ ______________________________________________________________________ ______________________________________________________________________ ______________________________________________________________________ ______________________________________________________________________...
- Page 21 Notes: ______________________________________________________________________ ______________________________________________________________________ ______________________________________________________________________ ______________________________________________________________________ ______________________________________________________________________ ______________________________________________________________________ ______________________________________________________________________ ______________________________________________________________________ ______________________________________________________________________ ______________________________________________________________________ ______________________________________________________________________ ______________________________________________________________________ ______________________________________________________________________ ______________________________________________________________________ ______________________________________________________________________ ______________________________________________________________________ ______________________________________________________________________ ______________________________________________________________________ ______________________________________________________________________ ______________________________________________________________________ ______________________________________________________________________ ______________________________________________________________________ ______________________________________________________________________ ______________________________________________________________________ ______________________________________________________________________ ______________________________________________________________________ ______________________________________________________________________ ______________________________________________________________________ ______________________________________________________________________ ______________________________________________________________________ ______________________________________________________________________ ______________________________________________________________________ ______________________________________________________________________...
- Page 22 Notes: ______________________________________________________________________ ______________________________________________________________________ ______________________________________________________________________ ______________________________________________________________________ ______________________________________________________________________ ______________________________________________________________________ ______________________________________________________________________ ______________________________________________________________________ ______________________________________________________________________ ______________________________________________________________________ ______________________________________________________________________ ______________________________________________________________________ ______________________________________________________________________ ______________________________________________________________________ ______________________________________________________________________ ______________________________________________________________________ ______________________________________________________________________ ______________________________________________________________________ ______________________________________________________________________ ______________________________________________________________________ ______________________________________________________________________ ______________________________________________________________________ ______________________________________________________________________ ______________________________________________________________________ ______________________________________________________________________ ______________________________________________________________________ ______________________________________________________________________ ______________________________________________________________________ ______________________________________________________________________ ______________________________________________________________________ ______________________________________________________________________ ______________________________________________________________________ ______________________________________________________________________...
-
Page 24: How To Order Repair Parts
MODEL NO. HOW TO ORDER REPAIR PARTS: Each TrailMower has its own serial number. Each engine has QBT11544 its own serial number. The serial number for the TrailMower will be found on the right hand side of the drive belt housing.
Need help?
Do you have a question about the QBT11544 and is the answer not in the manual?
Questions and answers