Table of Contents
Advertisement
Quick Links
Advertisement
Table of Contents

Summary of Contents for Silver Star SPOT 250
- Page 1 SPOT 250 USER MANUAL www.yagang.com...
-
Page 2: Open The Box And Checking
1.Open the box and checking Congratulations on choosing our products! Please carefully read this instruction manual in its entirety and keep it well for using reference. This manual contained about the installation and the relative using information of this products. Please according to this manual's relative speaking when using this equipment. -
Page 3: Operating Determinations
by the plug. Never pull out the plug by tugging the power-cord. This device falls under protection class I. Therefore it is essential to connect the yellow/green conductor to earth. The electric connection, repairs and servicing must be carried out by a qualified employee. -
Page 4: Description Of The Device
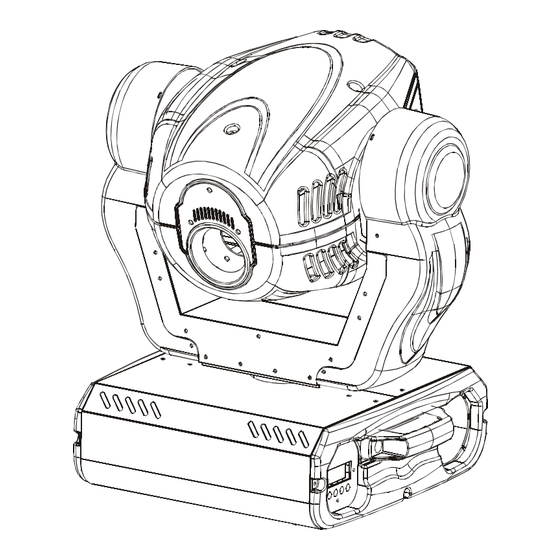
4.Description of the device 1 - Moving head 2 - Y oke 3 - Carry handles 4 - Base Rear panel: 5 - Power switch 6 - DMX output 7 - DMX input LAM P:M SD 25 0/2 MSD 250 8 - Power cord SERIAL DATA LI NK 9 - Fuse holder... - Page 5 5.Installion 5.1 Fitting the lamp To insert the lamp MSD 250 or MSD 250/2 open the top cover of the projector-head (see the drawing to identify which cover is top) by loosening the 3 screws on the cover. Then open the small lamp cover by loosening 2 fastening screws (see the drawing). If changing the lamp, remove the old lamp from the socket.
-
Page 6: Lamp Adjust
5.2 Lamp adjust The lamp holder is aligned at the factory. Due to differences between lamps , fine adjustment may improve light performance. Strike the lamp, open the shutter and the iris, set the dimmer intensity onto 100% and focus the light on a flat surface (wall). As the optimum distance of the lamp from lens was adjusted during the installing or changing the lamp (by turning the screw "A"... -
Page 7: Rigging The Fixture
5.4 Rigging the fixture DANGER TO LIFE:Please consider the respective national norms during the installation!The installation must only be carried out by an authorized dealer! The installation of the projector has to be built and constructed in a way that it can hold 10 times the weight for 1 hour without any harming deformation. -
Page 8: Dmx-512 Connection/Connection Between Fixtures
5.5 Connection to the mains Verify the power supply settings before applying power! If you wish to change the power supply settings,see the chapter Appendix. Connect the fixture to the mains with the enclosed power cable and plug. The earth has to be connected! The occupation of the connection-cables is as follows: Cable (EU) Cable (US) -
Page 9: Function Table
6. Control Board Operation Function Table: Mode Condition Function YES--negative direction YES--negative direction Vertical movement in positive or negative direction Address code set Reset YES--reset Rainbow color wheel change color linear or stepping YES--linear DMX512 mode Automatic Working mode Slave mode Lamp on Lamp switch Lamp off... -
Page 10: Dmx512 Channel Function
DMX512 Channel Function CHANNEL FUNCTION TILT PAN FINE(proportional) TILT FINE(proportional) Speed of PAN/TILT movement Lamp on/off & reset Colors Prism Rotating gobos otating g obo index, rotating gobo rotation Focus(proportional) Shutter / strobe Dimmer intensity(proportional) CHANNEL 1: PAN Value Effect Clockwise 0¡... - Page 11 CHANNEL 2: TILT Value Effect Anti-clockwise ¡ ã rotate CHANNEL 3: PAN FINE (proportio al) Value Effect Fine control of tilt movement...
- Page 12 CHANNEL 4: TILT FINE (proportional) Value Effect Fine control of tilt movement CHANNEL 5: Speed of PAN/TILT movement Value Effect Slow Slow Fast fast...
- Page 13 CHANNEL 6: Lamp on/off & reset Value Effect No function 240-255 95-100 Lamp off after 3 230-239 91-94 No function 140-229 55-90 128-139 50-54 Lamp on after 3 No function 0-127 0-49 CHANNEL 7: Color Forwards rainbow 128-255 50-100 effect from slow to fast Pink 112-127 44-49...
- Page 14 CHANNEL 8: Prism Value Effect Backwards rotation 133-255 53-100 from slow to fast No rotation 128-132 51-52 5-127 Forwards rotation 3-50 from fast to slow No rotation CHANNEL 9: Rotating gobos Value Effect Rotate gobo wheel 224-255 88-100 continue rotation from slow to fast 160-223 Rotate gobo 5...
- Page 15 CHANNEL 10:Rotating gobo index, rotating gobo rotation Value Effect Backwards gobo rotation 159-255 62-100 from slow to fast 61-158 24-61 Forwards gobo rotation from slow to fast Gobo indexing (0-540 ) ¡ ã 0-60 0-23 CHANNEL 11: Focus(proportional) Value Effect Near close distance far distance...
- Page 16 CHANNEL 12:Shutter, strobe Value Effect 87-100 224-255 Shutter Open 192-223 75-86 Random strobe- effect from slow to fast 62-74 160-191 Shutter Open 50-61 128-159 Pulse-effect in sequences from slow to fast 37-49 96-127 Shutter Open 25-36 64-95 Strobe-effect from slow to fast (max 10flashes/s) 32-63 12-24...
-
Page 17: Technical Specifications
8. Technical specifications US-model: Voltage......AC100/110/120V , 50/60Hz Fuse........ T 6.3 A@120V EU-model: Voltage......AC 220/230/240V ,50/60Hz Fuse ........ A @230V Rated Power £ º 500W DMX512 Channel £ º 13CHS Luminous £ º 18000 LUX Lamp: Philips MSD250/2 or MSD 250 GY 9,5 Optical System: Linear electric focus Color:... -
Page 18: Maintenance And Cleaning
Beampath: 9. Maintenance and cleaning It is absolutely essential that the fixture is kept clean and that dust, dir t and smoke-fluid residues must not buildup on or within the fixture. Otherwise, the fixtures light-output will be significantly reduced. Regular cleaning willnot only ensure the maximum light-output, but will also allow the fixture to function reliably throughout its life.A soft lint-free cloth moistened with any good glass cleaning fluid is recommended, under no circumstances should alcohol or solvents be used!
Need help?
Do you have a question about the SPOT 250 and is the answer not in the manual?
Questions and answers