
Related Manuals for SEVIC SV071101

Summary of Contents for SEVIC SV071101
- Page 1 ALL IN 1 IN DASH MONITOR 6.5” SV071101 (Pal BG + SecamL) SV071101-BG (Pal BG) SV071101-I (Pal I) MUTE VOLUME MO/ST CLEAR LOUD ZOOM PROGRAM USER MANUAL...
-
Page 2: Use This Product Safely
When Parked Features Parking in direct sunlight can produce Compatible with PAL DVD (Video CD) very high temperatures inside your This player can play discs recorded in vehicle. Give the interior a chance to either PAL or NTSC format. cool down before starting playback. ... -
Page 3: Table Of Contents
CONTENTS Safety Information ................4 Disc Notes .................... 5 Installation ..................... 7 The Player ..................10 Front View ......................10 Back View......................11 The Radio Box ................... 12 Electrical Connection ................. 13 Remote Control ................... 16 Location and Function of Keys ................16 Preparing the Remote Control ................19 Loading/Ejecting a disc ..............20 Loading a disc ....................20... -
Page 4: Safety Information
SAFETY INFORMATION CAUTION: and is intended for home and other MOBILE DVD PLAYER IS A CLASS I limited viewing uses only unless LASER PRODUCT. HOWEVER THIS otherwise authorized by Macrovision MOBILE DVD PLAYER USES A Corporation. Reverse engineering or VISIBLE/INVISIBLE LASER BEAM disassembly is prohibited. -
Page 5: Disc Notes
DISC NOTES Disc formats supported by this player Disc Cleaning Use a dry soft cloth to wipe the surface. 12 cm disc If the disc is quite dirty, use a soft cloth (Single-sided disc only) slightly moistured with isopropyl Video CD (rubbing) alcohol. - Page 6 DISC NOTES Preparing New Discs with Rough Spots A new disc may have rough edges on its inside and outside edges. If a disc with rough edges is used, the proper setting will not be performed and the player will not play the disc. Therefore, remove the rough edges in advance by using a ballpoint pen or pencil as shown on the right.
-
Page 7: Installation
INSTALLATION Notes: DIN FRONT-MOUNT (Method A) Choose the mounting location where Installation Opening the unit will not interfere with the This unit can be installed in any normal driving function of the driver. Before finally installing the unit, dashboard having an opening as shown connect the wiring temporarily and below:... - Page 8 INSTALLATION Note to install the short threading 5. Mount the sleeve by inserting the terminal of the mounting bolt to the sleeve into opening of back of the unit and the other long dashboard and bend open the tabs located around the sleeve with a threading terminal to the dashboard.
- Page 9 INSTALLATION DIN REAR-MOUNT (Method B) 1. Factory radio mounting bracket 2. Car radio mounting bracket 3. Screw 4. After aligning the car radio mounting bracket with factory radio mounting bracket, tighten the screws (5x5mm) at 2 places on each side. 5.
-
Page 10: The Player
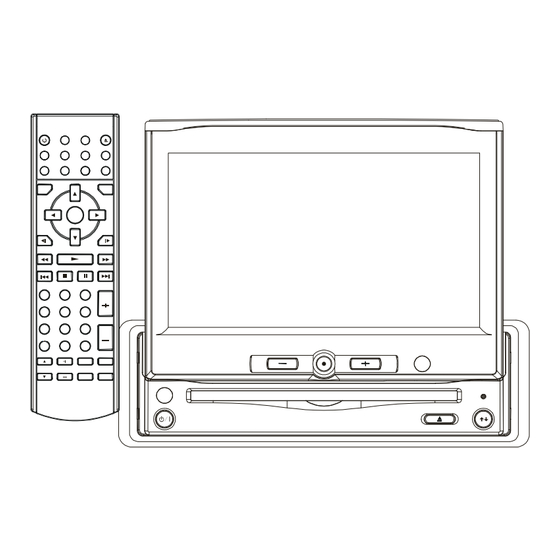
THE PLAYER FRONT VIEW Open Position Closed Position 1. POWER 7. PICTURE CONTROL 2. IR (on the front panel) 3. OPEN/CLOSE (EJECT button) 10. IR (on the monitor panel) 5. Disc Slot 11. 6.5 INCH COLOR TFT MONITOR 6. Reset button... -
Page 11: Back View
THE PLAYER BACK VIEW 13 14 12. 13 PIN SOCKET 15. AUDIO/VIDEO INPUT 13. RGB SYSTEM 16. DIGITAL AUDIO 14. REMOTE SOCKET 17. DC 12V IN... -
Page 12: The Radio Box
THE RADIO BOX ONE SIDE OTHER SIDE 1. 20 PIN SOCKET 4. AUDIO OUTPUT 2. TO MAIN UNIT 5. ANTENNA SOCKET 3. VIDEO OUTPUT 6. DIVERSITY ANTENNA... -
Page 13: Electrical Connection
ELECTRICAL CONNECTION METHOD A... - Page 14 ELECTRICAL CONNECTION METHOD B...
- Page 15 ELECTRICAL CONNECTION...
-
Page 16: Remote Control
REMOTE CONTROL LOCATION AND FUNCTION OF KEYS... - Page 17 REMOTE CONTROL POWER Press POWER to turn the unit ON or OFF. 2. EJECT Only in DVD mode, press to eject the disc. 3. OPEN/CLOSE Press to open/close the monitor. 4. SUBTITLE Changing of the SUBTITLE language on multi-subtitle language DVD disc. 5.
- Page 18 REMOTE CONTROL 28. PBC Changing between PBC ON and PBC OFF on the VCD disc. 29. CH In radio mode, press shortly to decrease frequency by one step of channel spacing. Hold longer for fast tuning. In TV mode, press (CH-) shortly to select channel downward.
-
Page 19: Preparing The Remote Control
REMOTE CONTROL Preparing the Remote Control Inserting the Batteries 1. Open the battery compartment cover. 2. Insert the new batteries. Make sure that the positive and negative terminals of the batteries are oriented as indicated. 3. Close the cover. Battery: Two AAA size battery Using the Remote Control Point the remote control towards the remote control signal receiver on the... -
Page 20: Loading/Ejecting A Disc
LOADING/EJECTING A DISC Loading a Disc 1. Turn the ignition on to the accessory position. 2. Press the POWER button (1). 3. Insert the disc with printed side facing up into the disc slot (2). 4. The player will start playback automatically. -
Page 21: Operation
OPERATION BASIC OPERATION Do not rotate the monitor forcibly to Turning the player on/off avoid mechanical damage. Press the POWER button on the front panel or (POWER) button on the remote control to turn the player on or off. Open/Close the Monitor and Angle Adjustment ... - Page 22 OPERATION following reasons: stretch out) or the remote sensor on the Initial installation of the unit when all monitor panel (when the monitor wiring is completed. stretches out) and press function keys on the remote control to control the DVD All the function buttons do not operate.
-
Page 23: Disc (Dvd, Vcd, Cd, Mp3) Operation
OPERATION DVD: DISC (DVD, VCD, CD, MP3) Normal Playback OPERATION Switching to DVD mode Pause (still picture) Press MODE button on remote control to Pressing on the remote control during select DVD mode. playback will stop play temporary. To Stopping Play return to normal playback, press Briefly press the (Stop) button to... - Page 24 OPERATION it means track 4 will be played first, then press A-B button again. Each time the press numeric button 6 and “PROGRAM button is pressed, the screen will display P02:06” appears. Press the different as follows: numeric button select A TO B SET A A TO B SET B A TO B CANCELLED...
- Page 25 OPERATION (2) Press DISPLAY for the second time: On-Screen Display function SINGLE REMAIN Press the DISPLAY button during 00:03:15 playback to display the contents of the current disc on the screen. Example: DVD: (3) Press DISPLAY for the third time: (1) Press DISPLAY for the first time: TOTAL ELAPSED 00:00:25...
- Page 26 OPERATION MENU function (For DVD Only) (5) Press DISPLAY for the fifth time: The message on the screen will be Press MENU button while the disc is playing and the disc root menu will be cleared. displayed. You can navigate with the MP3 (when set to NO MENU in SMART remote control navigation keys and NAV item):...
-
Page 27: Radio Operation
OPERATION RADIO OPERATION Smart navigation in MP3 Play Switching to radio mode MP3 disc is playing as the format of Press MODE button on remote FOLDER. For example: control to select radio mode. SMART NAVI In radio mode, the following information will appear on the display. -
Page 28: Tv Operation
OPERATION memory location button for several seconds. The current When in the default menu, the listening station will be stored “MUTE” willappear on the screen display. into the number button. Menu Control operation in radio Retrieve a Preset Station mode Press any one of the RADIO When you press MODE to select... -
Page 29: Av Operation
OPERATION Selecting channel Press CH button on remote VOLUME control to choose channel BASS upward and press CH button TREBLE on remote control to choose BALANCE channel downward. FADER The numeric buttons (0,1~9) LOUD allow you to select the corresponding channel directly. -
Page 30: Rgb Operation
OPERATION RGB OPERATION Switching to RGB mode When you connect the RGB terminals on the back of the DVD unit to the corresponding RGB system, then Press MODE button on remote control to select RGB mode, the RGB signal will appear on the screen. -
Page 31: Setup
SETUP INITIAL SETUP GENERAL SETUP SETUP MENU --- MAIN PAGE -- GENERAL PAGE -- GENERAL SETUP PIC MODE NORMAL/P SPEAKER SETUP TV DISPLAY NORMAL/L ANGLE MARK WIDE AUDIO SETUP OSD LANG PREFERENCES CAPTIONS SCR SAVER EXIT SETUP MAIN PAGE 1. Press SETUP on the remote control in the STOP mode. - Page 32 SETUP -- GENERAL PAGE -- -- GENERAL PAGE -- TV DISPLAY TV DISPLAY PIC MODE PIC MODE AUTO ANGLE MARK ANGLE MARK HI-RES ENGLISH OSD LANG N-FLICKER OSD LANG CAPTIONS FRENCH CAPTIONS SCR SAVER GERMAN SCR SAVER ITALIAN SPANISH MAIN PAGE MAIN PAGE PIC mode setup OSD LANG type setup...
-
Page 33: Speaker Setup
SETUP AUDIO SETUP -- GENERAL PAGE -- -- AUDIO SETUP -- TV DISPLAY AUDIO OUT ANALOG PIC MODE OP MODE SPDIF/RAW ANGLE DYNAMIC SPDIF/PCM MARK OSD LANG LPCM OUTPUT CAPTIONS SCR SAVER MAIN PAGE MAIN PAGE AUDIO OUT - Select ANALOG mode to activate SCR SAVER setup analog audio output. -
Page 34: Preferences Setup
SETUP PREFERENCES SETUP -- AUDIO SETUP -- --PREFERENCES PAGE-- AUDIO OUT TV TYPE AUTO OP MODE FULL AUDIO NTSC DYNAMIC SUBTITLE LPCM OUTPUT DISC MENU PARENTAL PASSWORD DEFAULTS SMART NAV MAIN PAGE MAIN PAGE Dynamic range Control Select DYNAMIC and adjust the TV type setup dynamic range of a Dolby Digital This player can play discs recorded in... - Page 35 SETUP --PREFERENCES PAGE-- -- PREFERENCES PAGE -- TV TYPE TV TYPE ENGLISH AUDIO AUDIO SUBTITLE FRENCH SUBTITLE 3 PG DISC MENU SPANISH DISC MENU 4 PG 13 PARENTAL CHINESE PARENTAL PASSWORD JAPANESE PASSWORD 6 PG-R DEFAULTS GERMAN DEFAULTS 7 NC-17 SMART NAV ITALIAN 8 ADULT...
-
Page 36: General Setup
SETUP -- PREFERENCES PAGE -- DEFAULTS TABLE TV TYPE AUDIO General Setup TV display Normal/LB SUBTITLE PIC mode AUTO Angle mark DISC MENU OSD Language English PARENTAL Captions PASSWORD SCR Saver DEFAULTS RESET Speaker Setup Downmix Stereo SMART NAV Audio Setup Audio Out SPDIF/RAW MAIN PAGE... -
Page 37: Trouble Shooting
TROUBLE SHOOTING COMPLETELY DISTORTED PICTURE If it appears that your DVD unit is faulty, The disc format is not according to first consult this checklist. It may be that the TV-set used (PAL). something simple has been overlooked. NO COLOR IN PICTURE Under no circumstances should you ... -
Page 38: Trouble Shooting
TROUBLE SHOOTING NO AUDIO AT DIGITAL OUTPUT Check the digital connections Check the Digital Audio menu to make sure that the digital output is correctly set. Check if the audio format of the selected audio language matches your receiver’s capabilities. -
Page 39: Specifications
SPECIFICATIONS GENERAL Power Supply Requirements : DC 12 Volts, Negative Ground Maximum Output Power - Version Y : 4x40 watts Current Drain - Version Y : 15 Ampere (max.) (For High Power Version) TV Sensitivity : 45dBμV @CH25 in average RADIO For 2 Bands (U.S.A.) -
Page 40: Specifications
SPECIFICATIONS Supply voltage: 12V DC (11V-15V), test voltage 14.4V, negative ground Current consumption: Less than 2A Signal system: Compositive video 1.0Vp-p 75Ω Discs played: (1) DVD-VIDEO disc 5” (12 cm) single-sided, single-layer 5” (12 cm) single-sided, double-layer (2) Compact disc (CD-DA/CD-R/CD-RW/MP3) (3) (12 cm) VIDEO CD Monitor Screen Size: 6.5”...
Need help?
Do you have a question about the SV071101 and is the answer not in the manual?
Questions and answers