Advertisement
Operator's Manual
18.0-Volt Cordless Drill/Driver
Model No. 241-0400
IMPORTANT :
WARNING! To reduce the risk of injury, user must read instruction
manual.
Safety symbols in this manual are used to flag possible dangers. The safety
symbols and their explanations require your full understanding. The safety
warnings do not, by themselves, eliminate any danger, nor are they substitute
for proper accident prevention measures.
This Safety Alert Symbol indicates caution, warning, or danger. Failure to
obey a safety warning can result in serious injury to yourself or others. To reduce
the risk of injury, fire, or electric shock, always follow the safety precautions. .
CHARGE BATTERY
BEFORE FIRST USE
Advertisement

Related Manuals for MasterForce 241-0400

Summary of Contents for MasterForce 241-0400
- Page 1 Operator’s Manual 18.0-Volt Cordless Drill/Driver Model No. 241-0400 CHARGE BATTERY BEFORE FIRST USE IMPORTANT : WARNING! To reduce the risk of injury, user must read instruction manual. Safety symbols in this manual are used to flag possible dangers. The safety symbols and their explanations require your full understanding.
-
Page 2: Table Of Contents
TABLE OF CONTENTS Safety Symbols ..................page 2 Safety Instructions ................page 5 Description ..................page 11 Assembly ....................page 12 Operation ....................page 13 Maintenance ..................page 22 Troubleshooting .................page 24 Warranty .....................page 24 INTRODUCTION SAVE THESE INSTRUCTIONS! This cordless Drill Driver has many features for making its use more pleasant and enjoyable. - Page 3 Indicates a potentially hazardous situation, WARNING: which, if not avoided, could result in death or serious injury. Indicates a potentially hazardous situation, CAUTION: which, if not avoided, could result in minor or moderate injury. (Without Safety Alert Symbol) Indicates a NOTE: situation that may result in property damage.
- Page 4 Revolutions, strokes, surface speed, orbits .../min Per Minute .../min etc., per minute Do not expose to rain or use in damp Conditions locations. Alert Read The To reduce the risk of injury, user must read Operator’s operator’s manual. Manual Always wear safety goggles or safety glasses Eye Protection with side shields, or a full face shield when operating this product.
-
Page 5: Safety Instructions
SAFETY INSTRUCTIONS GENRAL SAFETY RULES WARNING! Read all safety warnings and instructions. Failure to follow the warnings and instructions may result in electric shock, fire and / or serious injury. Save all warnings and instructions for future reference. The term power tool in the warnings refers to your mains-operated (corded) power tool or battery-operated (cordless) power tool. - Page 6 PERSONAL SAFETY Stay alert, watch what you are doing and use common sense when operating a power tool. Do not use tool while tired or under the influence of drugs, alcohol, or medication. A moment of inattention while operating power tools may result in serious personal injury. Use personal protective equipment.
- Page 7 users. Maintain power tools. Check for misalignment or binding of moving parts, breakage of parts and any other condition that may affect the power tool’s operation. If damaged, have the power tool repaired before use. Many accidents are caused by poorly maintained power tools. keep cutting tools sharp and clean.
- Page 8 operation where the cutting tool may contact hidden wiring or its own cord. Contact with a live wire will make exposed metal parts of the tool live and shock the operator. Use protective gloves when removing the bit from the tool, or first allow the clamp to cool down.
- Page 9 Make sure that the cord is located so that it will not be stepped on, tripped over, come in contact with sharp edges or moving parts, or otherwise subjected to damage or stress. This will reduce the risk of accidental falls, which could cause injury and damage to the cord, which could then result in electric shock.
- Page 10 Risk of electric shock. Do not touch the uninsulated portion of output connector or uninsulated battery terminal. Save these instructions. Refer to them frequently and use them to instruct others who may use this tool. If you lend this tool to someone else, also lend these instructions to them to prevent misuse of the product and possible injury.
-
Page 11: Description
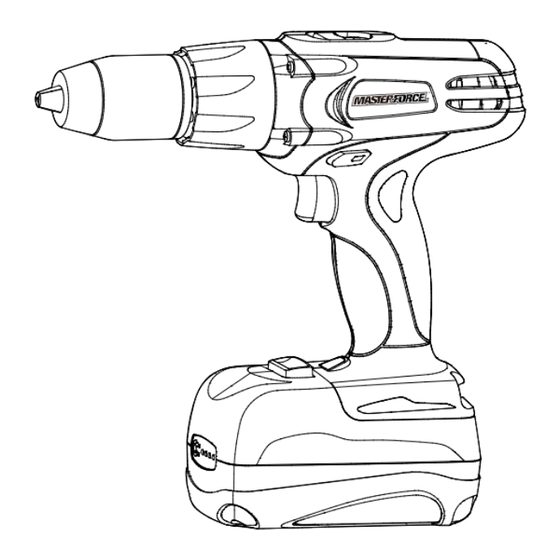
DESCRIPTION kNOW YOUR DRILL/DRIVER (Fig.1) Two-speed gearbox switch Fig. 1 Torque adjustment ring Keyless chuck Vents Direction of Rotation Selector (Forward/ Trigger Switch Center Lock/ Reverse) LED Worklight Battery Release Button Powerdisplay button Battery Pack Power indicator PRODUCT SPECIFICATIONS Motor 18Volt DC Switch VSR (Variable Speed Reversible) -
Page 12: Assembly
WARNING! The safe use of this product requires an understanding of the information on the tool and in this operator’s manual, as well as knowledge of the project you are attempting. Before use of this product, familiarize yourself with all operating features and safety rules. ADJUSTABLE TORQUE The drill has a 23+1position clutch. -
Page 13: Operation
UNPACkING This product has been shipped completely assembled. Carefully remove the tool and any accessories from the box. Make sure that all items listed in the packing list are included. Inspect the tool carefully to make sure no breakage or damage occurred during shipping. - Page 14 WHEN TO CHARGE THE BATTERY PACk Battery packs are shipped in a low charge condition to prevent possible problems. The battery should be charge until the green LED on the charger comes on. NOTE: Batteries will not reach full charge at the first time they are charged. Allow several cycles (operation followed by recharging) for them to become fully charged.
- Page 15 Fig. 4 BATTERY GREEN LED INDICATOR ACTION PACK Fast charge will begin when Hot/cold battery returns to 41°F (5°C) HI / LO TEMP. battery and 104°F (40°C). Battery pack or charger DEFECTIVE Defective Flashing BATTERY is defective. BATTERY Charging Flashing Charging CHARGING Fully...
- Page 16 BATTERY FULL After fully charged, the green LED Light on the charger will be on and the red LED light will be off. NOTE: The battery pack will fully charge, but will not overcharge, if left on the charger. NOTE: The power indicator LED lights will not be displayed when the power indicator button pressed while the battery pack is still on the charger.
- Page 17 The variable-speed trigger Fig. 6a switch delivers higher speed with increased trigger pressure and lower speed with decreased trigger pressure. DIRECTION-OF-ROTATION Direction-of-ro- Variable-speed SELECTOR (FORWARD/REVERSE/ tation selector trigger switch CENTER LOCk) (Fig. 6b) The direction of bit rotation is reversible and is controlled by a Fig.
- Page 18 GRIP (tighten) or OPEN (release) the chuck jaws on the drill bit. WARNING! Do not hold the chuck body with one hand and use the power of the drill to tighten the chuck jaws on the drill bit. The chuck body could slip in your hand, or your hand could slip and come in contact with the rotating bit.
- Page 19 driving applications, it is necessary to increase or decrease the torque in order to help prevent the possibility of damaging screw heads, threads, workpiece, etc. Adjust the torque by rotating the torque-adjustment ring. The proper setting depends on the job and the type of bit, fastener, and material you will be using.
- Page 20 NOTE: Rotate the chuck body in the Fig. 12a direction of the arrow marked GRIP OPEN (Release) to close the chuck jaws. Do not use a wrench to tighten or loosen the Keyless chuck jaws. chuck Tighten the chuck jaws securely on the bit.
- Page 21 elongate a hole. Let the tool do the work. When drilling hard, smooth surfaces, use a center punch to mark the desired location of the hole. This will prevent the drill bit from slipping off-center as the hole is started. If the bit jams in the workpiece or if the drill stalls, stop the tool immediately.
-
Page 22: Maintenance
MASONRY DRILLING For maximum performance, use carbide-tipped masonry bits when drilling holes in brick, tile, concrete, etc. √Maintain a speed and pressure which allows cutting without overheating the bit or drill. Applying too much pressure will: - Overheat the drill. - Wear the bearings. - Page 23 BATTERIES: The battery pack is equipped with nickel-cadmium rechargeable batteries. Length of service from each charging will depend on the type of work you are doing. The batteries have been designed to provide maximum trouble-free life. However, like all batteries, they will eventually wear out. Do not disassemble battery pack and at-tempt to replace the batteries.
-
Page 24: Troubleshooting
WARRANTY If, during normal use, this MASTERFORCE power tool breaks or fails due to a defect in material or workmanship within three years from the date of original purchase, simply bring this tool and its sales receipt back to your... - Page 25 bulbs, and/or batteries; (2) shall be void if this tool is used for commercial or/and rental purposes; (3) does not cover any losses, injuries to persons/properties, or costs. This warranty does give you specific legal rights and you may have other rights, which vary from state to state.
Need help?
Do you have a question about the 241-0400 and is the answer not in the manual?
Questions and answers