Table of Contents
Advertisement
Available languages
Available languages
Quick Links
™
perfect view
video monitor
additional camera
User Guide
3927006
• Please read the following instructions
and warnings carefully.
• Keep these instructions for future reference.
• Tool needed: Phillips Head Screwdriver (not included).
• For use with children from birth and up.
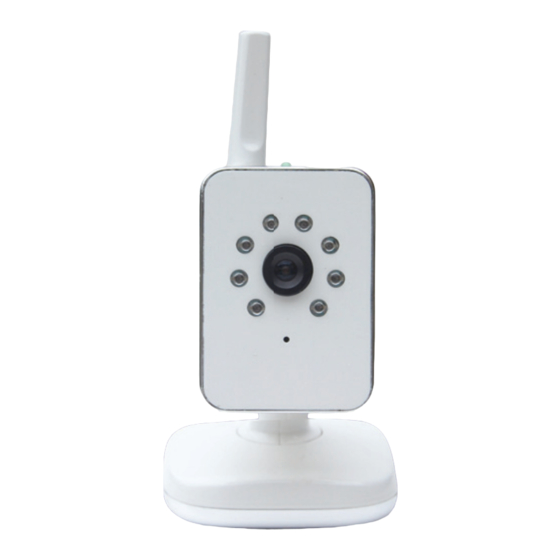
Features & Components
Baby Unit (Camera)
A
E
I
B
C
F
D
G
H
A
G
Antenna
Power On/Off Switch
B
H
Nighttime Viewing Lights
AC Adapter Jack
C
I
Camera Lens
Wall Mount Notch
D
J
Microphone
Room Darkening
J
Automatic Sensor
E
Power On Indicator
F
Pair Button
Security
Clips (6)
Wall Anchor
Screw
AC Adapter
Set-up & Use of Baby Unit (Camera)
DO NOT PLACE UNITS IN CRIB OR MOUNT ON CRIB. KEEP OUT OF REACH OF CHILDREN.
Set-up:
1 Connect AC adapter to the back of Baby Unit (Camera).
2 Plug Baby Unit into wall outlet to operate AC power.
3 To turn On, slide Power On/Off switch to On and Power On Indicator will illuminate
green. To turn Off, slide Power On/Off switch to Off.
Using your Baby Unit (Camera):
IMPORTANT: When choosing locations to set up the Baby Unit (Camera) follow these guidelines:
Table top Set Up:
• Determine a location for the Baby Unit (Camera) that will provide the best view of your baby.
Place the Baby Unit (Camera) on a flat surface, such as a dresser, bureau, or shelf (see diagram).
NEVER place Baby Unit (Camera) or cords within 3 feet (0.9 m) of the baby's reach.
ALWAYS secure the cord to the wall using the six (6) security clips included to keep cord
away from baby's reach (see diagram).
WARNING: Strangulation Hazard -
Children have STRANGLED in cords.
Keep cords out of reach of children
(more than 3 feet (0.9 m) away).
Wall Mounting:
Mounting the Baby Unit (Camera) on a wall is similar to mounting a picture frame.
Be sure to test reception and camera positioning before mounting to a wall.
1 Pre-drill a hole in the wall (3/16", 4.8mm, drill bit).
2 Insert the wall anchor into the hole and with a hammer, tap gently
on the end until the wall anchor is flush with the wall.
3 Insert the screw into the wall anchor and tighten screw until only
1/4" (6.2mm) of the screw is exposed.
4 Insert AC Adapter into the Baby Unit's AC Adapter Jack. Slide the bottom of the
Baby Unit down onto the screw until the Baby Unit (Camera) is secure to the wall.
5 Plug the AC Adapter into a standard electrical outlet.
6 Secure the cord to the wall using the 6 Security Clips to keep cord away from baby's reach.
7 To turn On, slide Power On/Off switch to On and Power On Indicator will illuminate green.
To turn Off, slide Power On/Off switch to Off.
IMPORTANT - CHECK RECEPTION:
The first time you use the monitory system, two adults should test it in the following way:
• Place Parent Unit at least 20 feet (6 m) away from Baby Unit (Camera).
• Have an adult speak into Baby Unit at various levels (soft to loud) while another adult checks Parent Unit
for proper sound and picture reception. Try Parent Unit in every location that it will be used.
• To adjust the Baby Unit (Camera), hold the base, and with the other hand, tilt up or down.
Baby Unit (Camera) can rotate left to right, up to 180˚ angle.
Pairing Set-up:
• Ensure Parent Unit (Monitor) and Baby Unit (Camera) are both On. To access the main menu, press the Power On/Off & Main Menu
Button on the left side of the Parent Unit. The main menu will appear on the screen.
PAIR/ADD CAMERA
Press the Volume +/- Buttons to navigate the Main Menu and select "Pair" icon. Press the Brightness +/- Buttons to navigate left/right
and select Camera 2, press Enter (Zoom Control Button), then press the "Pair" button on the back of the Baby Unit (Camera). The Baby
Unit (Camera) is now paired and camera image will appear on screen.
SELECT CAMERA:
Press the Volume +/- Buttons to navigate the Main Menu and select "Select" icon. Press the Brightness +/- Buttons to navigate
left/right and select Baby Unit (Camera) you want to view, then press Enter (Zoom Control Button). The Baby Unit (Camera)
is now selected and camera image will appear on screen.The selected Baby Unit (Camera) will remain active until camera selection
is changed or scanning feature is selected.
CAMERA SCANNING:
The Scan features allows parents to scan up to 4 Baby Units (Cameras) with each scan duration of about 8 seconds. Press the Volume
+/- Buttons to navigate the Main Menu and select "Scan" icon, then press Enter (Zoom Control Button) to activate this feature.
UNPAIR/DELETE CAMERA:
Press the Volume +/- Buttons to navigate the Main Menu and select "Unpair" icon.Press the Brightness +/- Buttons to navigate left/right
and select Baby Unit (Camera) you want to delete, then press Enter (Zoom Control Button). The Baby Unit (Camera) is now unpaired.
Important Information
To order either the Rechargeable
Battery or Additional BabyUnit/Camera,
visit www.babiesrus.com.
Additional Baby Unit/Camera:
Power
This product can accept up to 4 cameras.
Plug in
On/Off
For added portability, purchase an
here
additional Baby Unit/Camera for your
monitor which will provide the
3 feet
convenience of monitoring
additional areas in your home.
Rechargeable Battery:
For added portability, purchase a
rechargeable battery for your monitor
which will provide approximately
5 hours of video usage and
10 hours of audio only usage.
Security
Clips
Do Not Return To The Store!
Should you have any questions or experience any
issues with your Perfect View Color Video Monitor
please contact us directly. Many times there is a
simple solution to your question or problem.
Use for Wall Mount
Baby's Journey stands behind all of its products.
If you are not completely satisfied or have
questions, please contact our Consumer Care
Team at 1-855-422-2975 or email us at
wecare@babysjourney.com.
BABIES "R" US is a mark of (est une marque de) Geoffrey, LLC
and Toys "R" Us (Canada) Ltd. (ltée). © 2012 Geoffrey, LLC.
Made in China (Fabriqué en Chine). Distributed in the United States
by (Distribué aux États-Unis par) Toys "R" Us, Inc., Wayne, NJ 07470.
Imported in Canada by (Importé par) by Toys "R Us (Canada) Ltd. (ltée),
2777 Langstaff Road, Concord ON L4K 4M5. Imported in Australia by
Toys "R" Us (Australia) Pty Ltd., Regents Park NSW 2143
WWW.BABIESRUS.COM
Colors and styles may vary.
Please retain for future reference.
Important Safety Warnings
WARNING!
Strangulation Hazard - Children have
STRANGLED in cords. Keep cords
out of reach of children
(more than 3 feet
(0.9 m) away).
WARNING!
• Adult assembly is required. Keep small parts
away from children.
• This product is not a toy. Do not allow children
to play with it.
• This baby monitor is not a substitute for
responsible adult supervision.
• Do not place the baby monitor or cord in the crib.
• Keep cords out of reach of children.
• ALWAYS use enclosed Security Clips to help
secure cord away from baby's reach.
• Never use extension cords with power adapters.
Only use the power adapters provided.
• Do not cover the baby monitor with a blanket
or towel.
• Test the baby monitor and all its functions so
that you are familiar with it prior to actual use.
• Do not use baby monitor near water.
• Do not install the baby monitor near
a heat source.
• Only use the chargers and power adapters
provided. Do not use other chargers or power
adapters as this may damage the device and
battery pack.
• Only insert a battery pack of the same type.
• When the power adapter is plugged into an
electrical outlet, do not touch the exposed end.
• Make sure there is proper ventilation around
all baby monitor components. Do not place on
soft surfaces.
1/14/13
Advertisement
Table of Contents

Summary of Contents for Babies R' Us 39270006
- Page 1 • Only insert a battery pack of the same type. Pair Button BABIES “R” US is a mark of (est une marque de) Geoffrey, LLC is now selected and camera image will appear on screen.The selected Baby Unit (Camera) will remain active until camera selection and Toys “R”...
- Page 2 Montage Mural La caméra est maintenant sélectionnée et l'image de la caméra apparaît à l'écran. La caméra sélectionnée restera active jusqu'à ce que BABIES “R” US is a mark of (est une marque de) Geoffrey, LLC Indicateur d'alimentation Loger Détecteur •...
Need help?
Do you have a question about the 39270006 and is the answer not in the manual?
Questions and answers