Table of Contents
Advertisement
Quick Links
Advertisement
Table of Contents

Summary of Contents for Herbert Diezel
- Page 1 Diezel User Manual for the Herbert Amplifier...
-
Page 2: Table Of Contents
Table of Contents Chapter One: Safety and Warranty 1.1 Safety Warnings 1.2 Warranty Information Chapter Two: Using Your Herbert 2.1 Mains Connections, Power and Standby 2.1.1 Mains/connect to power outlet 2.1.2 Power up, Warm up, Standby off 2.1.3 Power tube caution 2.1.4 Operating Temperature... - Page 3 5.1.3 Deep 5.2 Power Amplifier Tubes 5.2.1 Function 5.2.2 Selection 5.2.3 Life Span Chapter Six: Functions and Switches 6.1 Programming Herbert 6.2 Manual Channel Selection 6.3 Mid Cut on/off 6.4 Loop on/off 6.5 Mute on/off 6.6 Master 2 6.7 Store Chapter Seven: Midi 7.1 MIDI...
- Page 4 Chapter Eight: Remote Switch Chapter Nine: Maintenance and Cleaning 9.1 Cleaning 9.2 Care 9.3 Tube Change...
-
Page 5: Chapter One: Safety And Warranty
Do not open the panels of the amplifier. No user serviceable parts inside. Your Herbert operates on very high internal voltages, which may still be present after the Amplifier has been turned off and disconnected for a while. - Page 6 10 years to the original owner with proof of purchase. Power Tubes and Pre Amp tubes are covered for 3 months to the original owner. The amps will be tracked via both Diezel USA and Diezel Germany recorded sales beginning 1/20/2009. ALL REPAIR WORK MUST BE DONE BY A DIEZEL CERTIFIED TECHNICIAN.
-
Page 7: Chapter Two: Using Your Herbert
First turn the Power switch to on (facing up). The indicator will light up. This starts the tube heating process. After about 40 seconds, the tubes have sufficiently heated for normal operation. Your Herbert is now ready for operation and the standby switch can be turned to “run”... -
Page 8: Operating Temperature
Anodes have reached their operating temperature then the Anode surfaces are not heated evenly yet; the “operating temperature” of the tube is not reached yet. This causes undue stress on the tubes and their related components inside the amp. One should therefore always give the amp it’s much needed warm-up time, even if musical inspiration hits with full force. -
Page 9: Chapter Three: Peripheral Connections
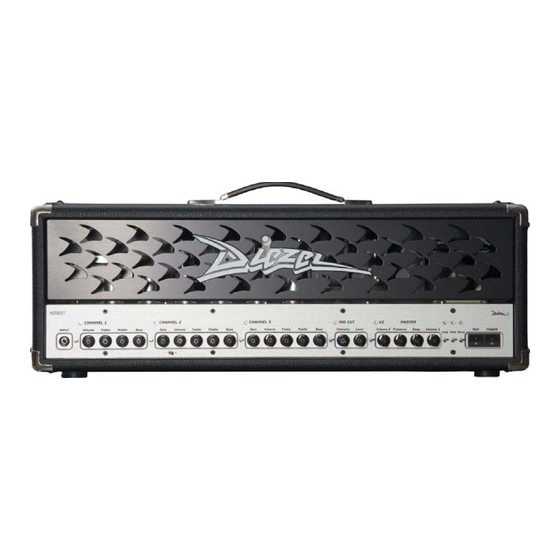
Chapter Three: Peripheral Connections Front Panel Connections 3.1.1 The input jack (“IN”) receives your Electric Guitar signal by means of a shielded guitar cord with 1/4” mono style plug. Your guitar cord is an important part of your signal chain and its quality and construction type clearly affect the overall tone of your rig. -
Page 10: Rear Panel Connections
There are 2 ways to handle effects signals. If you use the serial return, then the signal path of your Herbert is interrupted, the signal is sent to the processor, gets more or less processed, then sent back to the serial return into the power amp. -
Page 11: Switch-Able Loop As Additional Volume Control
One might extend one’s tonal variety by hooking up an external guitar pre-amp to the switch-able return jack. Now the external preamp, once selected via the “Loop” function, can feed the Herbert’s power amp. 3.2.5 Switch-able Parallel Loop To route your effects signal parallel to the original signal, connect the... -
Page 12: Tuner Out
3.2.8 Speaker Connections Herbert has 5 speaker jacks: 1 for a 16-Ohm load, 2 for 2 16-Ohm loads or 1 8Ohm load, and 2 for 2 8-Ohm loads or 1 4-Ohm load. Confusing? Oh, yes! Just do what it says on the jacks, and you’ll be... -
Page 13: Reasons For Dynamic Losses In The Effects Loop
3.3.1 MIDI In Midi in receives “program change” orders from commonly available midi pedals and control systems. The Herbert is able to supply phantom power to your midi pedal via a 7-prong DIN midi cable. This can help unclutter your stage system and rids the artist of these pesky power supplies. -
Page 14: Midi Thru
3.3.2 MIDI Thru This jack routes the midi signal to other midi partners. MIDI data not addressed to the Herbert gets looped through this jack. See chapter 7 for MIDI programming instructions... -
Page 15: Chapter Four: The Three Pre-Amplifiers
From hard and percussive sounds to soft and warm blossoming tones. Herbert was designed to offer as many of the clean variety as possible. Your choice of guitars and pickups will have a large part in this equation. -
Page 16: Channel Three
If you don’t want to use the Mid Cut function, then it can be used as an additional programmable volume control with the Intensity control set to 0 or off. This gives your Herbert 8 programmable volume options! - Page 17 4.2 Pre-amp Tubes The pre-amps are equipped with 12AX7 tubes in all positions. The pre-amp tubes are not used to make big power, but merely as pre-amplifiers. Therefore their life expectancy is much higher than that of the power amplifier tubes. This is not to undermine their utter importance in overall sound and response of the amplifier.
-
Page 18: Chapter Five: Power Amplifier
5.1.3 Deep The Deep control is an active bass control, contrary to conventional bass controls. It controls the frequencies around 120Hz without influencing the overall dynamic range of the power amplifier. Diezel Co. is not responsible for disintegrating speaker cabinets. -
Page 19: Power Amplifier Tubes
5.2.2 Selection Diezel Co. installs the most reliable and best sounding tubes that are currently available in sufficient quantities. So it is possible that tube brand and tube type will change during production. You can fine-tune your Herbert by having different type and brands of tubes installed, however, it is imperative that the amp is biased properly. -
Page 20: Life Span
5.2.3 Life Span Power tubes last 1 to 3 years, depending on care, volume and frequency of use of the amplifier. If you use your amp only once a month, then the tubes will obviously last longer. Really… We have heard tubes that are over 10 years old, but it was not a good thing. -
Page 21: Chapter Six: Functions And Switches
Chapter Six: Functions and Switches 6.1 Programming the Herbert It is quite easy to program your Diezel Herbert and, also, easy to explain. Pushing the “Store” toggle switch twice must follow each change in the MIDI program. After the first click, the selected blue LED lights will blink. -
Page 22: Mid Cut On/Off
6.3 Mid Cut On/Off The switching function “Mid Cut” is applicable to all channels. The Mid Cut is active when the corresponding LED is lit. 6.4 Loop On/Off This function activates a device that is connected to the switch-able loop. 6.5 Mute On/Off “Mute”... -
Page 23: Chapter Seven: Midi
(and processors and computers) of all kinds. We will only need to learn a small portion of this “language” to use the Herbert and its peripheral MIDI partners. We are going to learn only about “program change”. -
Page 24: Single Channel Mode - Automatic Channel Recognition
Preamp channel one selector off, channel two selector on, channel 3 selector on. If you let go of “Mute” now, then your Herbert is set to respond to MIDI channel 7 only. Get it? The table below gives you the sequence for all 7 MIDI channels. - Page 25 Chapter Eight: Footswitch The optional Columbus footswitch can be connected via the rear panel mounted XLR jack. The Columbus will not recognize functions selected from the front panel. Chapter Nine: Maintenance and Cleaning 9.1 Cleaning Never use a wet method of cleaning the amplifier, i.e. amplifier.
- Page 26 9.3 Tube Change Tube changes are only to be undertaken by authorized service personnel. If power tubes with different values then the original ones are to be installed, then the amplifier must be re-biased before operation can be resumed. The amplifier uses a three circuit bias system.
Need help?
Do you have a question about the Diezel and is the answer not in the manual?
Questions and answers