Table of Contents
Advertisement
®
DVD / CD+G / CD / USB
DVD+R/RW / DVD-R/RW / CD-DA / CD - R / CD - RW /
MP3 / SVCD / VCD / JPEG / Kodak Picture CD /
OWNER'S MANUAL
This manual refers to models: PCK3000
/II
US,
PCK3000/II EU PCK3000/II
,
UK and
PCK3000/II
AU
Please review this manual before playing the machine.
This manual is also available as a .PDF file at www.soundchoice.com.
Advertisement
Table of Contents

Summary of Contents for Sound Choice PCK3000/II US
- Page 1 ® DVD / CD+G / CD / USB DVD+R/RW / DVD-R/RW / CD-DA / CD - R / CD - RW / MP3 / SVCD / VCD / JPEG / Kodak Picture CD / OWNER’S MANUAL This manual refers to models: PCK3000 PCK3000/II EU PCK3000/II UK and PCK3000/II...
- Page 2 Songs include background vocals if found on the original recording. Sound Choice songs are available on compact disc plus graphics (CDG) and as digital downloads from various sites around the world. Visit www.soundchoice.com and look for the music downloads link.
-
Page 3: Table Of Contents
Table of Contents *Important: The information contained herein is subject to change without notice. General Information Disc Care Safety Information 2 - 3 Introduction Features Video Standards (NTSC/PAL) Formats Playback Control Connections Video Connections Audio Connections Microphone Connection Getting Started Front Panel Operation Remote Control Setup Basic Play... -
Page 4: Safety Information
Importa nt Safety Instru ctions CAUTION: Please read and observe all warnings and instructions given in this owner’s manual and those marked on the player. Retain this manual for future reference. This player has been designed and manufactured to assure personal safety. Improper use can result in electric shock or fire hazard. - Page 5 Importa nt Safety Instru ctions Laser Do not remove the cabinet cover. Direct exposure to the laser may cause damage to eyesight. Object and liquid entry Never attempt to insert objects of any kind into the openings of the player, or you may be exposed to dangerous voltage. Do not store player near liquids of any kind in order to prevent a fire or electrical shock.
-
Page 6: Introduction
Introduction Welcome Thank you for purchasing this Sound Choice DVD / CD+G player. This manual will describe the functions and features of the player and the remote control. The player itself has many unique built-in features that will make your DVD viewing and Karaoke experience more enjoyable. -
Page 7: Formats
Acceptable Formats Playable Discs This DVD player will play the following formats: Digital Video Discs (DVD), Compact Disc+Graphics (CD+G), Compact Disc (CD), Digital Video Disc Recordable (DVD+R / DVD-R), Digital Video Disc Re-Writable (DVD+RW / DVD-RW), Super Video Compact Disc (SVCD), Video Compact Disc (VCD), Compact Disc Recordable (CD-R), Compact Disc Re-Writable (CD-RW), MPEG 3 (MP3), Compact Disc Digital Audio (CD-DA), JPEG, WMA and Kodak Picture CD. -
Page 8: Video Connections
Video Connections Instructions for connecting the video output Video Output (Standard / Interlaced) Video cable Connect to the VIDEO (Yellow) input of the TV set. S-VIDEO Output Connect to the S-VIDEO input of the TV set in which there is an S-VIDEO JACK. The S-Video input is S-VIDEO cable higher resolution picture than the video input. -
Page 9: Audio Connections
Audio Connections Instructions for connecting the audio output Stereo output mode (Standard) - This output must be used for the Karaoke feature. Stereo cable (Right) Connect to the Stereo (Red & White) inputs of your TV or Stereo. Stereo cable (Left) Surround Sound (5.1) output mode Connect to the (5.1) channel audio input s of the (5.1) Channel Audio cable... -
Page 10: Microphone Connection
Microphone Connection Microphone Connection 1. The microphone must be switched “Off” before connecting. 2. The microphone volume must be turned to (0) on the player. 3. Connect the microphone plug into the jack. 4. Turn the microphone “On” using the on/off switch on the body of the microphone. -
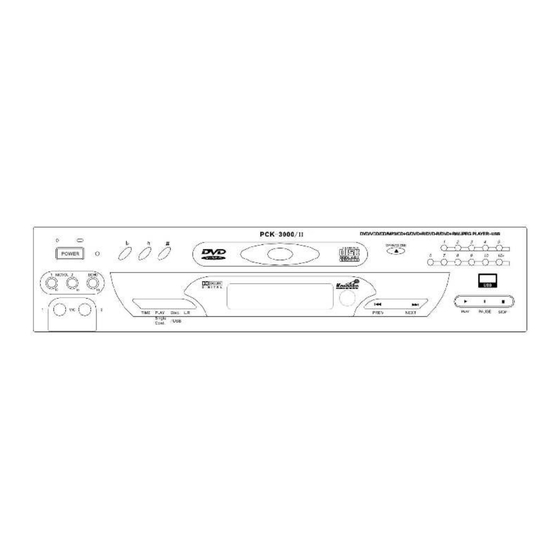
Page 11: Front Panel Operation
Front Panel Operation 1. Power Press to turn the power ON or OFF. 2. Direct Track/Title Access For Turbo Load place your disc in the tray, then without closing the tray, press your desired track # on the front panel. The tray will close, and the player will directly play the selected track. -
Page 12: Remote Control Setup
Remote Contro l Setup Preparation of the remote control Operation of the remote control Instructions for using the remote control. Place the batteries into the remote control. The remote control will then be ready to operate the DVD player. 1. Open the cover. Progressive Scan Progressive Scan Remote Sensor... -
Page 13: Basic Play
Basic Play After connecting all of the component systems, turning on the relevant equipment and equipping the remote control with the batteries, the user is now ready to use the DVD video player. Preparation a. Turn on the TV set. b. - Page 14 Basic Play POWER OPEN/CLOSE 4. Pause During the play, press PAUSE and the playback will pause. Press the button again to return to normal playback. 5. Volume adjustment During playback, press VOL(+) and VOL(-) to adjust the output volume of the DVD video player. 6.
-
Page 15: Menu
Basic Play 1. Fast-forward playback This function does not work with CD+G discs. For VCD discs the PBC must be turned “off” to activate this function. During playback, press the "FF" button to achieve fast- forward playback. There are four levels of speed. Each time it is pressed, the speed will increase a level. -
Page 16: Timed Playback
Basic Play 7. Skip to the timed playback A. DVD discs Press GOTO twice Press numerical buttons to enter the desired time. The format of the time is “hh/mm/ss”. For example, if you want to play from the point of 35 minutes 5 seconds, press 0,0,3,5,0,5;... -
Page 17: Programmable Playback
Basic Play 10. Programming playback While the menu is off and in the stop mode: press "PROG". The following on-screen display will appear: Program: P 00:00 Press number buttons to enter the track or chapter numbers. For example, the desired programs are chapter 5, chapter 3 and chapter 6. -
Page 18: Mp3 Disc Playback
Playing MP3 Discs MP3 Discs The MP3 disc is a large capacity disc containing CD audio programs. This player can support the MP3 disc format. The detailed operation is as follows: Press OPEN/CLOSE button to eject the disc tray. Place an MP3 disc into the tray and press the OPEN/CLOSE button to close the disc tray. -
Page 19: Remote Control
Remote Contro l Quick Reference Guide The functions of keys on the remote control This section lists the functions or operations of keys on the remote control. It is intended for the user`s speedy search. You can refer to the previous pages for the detailed operation of most keys. 1. - Page 20 Remote Control Quick Reference Guide 10. ANGLE This is for DVD discs only with multi-angle feature. Press this button to view the picture from the different angles. Each time it is pressed, the picture will switch to another angle. 11. RESUME During playback, press STOP once.
-
Page 21: Remote Control
Remote Control Quick Reference Guide 24. AUDIO (DVD Karaoke Only) Most Karaoke discs are designed to play the demonstration vocal on the right channel only, so that you will not hear the lead vocal in stereo. Press this button to turn “On/Off” the demonstration (lead) vocal track during playback. The default setting is “off”;... -
Page 22: Features Setup
Features Setup This section will instruct you on how to navigate the setup features of the DVD player. There are many features that are built into this player that can be accessed by the user. Please review this section of the manual before attempting to adjust any of the features. - Page 23 Features Setup (Note: At any time you may exit the menu by pressing the SETUP button.) GENERAL SETUP PAGE CONTINUED LAST MEMORY (This allows the player's memory to remember the exact location on a disc when the player is turned "off".
- Page 24 Features Setup (Note: At any time you may exit the menu by pressing the SETUP button.) AUDIO SETUP PAGE CONTINUED SPDIF SETUP SPDIF OUTPUT SPDIF/OFF (Turns "off" the (DIGITAL OUTPUT (DIGITAL OUTPUT) digital outputs of SETUP) player.) SPDIF/RAW (Activates the optical outputs of the player.) SPDIF/PCM...
- Page 25 Features Setup (Note: At any time you may exit the menu by pressing the SETUP button.) AUDIO SETUP PAGE CONTINUED 3D PROCESSING PRO LOGIC II (This option not available on this model) MUSIC MODE (Set this mode to the MOVIE type of audio/video signal that you are PRO LOGIC...
- Page 26 Features Setup (Note: At any time you may exit the menu by pressing the SETUP button.) AUDIO SETUP PAGE CONTINUED To Return, Press Setup VIDEO SETUP PAGE COMPONENT S-VIDEO (Most televisions use YUV) (Progressive Scan) (Progressive Scan) TV MODE P-SCAN (Progressive Scan) INTERLACED SHARPNESS...
- Page 27 Features Setup (Note: At any time you may exit the menu by pressing the SETUP button.) PREFERENCE PAGE Note: In order to access the Preference Page, the player must come to a complete stop. To completely stop the player, the user must press the STOP button twice. TV TYPE (Europe and Australia) AUTO...
- Page 28 Features Setup (Note: At any time you may exit the menu by pressing the SETUP button.) PREFERENCE PAGE CONTINUED PARENTAL KID SAFE PG-13 NC-17 ADULT PASSWORD CHANGE (The default code is: 0000) DEFAULT RESET WARNING!!! (By selecting RESET, this will reset the player's memory to the factory settings.
-
Page 29: Trouble-Shooting Guide
Trouble-Shooting Guide Check the following guide for the possible cause of a problem before contacting service. Symptom Possible Cause Correction Connect the power plug securely into the electrical The power plug is disconnected. No power. outlet. Load the disc and check the DVD indicator on the The player doesn’t No disc. -
Page 30: Specifications
Specifications Digital Video Discs (DVD), Compact Disc+Graphics (CD+G), Disc type: Compact Disc (CD), Super Video Compact Disc (SVCD), AVI, Video Compact Disc (VCD), Compact Disc Recordable (CD-R), Compact Disc Re-Writable (CD-RW), MPEG 3 (MP3), Compact Disc Digital Audio (CD-DA), JPEG, and Kodak Picture CD. Video format: Mpeg2 for DVD, Mpeg1 for VCD, CD+G and AVI MP3, MPEG1, MPEG2, PCM, DOLBY DIGITAL;... -
Page 31: Index
Index Program (PROG) 15, 17 A - B Angle Progressive Scan 4, 24 Connection Arrow Buttons 12, 18 Remote Control Audio Batteries Close 9, 11, 17 Operation Repeat 14, 17 Digital Coaxial Audio Output 7, 22 Resume Digital Echo Reverb Digital Key Control 9, 19 Reverse (REV) - Page 32 PCK-350DR All-In-One System Input and Output: • 4 x ¼” microphone inputs (2 front / 2 rear) and independent volume controls • Input: RCA AUX A/V inputs • Independent Echo / Vocal volume controller • Independent Guitar TREBLE / MID / BASS control •...
- Page 33 PCK-350DR All-In-One System This versatile machine does it all! It’s an amplifier, portable address system, karaoke machine, DVD/CD player and MP3 Player all rolled into one affordable compact package. It’s perfect for Singers, Musicians, Teachers, Schools, Churches, Public Speakers and Karaoke Jockeys, whether practicing, rehearsing, performing or playing And with the Digital Recorder, you can easily record your performances or transfer all your old audio tapes to a digital storage medium (SD card).
- Page 34 (including any type of liquid), lightning or other uncontrollable forces of nature, or any parts or service furnished by anyone else other than Sound Choice . This warranty does not cover damaged cartons, carrying cases, broken or damaged cabinets, or any other items used in connection with the product or consequential damages due to defect in that product.
-
Page 35: Limited Warranty
If there is no service center near you, then the unit must be sent prepaid by insured parcel post or UPS to the Sound Choice service center address nearest you. To establish eligibility for free repair or replacement, YOU MUST... - Page 36 Download Karaoke Songs From The Internet And Play Them Back From Your Memory Stick or External Hard Drive! To purchase Karaoke songs go to: www.soundchoice.com ® FOR YOUR RECORDS MAIN PAGE (This button will take you back to the main page of the MENU.) Model #: Date of Purchase: Place of Purchase:...
Need help?
Do you have a question about the PCK3000/II US and is the answer not in the manual?
Questions and answers