Table of Contents
Advertisement
IMPortANt: This instruction manual contains important information necessary for the proper
assembly and safe use of the appliance.
Read and follow all warnings and instructions before assembling and using the appliance. Keep this
manual for future reference.
OWNER'S MANUAL
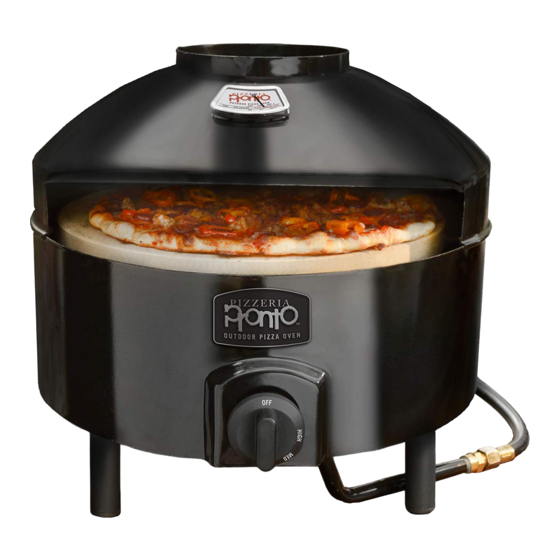
makes great tasting,
traditional italian pizza –
with bubbly cheese, crispy
crust & toasty toppings.
Pizzeria Pronto
Pizzacraft
PC6000/ PC6002/ PC6004/ PC6005
CS051614
©The Companion Group 2013
1250 9th Street, Berkeley, CA 94710
1.800.521.0505
info@companion-group.com
CERTIFICATION ETL
Conforms to ANSI STD Z21.89b-2012
Certifi ed to CSA STD 1.18b-2012
Outdoor cooking specialty gas appliances
®
®
Advertisement
Table of Contents

Subscribe to Our Youtube Channel
Related Manuals for Pizzeria Pronto PC6000

Summary of Contents for Pizzeria Pronto PC6000
- Page 1 Read and follow all warnings and instructions before assembling and using the appliance. Keep this manual for future reference. ® Pizzeria Pronto Pizzacraft ® PC6000/ PC6002/ PC6004/ PC6005 CS051614 ©The Companion Group 2013 1250 9th Street, Berkeley, CA 94710 1.800.521.0505 info@companion-group.com CERTIFICATION ETL Conforms to ANSI STD Z21.89b-2012...
- Page 2 UNPACKING INstrUCtIoNs When unpacking do not disturb starter, doing so could affect starting performance. Position is set at factory. Starter Remove protective silicone caps from stone brackets before use.
- Page 3 dANGer If you smell gas: 1. Shut off gas to the appliance. 2. Extinguish any open flame. 3. Remove hood. 4. If odor continues, keep away from the appliance and immediately call your fire department. Failure to follow these instructions could result in fire or explosion, which could cause property damage, personal injury or death.
-
Page 4: Table Of Contents
tAbLe oF CoNteNts safety Information ........5 Assembly Instructions ....... 6 Installation Instructions ......9 operation Instructions ......12 Cooking Pizza ..........13 Care and Maintenance ....... 15 troubleshooting ......... 17 Accessories ..........18 replacement Parts ........20 Warranty and registration ......21... -
Page 5: Safety Information
sAFety INForMAtIoN Installation of this appliance must conform with Do not leave the appliance unattended. Keep local codes, or in the absence of local codes, with children and pets away from the appliance at all the National Fuel Gas Code, ANSI Z223.1/NFPA times. -
Page 6: Assembly Instructions
AsseMbLy INstrUCtIoNs Before beginning assembly of product, make sure all parts are present. Compare parts with package contents and hardware contents list. Do not discard packing materials before assembly is complete. If any part is missing or damaged, do not attempt to assemble the product. Call customer service at 800- 521-0505. - Page 7 Attach legs to body as shown and slide into place; secure with M6x8 Phillips screws. Tighten screws by hand. Insert gas inlet assembly into body as shown. Secure control valve with 2 supplied screws to body front then secure pipe support with the third M4x5 Phillips screw. Attach control knob by aligning the keyway and pushing onto valve spindle.
- Page 8 Place the oven on a sturdy, level, heat-resistant surface on which you will be cooking. Level oven as needed and secure screws with screwdriver. Place the two baking stones as shown into oven so they rest on the sup- port brackets. The flat stone belongs on the bottom; the stone with indentations should be placed on top as shown below.
-
Page 9: Installation Instructions
INstALLAtIoN INstrUCtIoNs For Portable Liquid Propane -Gas Connection Gas requirements: the oven is set and tested at the factory for use with LP gas only. WArNING Do not attempt to operate your oven on other gases. Failure to follow this warning could lead to a fire hazard and bodily harm. - Page 10 D. tempeRatuRe-activateD sHut-oFF the tank. Contact customer service. The large plastic nut on the regulator assembly is Liquid Propane (LP) tank safety Information designed in coordination with a check valve in the tank valve to shut off the flow of gas when exposed .
- Page 11 CAUtIoN Never transport or move your oven or oven tank without first closing the manual valve on your LP (liquid propane) gas tank. Gauging Amount of LP (liquid propane) Fuel In tank To gauge the amount of propane fuel in your gas tank, the oven must be in operation with the tank connected. Using caution not to get too close to the oven, place your hand at the top of the tank and slowly move down the side until the tank feels cool to the touch.
-
Page 12: Operation Instructions
oPerAtING INstrUCtIoNs bReaking in youR oven When firing your oven for the first time, it is advisable to run the burner on “High” for 20 minutes and then turn the oven off and let cool to room temperature. This tempers the oven and once cool is ready for use. -
Page 13: Cooking Pizza
® barbecue grill or kitchen oven. Pizzeria Pronto After lighting, run the oven on “High” for 15 minutes, to 700°F or more for an ambient temperature that but no more than 20 minutes. This preheating will... - Page 14 Once a pizza is finished cooking, the oven imme- • ® diately is ready for another one. Pizzeria Pronto If cooking a fresh pizza with raw pizza dough turn performs best when pizza are cooked successively. the control knob slightly between “Med” and “High”...
-
Page 15: Care And Maintenance
CAre ANd MAINteNANCe cleaning burner tube Visually check the burner flames prior to each use. Porcelain Coated steel Finish The flames should be blue. If they are not, clean The outside of this oven is made of high heat rated burner tubes for insects and nests. - Page 16 WArNING The baking stones must be completely cooled before handling. The stones can hold high tempera- tures long after the oven has been turned off. Please use extreme caution when handling to avoid severe burns. Baking stones should be air dried completely before use. Failure to do so may result in damage to the stone.
-
Page 17: Troubleshooting
troUbLeshootING pRoblem cause solution Check black wire is connected to starter plug (pg. 7 - step 2) Follow auxilery starter instructions No spark to confirm spark (pg. 12) Sparking pin distance has been changed (adjust pin for stronger spark) burner will not light Replace tank Check for gas leaks in connections No gas flow to burner... -
Page 18: Accessories
ACCessorIes Available at pizzacraft.com/accessories.html DescRiption item numbeR accessoRy 1 Pound disposable tank Adapter: Allows small portable propane bottle to be PM6013 used with the pizza oven. Great for tailgating and camping. tee Valve: Allows you to use only one or two PM6014 cooking units for a 20 lb. - Page 19 DescRiption item numbeR accessoRy stone brush: Long handle brush with natural PM0218 fiber bristles. Keeps stone clean between pizzas. Flexible dough rolling Mat: Easy to PM0408 measure and roll perfectly sized pizza crust. Pizza Warming stand and tray: 12 inch PM6020 pan is held above the hot oven, keeping the cooked pizza warm.
-
Page 20: Replacement Parts
rePLACeMeNt PArts paRts 1. Rain cover 6. Body 11. Hardware package 2. Thermometer 7. Gas valve 12. Crumb tray 3. Hood 8. Knob 13. Hose and regulator 4. Stone 9. Gas inlet pipe 5. Burner 10. Legs... -
Page 21: Warranty And Registration
WArrANty ANd reGIstrAtIoN We guarantee our products for one year from date of purchase for defects in manufacture or materials. We will repair or replace at our option. Proof of purchase is required. For replacement parts call 1.800.521.0505 Please register your oven at pizzacraft.com/register-pizza-oven.html or with enclosed postcard...
Need help?
Do you have a question about the PC6000 and is the answer not in the manual?
Questions and answers