Table of Contents
Advertisement
Quick Links
Advertisement
Table of Contents

Subscribe to Our Youtube Channel
Related Manuals for Xilica Audio Design XPanel V2

Summary of Contents for Xilica Audio Design XPanel V2
- Page 1 XPanel V2 Remote Control Panel User Manual XILICA Audio Design...
-
Page 2: Important Safety Instructions
Important Safety Instructions 1. READ THESE INSTRUCTIONS All the safety and operating instructions should be read before the product is operated. 2. KEEP THESE INSTRUCTIONS The safety and operating instructions should be retained for future reference. 3. HEED ALL WARNINGS All warnings on the product and in the operating instructions should be adhered to. - Page 3 This Product should be situated away from heat sources such as radiators, stoves, or other products (including amplifiers) that produces heat. 9. DO NOT DEFEAT THE SAFETY PURPOSE OF THE POLARIZED OR GROUNDING-TYPE PLUG A Polarized plug has two blades with one wider than the other. A grounding-type plug has two blades and a third grounding prong.
-
Page 4: Table Of Contents
Table of Contents Table of Contents ..............4 1.0 Introduction ..............5 2.0 Features ................5 3.0 The XPanel ..............6-7 4.0 Firmware upgrading the XPanel ........7 5.0 Setting Up the XPanel ............ 8 6.0 Programming the XPanel ........... 8-9 7.0 Control Options ............ -
Page 5: Introduction
1.0 Introduction When it comes to remote control hardware, it is necessary to provide an easy yet powerful interface for the personnel in charge. XPanel is created with this purpose in mind. The menu names and control parameters are programmable via our XConsole software provided along with the device. As a matter of fact, the XPanel is so flexible that it not only allows the user to define what parameters to be controlled, but the in/max of the parameters range. -
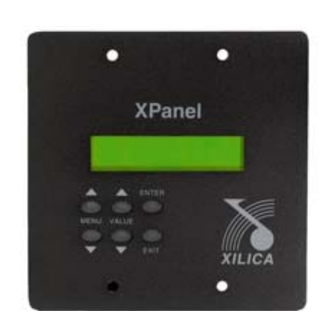
Page 6: The Xpanel
3.0 The XPanel XPanel User's manual - Page 6... -
Page 7: Firmware Upgrading The Xpanel
4.0 Firmware upgrading the XPanel New XPanel firmware is included in the latest XConsole Setup. Go to WWW.XILICA.COM and download the latest XConsole and install . Please read the XConsole release notes for new XPanel features. Now follow the next 5 steps to successfully firmware upgrade the XPanel. -
Page 8: Setting Up The Xpanel
5.0 Setting Up the XPanel 1. The XPanel can be powered from a standard 48v PoE router/switch (CAT-5) or an external 48V/DC source. Power consumption approx 100mA. Make sure only one power source is used at a time! 2. Press the VALUE UP,DOWN and the EXIT button at the main menu simultaneously to access the system settings. - Page 9 5. Enter any description for the selected menu in the Display on LCD textbox. 6. Select a Control for the selected menu. 7. Click on Data Min or Data Max to specify the data range for the selected control, the min/max value is indicated in the dialog box. 8.
-
Page 10: Control Options
XPanel command(s). Please refer to the “XConsole communication protocol” to start making your own commands. The communication protocol can be found under: Downloads XConsole Manuals on WWW.XILICA.COM XPanel User's manual - Page 10... -
Page 11: Specifications
8.0 Specifications Front Panel Controls Menu : 2x Buttons, Up and Down Value: 2x Buttons, Up and Down Enter: 1x Button Exit: 1x Button Connectors Power: RJ45 CAT-5 (PoE) or 2-Pin Screw Terminal Type USB: Type B Ethernet: RJ45 CAT-5 General Power: 48V/DC, 100mA... -
Page 12: Warranty
Products covered by this warranty will be repaired or replaced at the option of Xilica, without charge for materials or labor, provided all the terms of this warranty have been met. - Page 13 User Manual v2.00 (Jul 2010) XILICA Audio Design www.xilica.com...
Need help?
Do you have a question about the XPanel V2 and is the answer not in the manual?
Questions and answers