HP Digital Projector VP6121 User Manual
Vp6100 series
Hide thumbs
Also See for Digital Projector VP6121:
- Supplementary manual (4 pages) ,
- Installation manual (12 pages) ,
- Specifications (4 pages)
Table of Contents
Advertisement
Advertisement
Table of Contents

Subscribe to Our Youtube Channel
Related Manuals for HP Digital Projector VP6121


Summary of Contents for HP Digital Projector VP6121
- Page 1 HP VP6100 Series Digital Projector User’s Guide...
- Page 2 Furthermore, HP reserves the right to revise this publication and to make changes from time to time in the contents hereof without obligation of HP to notify any person of such revision or changes.
-
Page 3: Table Of Contents
Projector Description ........ - Page 4 Projector Specifications ........
-
Page 5: Introduction
ATE YOUR PROJECTOR. SAVE THIS USER’S GUIDE FOR FUTURE REF- ERENCE . Safety Instructions Read this user’s guide before you operate your projector and save it for future reference. The lamp becomes extremely hot during operation. Allow the projector to cool for approximately 45 minutes prior to removing the lamp assembly for replacement. -
Page 6: Shipping Contents
User’s Guide Shipping Contents The projector is shipped with the cables required for connection to standard PC or laptop computers. Carefully unpack and verify that you have all the items shown below. If any of these items are missing, please contact personnel at the place of purchase. -
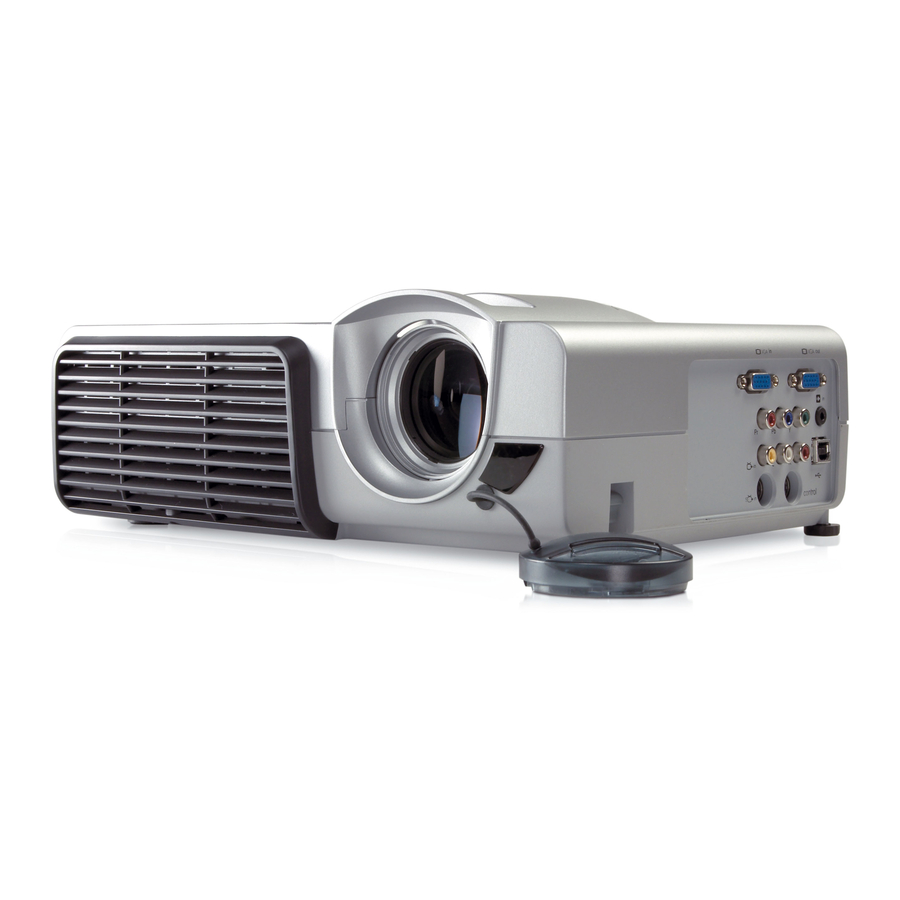
Page 7: Projector Description
Projector Description Projector External control panel (see next page) Projection lens Front adjuster IR remote sensor Ventilation grill Speaker Focus and zoom adjusters VGA signal input (PC) VGA signal output connector Audio/ Video connector Audio jack USB mouse connector S-Video jack... -
Page 8: External Control Panel
User’s Guide External Control Panel Power Turns the projector on or off. Auto Sync Automatically determines the best picture settings for current received signals. < > Menu Menu displays the menu system and closes the menu system. < and >... -
Page 9: Adjuster
Adjuster The projector is equipped with 2 quick-release adjuster feet. Push the buttons to adjust its tilt angle. Lift the projector up and press the adjuster button to release the adjuster. The adjuster will drop into position and be locked. -
Page 10: Remote Control Description
Keystone Remote Control Effective Range The remote sensors are located on the front and the back of the projector. It can function in a range of 30 degrees horizontally and 30 degrees vertically relative to a line that is a right angle to the remote sensors. The distance between the remote control and the remote sensors must be shorter than 6 meters (19.5 feet). -
Page 11: Replacing The Battery
Replacing the Battery Pull out the battery holder. Caution Avoid excessive heat and humidity. There may be danger of an explosion if batteries are incorrectly replaced. Replace only with the same or equivalent type recommended by the manufacturer. Dispose of used batteries accord- ing to the manufacturer’s instructions. -
Page 12: Installation
User’s Guide INSTALLATION Screen Size Place the projector at the required distance from the screen according to the desired picture size (see the table below). • VP6120, VP6121 (XGA) screen size chart Diagonal measurement Distance from Minimum screen zoom feet... -
Page 13: Connecting To Various Equipment
HDTV Equipment The projector is capable of displaying various High Definition TV display modes. Some of these sources are: • Digital-VHS (D-VHS) player •... - Page 14 User’s Guide Connecting to Various Equipment It only takes a few seconds to connect your projector to your desktop or notebook computer, VCR, or other systems. However, a Mac adapter is needed for connection to Macintosh computers. Computer The USB cable is not needed unless you have a remote control with mouse functions.
- Page 15 Video device or VCR Output monitor User’s Guide Installation 15...
-
Page 16: Operation
User’s Guide OPERATION Start Up Plug the power cord into the projector and into a wall socket. Turn on the main power switch. Press and hold POWER to start the unit. The back-lit POWER key flashes blue and stays blue when the power is turned on. -
Page 17: Digital Keystone Correction
Keystoning refers to the situation where the projected image is noticeably wider at either the top or bottom. To correct this, press KEYSTONE the control panel of the projector or on the remote control, and then adjust the sliding bar labeled Keystone, as needed. Press if the bottom of the image is too wide. -
Page 18: Source Selection
Projector Video and Audio Adjustments -- the Menu System On the projector or remote control, press the Menu button. Press < or > to select the desired menu. Press v or ^ to select the desired parameter. -
Page 19: Quick Tab
User’s Guide Quick Tab FUNCTION DESCRIPTION Selects picture source. Source *The operation of this function depends on the Source Scan setting. Corrects slanted edges of the image. Keystone Adjusts picture for type of input. Picture mode Synchronizes with input signal. Auto-sync Selects proportions of the image. -
Page 20: Adjust Tab
User’s Guide Adjust Tab FUNCTION Brightness Contrast Frequency Tracking V position Saturation Tint Sharpness Color temp Operation DESCRIPTION Brightens or darkens the image. Sets difference between light and dark areas. Adjusts timing relative to input signal. *This function is available only when the input source is PC. Adjusts synchronization to input signal. -
Page 21: Audio Tab
User’s Guide Audio Tab FUNCTION DESCRIPTION Stops audio output. Mute Changes loudness of audio Volume Changes loudness of higher frequencies. Treble Changes loudness of lower frequencies. Bass Operation 21... -
Page 22: Setup Tab
Operation DESCRIPTION Selects language for menus. Use < / > key to select the desired lan- guage. Adjusts the image to match the projector placement. 1. Default 3. Rear screen projection Sets whether projector searches for input signal. Selects position of on-screen menu. -
Page 23: Pip Tab
PIP Tab These functions are available only when the input source is PC and a video or S-video source is also connected. FUNCTION Selects an input source for the picture-in-picture. Source Selects the size of the pic- ture-in-picture. Use < / > key to select small, medium or large PIP size. -
Page 24: Shutdown
Please do not unplug the power cord before POWER is shut down or dur- ing the two-minute cooling process. If the projector is not properly shut down, to protect the lamp, the sys- tem will detect this and cool the lamp for two minutes automatically before turning on again. -
Page 25: Maintenance
To reduce the risk of electrical shock, always turn off the projector and dis- connect the power cord before changing the lamp. To reduce the risk of severe burns, allow the projector to cool for at least 45 minutes before replacing the lamp. - Page 26 User’s Guide Turn off the projector. Disconnect the power cord from the outlet and the projector. Loosen the screw and remove the lamp cover. If the lamp is hot, avoid burns by waiting 45 minutes until the lamp has cooled.
-
Page 27: Temperature Warning Indicator
Status Temperature LED is off Temperature LED is blinking Temperature LED is on Accessories You can buy HP accessories for your projector, such as the following: • Carrying case • Premium remote control (plus USB cable) • Ceiling mount •... -
Page 28: Troubleshooting
• Adjust brightness, contrast, or saturation. • Press Auto Sync on the control panel of the projector or the remote control unit to get better picture quality. • Adjust the focus. •... -
Page 29: Status Messages
Status Messages On-Screen Messages Projector is searching for input. SEARCHING Projector has identified the input signal and is running the auto ACQUIRING image adjustment function. SIGNAL Input signal frequency exceeds the projector’s range. OUT OF RANGE The lamp has been in operation for 1900 hours. Install a new lamp LAMP WARNING for optimal performance. -
Page 30: Specifications
User’s Guide SPECIFICATIONS Projector Specifications Technical Specifications Note: All specifications are subject to change without notice. General Model name Optical Display system Lens F/Number Lamp Electrical Power supply Power consumption Mechanical Dimensions Operating temperature range Weight Input terminal Computer input... -
Page 31: Timing Chart
Timing Chart Resolution 640x350 640x400 720x400 720x400 640x480 640x480 640x480 640x480 800x600 800x600 800x600 800x600 800x600 832x624 1024x768 1024x768 1024x768 1024x768 1280x1024 H Sync (kHz) V Sync (Hz) 31.5 37.9 31.5 37.9 31.5 37.9 43.3 35.2 37.9 46.9 48.1 53.7 49.7 48.4 56.5... -
Page 32: Dimensions
User’s Guide DIMENSIONS Dimensions 307.5 307.5 109.46 109.46 Unit: mm... -
Page 33: U.s.a
(www.eiae.org) U.S.A. This digital projector has been tested and found to comply with the limits for a Class B digital device, pursuant to Part 15 of the FCC Rules. These limits are designed to provide reasonable protection against harmful interference in a residential installation. -
Page 34: Canada
User’s Guide to Identify and Resolve Radio-TV Interference Problems. This booklet is available from the U.S. Government Printing Office, Washington, DC 20402, Stock Number 004-000-00345-4. At the first printing of this manual, the telephone number was (202) 512-1800. Canada This Class B digital apparatus complies with Canadian ICES-003. Japan Korea Regulatory and Safety... -
Page 35: European Union
Street, Palo Alto, CA 94304. Phone: (650) 857-1501. DECLARATION OF CONFORMITY Hewlett Packard Company Hewlett Packard Company Digital Projection & Imaging 1000 NE Circle Blvd. Corvallis, OR 97330-4239 HP Digital Projector VP6120, VP6121, VP6110, VP6111 CRVSB-03HE User’s Guide Regulatory and Safety 35...
Need help?
Do you have a question about the Digital Projector VP6121 and is the answer not in the manual?
Questions and answers