Table of Contents
Advertisement
Quick Links
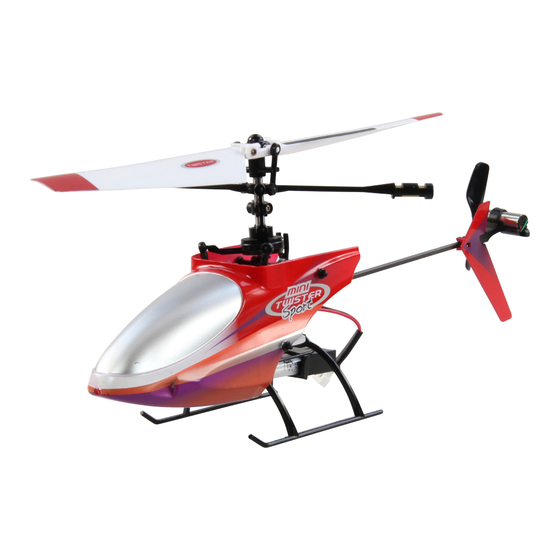
Mini Single Rotor Helicopter with 2.4GHz Transmitter
INSTRUCTION MANUAL
FEATURES
„ Gyro for incredible stability
„ Rechargeable, removeable Lipo
„ Charge easily direct from a USB port
„ 7-8 minute flight times!
„ Silky smooth & stable hovering
„ Full 4-channel control for full indoor fun
„ Adjustable digital trims
„ Efficient, stable under-slung flybar
„ Bell Hiller mix for performance and stability
„ Flexible wide track undercarriage
„ Low transmitter battery power warning
„ Spares pack included
„ Spares available from your local model shop
Please read the instructions carefully before use and retain for future reference.
Advertisement
Table of Contents

Summary of Contents for Mini Twister Sport Mini Single Rotor Helicopter with 2.4GHz Transmitter
-
Page 1: Instruction Manual
Mini Single Rotor Helicopter with 2.4GHz Transmitter INSTRUCTION MANUAL FEATURES „ Gyro for incredible stability „ Rechargeable, removeable Lipo „ Charge easily direct from a USB port „ 7-8 minute flight times! „ Silky smooth & stable hovering „ Full 4-channel control for full indoor fun „... -
Page 2: Table Of Contents
ViTAl SAFETy inFo ConTEnTS Introduction ..........3 Please read all instructions carefully before using this New to R/C helicopters? .......3 model. If any information in this manual is unclear, Specifications .........4 please contact your supplier for help. Please note especially the potential dangers Welcome ..........4 associated with the rotating parts in this model: A. -
Page 3: Introduction
If this is not what you were expecting, we advise you not to buy this model. Although the Mini Twister Sport is easy to fly, please note that we do not guarantee that by following the information included with this product you will be bound to achieve successful helicopter flight. -
Page 4: Specifications
SpECiFiCATionS Fuselage length .........................202mm Main rotor diameter......................190mm Weight (inc battery) ........................33g Charging time....................approx. 30 minutes Flying time ......................up to 7 minutes On board power................3.7V 150mAh LiPo battery Radio ....................Twister Mini 4, 2.4GHz 4-ch Range ..................25 metres (for indoor use only) Required Transmitter batteries ................ -
Page 5: Transmitter Part Names
B. TRANSMITTER PART NAMES Aerial Power Indicator ON/OFF switch Fore/Aft cyclic trim Throttle trim Throttle/Yaw stick Cyclic stick Yaw trim Left & Right cyclic trim LCD display Note: The throttle/yaw stick also has a built in button function The throttle/yaw stick can be pressed like a button and is used to perform the following functions: Binding the transmitter and helicopter if it comes unbound (see page 7) „... -
Page 6: Flight Controls (Mode 2)
And AdVAnCEd modE The Mini Twister Sport features beginner and advanced mode. With the transmitter and helicopter both ON press the throttle/yaw stick down, you will hear a combination of beeps depending on the mode you are now in:... -
Page 7: Binding Transmitter To Receiver
Once a transmitter is bound to it’s receiver, re-binding of transmitter and receiver is not normally required. However, by binding your transmitter, for example, to a friend’s Mini Twister Sport, the unique relationship between your original transmitter and receiver in your Mini Twister Sport will be broken. -
Page 8: Helicopter Charging Instructions
ChARGinG inSTRUCTionS Note: Charge the helicopter battery before using your Mini Twister Sport for the first time. Turn on the computer power switch Plug the USB charge lead into a spare USB slot in the computer Carefully connect the battery to the charge lead ensuring it is the correct way around. -
Page 9: Trimming The Helicopter (Mode 2)
TRimminG ThE hEliCopTER (modE 2) Gently apply throttle until the rotor blades start to turn, keep advancing the throttle until the helicopter leaves the ground and begins to hover. The model should be stable and centred in the hover to produce the best flight performance. -
Page 10: Flight Controls
FliGhT ConTRolS TAKING OFF If you have never flown an R/C helicopter before, we recommend learning to fly in the beginner mode before progressing to advanced mode. See page 7 for information on how to switch between the modes. Gently move the throttle stick up. The main rotor blades will start to spin. Keep advancing the throttle stick until the helicopter leaves the ground. -
Page 11: Fore/Aft Cyclic Control
FORE/AFT CyCLIC CONTROL Once you have got used to hovering the model and turning it you can try moving it around the room using the for/aft cyclic control, move the stick forward to make the helicopter move forwards. Centre the stick to stop the helicopter moving forwards. -
Page 12: Exploded Diagram
ExplodEd diAGRAm... - Page 13 Diagram Part Description Quantity JP Numbers Number Balance weight 6605655 Flybar 6605655 Flybar link 6605645 Centre hub 6605710 Main rotor blade 6605660 Main shaft 6605625 Swashplate link 6605645 Lower hub 6605715 Swashplate 6605640 Pushrod 6605650 Main shaft retaining collar 1 6605630 Main motor 6605620...
-
Page 14: Parts List
pARTS liST JP No Description Diagram Number 6605610 MAIN PCB WITH SERVOS WITH SCREWS (1) 6605615 TAIL MOTOR (1) 6605620 MAIN MOTOR (1) 16, 17 6605625 MAIN GEAR AND SHAFT SET 9, 21 6605630 SHAFT RETAINING COLLAR WITH SCREW 6605635 BALL BEARING 3x6x2mm (2) 6605640 SWASH PLATE (1) 6605645 UPPER LINK (4) 4, 10... -
Page 15: Lithium Polymer Battery Safety
liThiUm polymER bATTERy SAFETy Before Charging Li-po’s Before charging your battery check for any damage e.g. check if the battery has „ expanded or swollen in size or if the battery cells have been punctured. If any of the above is true: DO NOT CHARGE THE BATTERY! Charging Li-po’s Only use the USB lead supplied with this product to charge the Lithium polymer „... - Page 16 European agents: J Perkins Distribution, Lenham, England www.jperkinsdistribution.co.uk...
Need help?
Do you have a question about the Mini Single Rotor Helicopter with 2.4GHz Transmitter and is the answer not in the manual?
Questions and answers