
Related Manuals for Vax Pro


Summary of Contents for Vax Pro
- Page 1 Vax Careline: 0870 6061248 www.vax.co.uk BAGGED CYLINDER VACUUM CLEANER Please read carefully before using this cleaner. Always fully extend Vax Model Number: V-100 the mains cable before use. Instruction Manual...
-
Page 2: Parts Overview
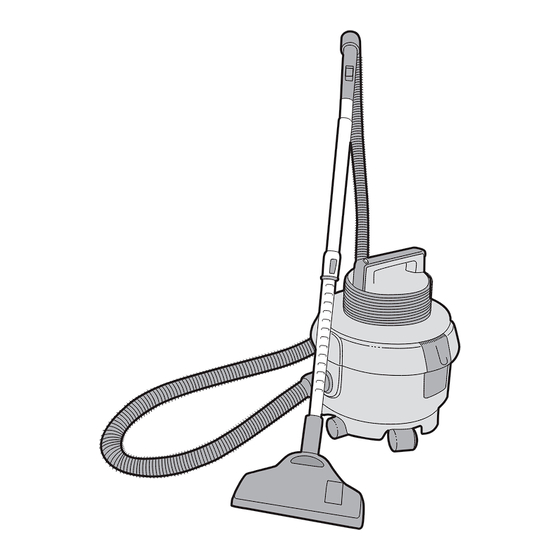
Parts Overview Parts Overview Fig. 1/1 Telescopic extension tube On/off button Flexible hose Carry handle Combination floor tool Dusting brush Castor wheels Crevice tool Top cover retainer clips Upholstery tool Post-motor filter (at rear) Dust bags (x5) Power cord IMPORTANT: The accessories are stored in the dust bag compartment and need to be removed before operating the vacuum cleaner. -
Page 3: Safety Information
Make sure the plug is damaged, return the vacuum cleaner to a foam filter sleeve is completely dry before inserting Vax Authorised Service Agent or suitably qualified back into the vacuum cleaner. person for examination, repair or adjustment. -
Page 4: Initial Setup
Initial Set Up/Use and Function Initial Set Up Use and Function IMPORTANT: The accessories are stored in the dust IMPORTANT: Always remove the power plug from bag compartment and need to be removed before the wall outlet before assembling or before removing operating the vacuum cleaner. -
Page 5: How To Operate
Use and Function/How to Operate Hard Floor Cleaning Fit the combination floor tool by pushing on to the extension tube (Fig 4/4). For hard floor cleaning, press the rocker switch on the combination floor tool as shown to lower the brushes (Fig.5/3). -
Page 6: Removal And Replacement
Accessories/Dust Bag & Filters: Removal & Replacement Turn off the vacuum cleaner and unplug it from Accessories the mains. Remove the hose. Unclip the retainer clips on either side of the vacuum cleaner and lift IMPORTANT: Always remove the power plug from off to gain access to the dust bag compartment the wall outlet before assembling or before removing (Fig.7/1). -
Page 7: Clearing Blockages
Dust Bag & Filters: Removal & Replacement/Clearing Blockages Fig.7/4 Fig.7/7 The pre-motor filter is found on the underside of Remove the post-motor filter (Fig.7/8). the top cover. To release the filter turn the cover anti-clockwise and lift away (Fig.7/5). Fig.7/8) Fig.7/5 The post-motor filter should be replaced every 9-12 months. -
Page 8: Troubleshooting
Troubleshooting Troubleshooting WARNING: TO REDUCE RISK OF PERSONAL INJURY, UNPLUG VACUUM CLEANER BEFORE SERVICING PROBLEM: Cleaner won’t run Cause: Not properly plugged into electrical outlet. Solution: Plug in firmly. Cause: No electricity in electrical outlet. Solution: Check fuse or breaker. Cause: On/off switch not turned on. - Page 9 Damage or loss to Product occurring and Section 5 (Limits to our responsibility). during transit to or from the Vax Approved 1.3 If Vax is in breach of our commitments then, subject Service Agent. to the other terms of this Guarantee, Vax will pay...
-
Page 10: Technical Specification
3 TRANSFER OF OUR COMMITMENTS TO YOU GENERAL 3.1 You cannot transfer our commitments (and this 6.1 No person other than you and Vax Limited has Guarantee) to another person. Our commitments any rights under this Guarantee. (and this Guarantee)will terminate if you transfer 6.2 This Guarantee is subject to English law. - Page 11 This page has been intentionally left blank.
- Page 12 EEC STATEMENT OF COMPLIANCE Manufacturer/EEC importer: Vax Limited, hereby on our own responsibility declare that the product V-100 Vax Pro is manufactured in compliance with the following: Safety: 73/23/EEC Low Voltage Directive, as modified by 93/68/EEC EMC: 89/336/EEC Electromagnetic Compatibility Directive, as modified by 93/68/EEC Waste electrical products should not be disposed of with household waste.
Need help?
Do you have a question about the Pro and is the answer not in the manual?
Questions and answers