Table of Contents
Advertisement
Advertisement
Table of Contents

Related Manuals for D-Link DSL-2640T


Summary of Contents for D-Link DSL-2640T
-
Page 1: User Guide
DSL-2640T ADSL2+ Wireless Router User Guide August 2006... -
Page 2: Table Of Contents
Table Of Contents BEFORE YOU START ......................1 Installation Overview............................1 Setup Wizard ..............................1 Packing List...............................1 Installation Notes..............................2 INTRODUCTION .........................5 Router Description and Operation........................5 Router Features ..............................6 802.11g Wireless...............................7 Installation Considerations ............................. 8 Front Panel Display ............................9 Rear Panel Connections ..........................10 Reset ..................................... - Page 3 Virtual Server ..............................57 LAN Clients ..............................60 SNMP ................................... 61 Filters ................................62 Bridge Filters ................................64 Static Routing ................................65 DMZ ..................................... 66 Parental Control............................. 67 URL Blocking................................68 Domain Blocking................................68 Firewall ................................69 RIP....................................70 PPP ....................................71 ADSL....................................
-
Page 4: Before You Start
Ethernet network or single computer. If you are using a computer with a functioning Ethernet port, the quickest and easiest way to set up the DSL-2640T is to follow the instructions provided in the Quick Installation Guide. -
Page 5: Installation Notes
Operating Systems The DSL-2640T uses an HTML-based web interface for setup and management. The web configuration manager may be accessed using any operating system capable of running web browser software, including Windows 98 SE, Windows ME, Windows 2000, and Windows XP. -
Page 6: Information You Will Need From Your Adsl Service Provider
DSL-2640T ADSL 2+ Router User Guide Information you will need from your ADSL service provider: This is the Username used to log on to your ADSL service Record info here provider’s network. It is commonly in the form − Username user@isp.co.uk Your ADSL service provider uses this to... - Page 7 It is recommended that your collect and record this information here, or in some other secure place, in case you have to re-configure your ADSL connection in the future. Once you have the above information, you are ready to setup and configure your DSL-2640T ADSL 2+ Router.
-
Page 8: Introduction
This section provides a brief description of the Router, its associated technologies, and a list of Router features. Router Description and Operation The DSL-2640T Wireless ADSL2+ Router is designed to provide connectivity for your private Ethernet LAN, and 802.11g/802.11b wireless LAN to the Internet via an ADSL connection. -
Page 9: Router Features
DSL-2640T ADSL 2+ Router User Guide Router Features The DSL-2640T ADSL 2+ Router utilizes the latest ADSL enhancements to provide a reliable Internet portal suitable for most small to medium sized offices. DSL-2640T advantages include: • PPP (Point-to-Point Protocol) Security – The DSL-2640T ADSL 2+ Router supports PAP (Password Authentication Protocol) and CHAP (Challenge Handshake Authentication Protocol) for PPP connections. -
Page 10: 802.11G Wireless
The physical environment in which the AP is operating can impact on its effectiveness and range. If you experience low signal strength or slow throughput, consider positioning the Router in a different location. See Installation Considerations below concerning the wireless environment and location of the AP (DSL-2640T). SSID Wireless networks use an SSID (Service Set Identifier) as means of identifying a group of wireless devices, similar to a domain or subnet. -
Page 11: Installation Considerations
Keep the number of walls and ceilings between the DSL-2640Tand other network devices to a minimum - each wall or ceiling can reduce your D-Link wireless product’s range from 3-90 feet (1-30 meters.) Position your devices so that the number of walls or ceilings is minimized. -
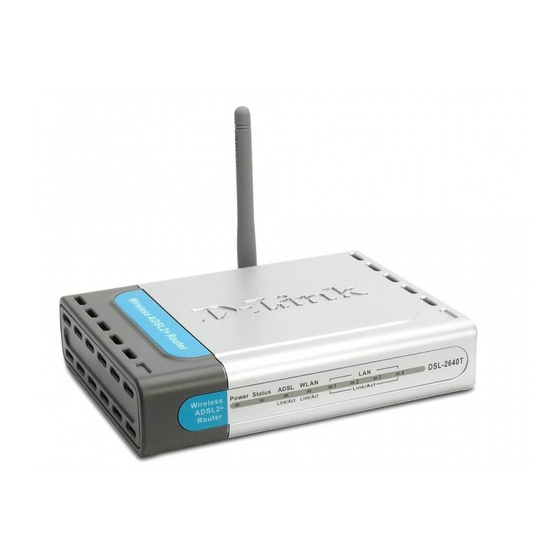
Page 12: Front Panel Display
DSL-2640T ADSL 2+ Router User Guide Front Panel Display Place the Router in a location that permits an easy view of the LED indicators on the front panel. The LED indicators on the front panel include Power, Status, ADSL and Ethernet. The ADSL, and Ethernet indicators monitor link status and activity (Link/Act). -
Page 13: Rear Panel Connections
DSL-2640T ADSL 2+ Router User Guide Rear Panel Connections All cable connections to the Router are made at the rear panel. Connect the power adapter here to power on the Router. Use the Reset button to restore the settings to the factory default values in the next chapter for instructions on using the reset button). -
Page 14: Reset
DSL-2640T ADSL 2+ Router User Guide Reset To Reset the Router to factory default settings including the default IP address 192.168.1.1, depress the reset button on the right side panel with a ballpoint pen, paper clip or similar object for a few seconds. The device will restart with default settings. -
Page 15: Hardware Installation
Hardware Installation The DSL-2640T maintains two separate physical interfaces, an ADSL and an Ethernet interface. Place the Router in a location where it can be connected to the various devices as well as to a power source. The Router should not be located where it will be exposed to moisture or excessive heat. -
Page 16: Network Connections
DSL-2640T ADSL 2+ Router User Guide Network Connections Network connections are provided through the ADSL port and Ethernet port on the back of the Router. See the Rear Panel diagram above and the illustrations below for examples. Connect ADSL Line Use the ADSL cable included with the Router to connect it to a telephone wall socket or receptacle. -
Page 17: Basic Router Configuration
DSL-2640T ADSL 2+ Router User Guide Basic Router Configuration The first time you setup the Router it is recommended that you configure the WAN connection using a single computer connected directly to the Router. Once the WAN connection is functioning properly, you may continue to make changes to Router configuration including IP settings and DHCP setup. -
Page 18: Access The Configuration Manager
DSL-2640T ADSL 2+ Router User Guide Access the Configuration Manager In order to make sure your computer’s IP settings allow it to communicate with the Router, it is advisable to configure your system be a DHCP client – that is, it will get IP settings from the Router. Appendix B describes how to configure different Windows operating systems to “Obtain IP settings automatically”. -
Page 19: Configure The Router
DSL-2640T ADSL 2+ Router User Guide Configure the Router When you successfully connect to the web manager, the Home directory tab will display the Setup Wizard window. You can launch the Setup Wizard from this page or use the buttons located in the left panel of the web page to view other windows used for basic configuration. -
Page 20: Wizard
DSL-2640T ADSL 2+ Router User Guide Wizard To use the Setup Wizard, click the Run Wizard button in the first browser window and follow the instructions in the pop-up window that appears. The initial window summarizes the setup process. Click the Next button to proceed. You may stop using the Setup Wizard at any time by clicking the Exit button. - Page 21 DSL-2640T ADSL 2+ Router User Guide Using the Setup Wizard - Choose Time Zone Choose the time zone you are in from the pull-down menu and click Next. This sets the system time used for the Router. If you wish to return to the previous window during the setup process, click the Back button.
- Page 22 DSL-2640T ADSL 2+ Router User Guide Using the Setup Wizard - Choose Connection Type Now select the Connection Type used for the Internet connection. Your ISP has given this information to you. The connection types available for “Multi-User” Mode are PPPoE/PPPoA, Dynamic IP Address, Static IP Address, and Bridge Mode.
- Page 23 DSL-2640T ADSL 2+ Router User Guide Using the Setup Wizard - For PPPoE/PPPoA connections: 1. Type in the Username and Password used to identify and verify your account to the ISP. 2. Select the specific Connection Type from the drop-down menu. The available PPP connection and encapsulation types are PPPoE LLC, PPPoA LLC and PPPoA VC-Mux.
- Page 24 DSL-2640T ADSL 2+ Router User Guide Using the Setup Wizard - For Dynamic IP Address connections: 1. Select the specific Connection Type from the drop-down menu. The available Dynamic IP Address connection and encapsulation types are 1483 Bridged IP LLC and 1483 Bridged IP VC-Mux.
- Page 25 DSL-2640T ADSL 2+ Router User Guide Using the Setup Wizard - For Static IP Address connections: 1. Select the specific Connection Type from the drop-down menu. The available Static IP Address connection and encapsulation types are 1483 Bridged IP LLC, 1483 Bridged IP VC-Mux, 1483 Routed IP LLC, 1483 Routed IP VC-Mux and IPoA.
- Page 26 DSL-2640T ADSL 2+ Router User Guide Using the Setup Wizard - For Bridge Mode connections: 1. Select the specific Connection Type from the drop-down menu. The available Bridge Mode connection and encapsulation types are 1483 Bridged IP LLC and 1483 Bridged IP VC-Mux.
- Page 27 DSL-2640T ADSL 2+ Router User Guide Using the Setup Wizard - Wireless LAN Configuration Configure the SSID and Channel for the Wireless LAN. You may also configure WEP security settings at this time or configure them later using the web manager. Select None to configure WEP later. To disable the wireless access point, click the Enable AP option box to remove the green check mark.
- Page 28 DSL-2640T ADSL 2+ Router User Guide Using the Setup Wizard - WEP Configuration If you are configuring WEP security, select the Authentication Type, Cipher rate and Encryption Key. Click Next to continue to the final menu.
- Page 29 DSL-2640T ADSL 2+ Router User Guide Using the Setup Wizard - Finish and Restart Finally you can confirm that the setup process is completed. If you are satisfied that you have entered all the necessary information correctly, click the Restart button to save the new configuration settings and restart the Router. If you need to change settings from a previous window, click the Back button.
-
Page 30: Wireless
DSL-2640T ADSL 2+ Router User Guide Wireless To configure the Router’s basic configuration settings without running the Setup Wizard, you can access the windows used to configure Wireless, WAN, LAN, DHCP, DNS, and Dynamic DNS settings directly from the Home directory. -
Page 31: Wireless Security
DSL-2640T ADSL 2+ Router User Guide Wireless Security In the Wireless Settings window, select the type of security you want to configure. The window will change to present the settings specific to the method being configured. The Router’s wireless security options include three levels of WEP encryption, WPA for IEEE 802.1x network authentication, and WPA with a user-configured Pre Shared Key (PSK). - Page 32 DSL-2640T ADSL 2+ Router User Guide 802.1x Some network-security experts now recommend that wireless networks use 802.1X security measures to overcome some weaknesses in standard WEP applications. A RADIUS server is used to authenticate all potential users. Configure the following: •...
- Page 33 DSL-2640T ADSL 2+ Router User Guide WPA (Wi-Fi Protected Access) Wi-Fi Protected Access was designed to provide improved data encryption, perceived as weak in WEP, and to provide user authentication, largely nonexistent in WEP. There are two versions of WPA, both are supported by the Access Point.
- Page 34 DSL-2640T ADSL 2+ Router User Guide 3. In the Group Key Interval entry field, enter a Time (in seconds) after which the Group Key is changed automatically. 4. Select either Radius Server or Pre-Shared Key depending on the varification you are using for the Wireless network.
-
Page 35: Wan
DSL-2640T ADSL 2+ Router User Guide To configure the Router’s basic configuration settings without running the Setup Wizard, you can access the windows used to configure WAN, LAN, DHCP, and DNS settings directly from the Home directory. To access the WAN Settings window, click on the WAN link button on the left side of the first window that appears when you successfully access the web manager. - Page 36 DSL-2640T ADSL 2+ Router User Guide Follow the instructions below to configure a Bridged connection for the WAN interface. To configure a Dynamic IP Address connection, perform the steps listed below. Some of the settings do not need to be changed the first time the device is set up, but can be changed later if you choose.
-
Page 37: Dynamic Ip Address
DSL-2640T ADSL 2+ Router User Guide Dynamic IP Address A Dynamic IP Address connection configures the Router to automatically obtain its global IP address from a DHCP server on the ISP’s network. The service provider assigns a global IP address from a pool of addresses available to the service provider. - Page 38 DSL-2640T ADSL 2+ Router User Guide To configure a Dynamic IP Address connection for the WAN, follow these steps: 1. Choose the Dynamic IP Address option from the WAN Settings pull-down menu. 2. Under the ATM VC Settings at the top of the window should not be changed unless you have been instructed to change them.
- Page 39 DSL-2640T ADSL 2+ Router User Guide Additional settings for Dynamic IP Address connections: Dynamic IP Parameters Description Connection Type This specifies the connection type and encapsulation method used for your Bridged IP LLC Dynamic IP Address connection. The options available are...
-
Page 40: Static Ip Address
DSL-2640T ADSL 2+ Router User Guide Static IP Address When the Router is configured to use Static IP Address assignment for the WAN connection, you must manually assign a global IP Address, Subnet Mask and Gateway IP Address used for the WAN connection. Most users will also need to configure DNS server IP settings in the DNS Configuration window (see below). - Page 41 DSL-2640T ADSL 2+ Router User Guide To configure a Static IP type connection for the WAN, follow these steps: 1. Choose the Static IP Address option from the WAN Settings pull-down menu. 2. Under the ATM VC Settings at the top of the window should not be changed unless you have been instructed to change them.
- Page 42 DSL-2640T ADSL 2+ Router User Guide Additional settings for Static IP Address connections: Static IP Parameters Description Connection Type This specifies the connection type and the encapsulation method used for Bridged IP LLC your Static IP Address connection. The options available are...
-
Page 43: Pppoe/Pppoa
DSL-2640T ADSL 2+ Router User Guide PPPoE/PPPoA Follow the instructions below to configure the Router to use a PPPoE or PPPoA for the Internet connection. Make sure you have all the necessary information before you configure the WAN connection. Most user will only need to change some or all of... - Page 44 DSL-2640T ADSL 2+ Router User Guide PPPoE and PPPoA Settings in detail The example menu below is a section of the WAN settings for PPPoE and PPPoA connection types. Most users will only need to enter a User Name and Password.
- Page 45 DSL-2640T ADSL 2+ Router User Guide 5. Choose the Connection Type from the pull-down menu located under the User Name and Password entry fields. This defines both the connection protocol and encapsulation method used for your ADSL service. The available options are PPPoA VC-Mux, PPPoA LLC and PPPoE LLC. If have not been provided specific information for the Connection Type setting, leave the default setting.
- Page 46 DSL-2640T ADSL 2+ Router User Guide PPPoE/PPPoA Description Parameters User Name For PPP connections, a User Name and Password are used to identify and verify your account to the ISP. Enter the User Name for your ADSL service account. User names and passwords are case-sensitive, so enter this information exactly as given to you by your ISP.
- Page 47 DSL-2640T ADSL 2+ Router User Guide ATM Settings - Traffic Shaping The ATM settings in the WAN Settings windows for the different connection types can be used to adjust QoS parameters for ADSL clients. This may not be available to all ADSL accounts.
- Page 48 DSL-2640T ADSL 2+ Router User Guide ATM Parameters Description (continued) Peak Cell Rate – The PCR is inversely related to the time interval between ATM cells. It is specified for all three service categories (UBR, CBR and VBR) in Kbps.
-
Page 49: Lan
DSL-2640T ADSL 2+ Router User Guide You can configure the LAN IP address to suit your preference. Many users will find it convenient to use the default settings together with DHCP service to manage the IP settings for their private network. The IP address of the Router is the base address used for DHCP. -
Page 50: Dhcp
DSL-2640T ADSL 2+ Router User Guide DHCP The DHCP server is enabled by default for the Router’s Ethernet LAN interface. DHCP service will supply IP settings to workstations configured to automatically obtain IP settings that are connected to the Router though the Ethernet port. -
Page 51: Disable The Dhcp Server
DSL-2640T ADSL 2+ Router User Guide The two options for DHCP service are as follows: You may use the Router as a DHCP server for your LAN. You can disable DHCP service and manually configure IP settings for workstations. You may also configure DNS settings for the LAN when using the Router in DHCP mode. In Auto DNS Mode, the Router will automatically relay DNS settings to properly configured DHCP clients. - Page 52 DSL-2640T ADSL 2+ Router User Guide To manually configure IP settings on Windows workstations, open the TCP/IP Properties menu and select the “Use the following IP address” option. You will need to supply the IP addres, Subnet mask and Defualt gateway (use...
-
Page 53: Dns
DSL-2640T ADSL 2+ Router User Guide The Router can be configured to relay DNS settings from your ISP or another available service to workstations on your LAN. When using DNS relay, the Router will accept DNS requests from hosts on the LAN and forward them to the ISP’s, or alternative DNS servers. -
Page 54: Dynamic Dns
DSL-2640T ADSL 2+ Router User Guide Dynamic DNS The Router supports DDNS (Dynamic Domain Name Service). The Dynamic DNS service allows a dynamic public IP address to be associated with a static host name in any of the many domains, allowing access to a specified host from various locations on the Internet. -
Page 55: Save Settings And Reboot
Save Settings and Reboot When you have configured the DSL-2640T with the settings you desire, make sure you save those settings. To save the system configuration settings, click the Tools tab. You will be presented first with the Administrator Settings window. -
Page 56: Multiple Virtual Connections
DSL-2640T ADSL 2+ Router User Guide Multiple Virtual Connections The Router supports multiple virtual connections. Up to eight PVCs to eight separate destinations can be created and operated simultaneously utilizing the same bandwidth. Additional PVC connections can be added for various purposes. - Page 57 DSL-2640T ADSL 2+ Router User Guide To add a new virtual connection: 1. Select the new PVC to configure from the pull-down menu. 2. Enter the values for the VPI and VCI given to you by your service provider. 3. To activate the VC, select Enabled from the Virtual Circuit pull-down menu.
-
Page 58: Advanced Management
DSL-2640T ADSL 2+ Router User Guide Advanced Management This chapter introduces and describes the management features that have not been presented in the previous chapter. These include the more advanced features used for network management and security as well as administrative tools to manage the Router, view statistics and other information used to examine performance and for troubleshooting. -
Page 59: Upnp
DSL-2640T ADSL 2+ Router User Guide UPnP UPnP supports zero-configuration networking and automatic discovery for many types of networked devices. When enabled, it allows other devices that support UPnP to dynamically join a network, obtain an IP address, convey its capabilities, and learn about the presence and capabilities of other devices. -
Page 60: Virtual Server
(WAN-to-LAN) traffic. The Virtual Server function allows remote users to access services on your LAN such as FTP for file transfers or SMTP and POP3 for e-mail. The DSL-2640T will accept remote requests for these services at your Global IP Address, using the specified TCP or UDP protocol and port number, and then redirect these requests to the server on your LAN with the LAN IP address you specify. - Page 61 DSL-2640T ADSL 2+ Router User Guide You may also create customized rules to manage TCP/UDP ports. The pre-configured rules include those listed in the table here: Category Available Rules Games: Alien vs. Predator, Asheron’s Call, Dark Rein 2, Delta Force, Doom, Dune 2000, DirectX (7.8) Games, EliteForce, EverQuest, Fighter Ace II, Half Life,...
- Page 62 DSL-2640T ADSL 2+ Router User Guide Custom Forwarding Rules The User category for port forwarding is used to set up customized port forwarding rules. To set up custom TCP or UDP port forwarding rules, follow these steps: 1. Select the User category and click the Add button located below the Available Rules list. This will change the window to look like the window below.
-
Page 63: Lan Clients
DSL-2640T ADSL 2+ Router User Guide LAN Clients The LAN Clients window is used when establishing port forwarding rules in the Virtual Server and Filters windows. This window can be accessed directly by clicking on the LAN Clients button in the Advanced tab. In order to use these advanced features it is necessary to have IP addresses available for configuration. -
Page 64: Snmp
DSL-2640T ADSL 2+ Router User Guide SNMP Simple Network Management Protocol is a standard for internetwork and intranetwork management. SNMP Management window Configure these parameters for SNMP on the Router: SNMP Category Parameters This is used to enable or disable SNMP Agent and SNMP Traps or edit client SNMP Management SNMP Name, Location and Contact. -
Page 65: Filters
DSL-2640T ADSL 2+ Router User Guide Filters Filter rules in the Router are put in place to allow or block specified traffic. The Filter Rules however can be used in a single direction to examine and then Allow or Deny traffic for Inbound (WAN to LAN) or Outbound (LAN to WAN) routed data. -
Page 66: Destination Port
DSL-2640T ADSL 2+ Router User Guide Click the Apply button to put the new rule into effect. Any filter rule configured in the menu will appear in the Filters List with the new settings. The Router must save the new settings and reboot before the new rules are applied. -
Page 67: Bridge Filters
DSL-2640T ADSL 2+ Router User Guide Bridge Filters Bridge filters are used to block or allow various types of packets through the WAN interface. This may be done for security or to improve network efficiency. The rules are configured for individual devices based on MAC address. Filter rules can be set up for source, destination or both. -
Page 68: Static Routing
DSL-2640T ADSL 2+ Router User Guide Static Routing Use Static Routing to specify a route used for data traffic within your Ethernet LAN or to route data on the WAN. This is used to specify that all packets destined for a particular network or subnet use a predetermined gateway. -
Page 69: Dmz
DSL-2640T ADSL 2+ Router User Guide Firewalls may conflict with certain interactive applications such as video conferencing or playing Internet video games. For these applications, a firewall bypass can be set up using a DMZ IP address. The DMZ IP address is a “visible”... -
Page 70: Parental Control
DSL-2640T ADSL 2+ Router User Guide Parental Control Use Parental Controls to deny access to specified websites or websites containing specified words in the URL. Parental Control menu... -
Page 71: Url Blocking
DSL-2640T ADSL 2+ Router User Guide URL Blocking URL or Uniform Resource Locator is a specially formatted text string that uniquely defines an Internet website. This window will allow users to block computers on the LAN from accessing certain URLs. This may be accomplished by simply entering the URL to be blocked in the URL Address field. -
Page 72: Firewall
DSL-2640T ADSL 2+ Router User Guide Firewall The Firewall Configuration window allows the Router to enforce specific predefined policies intended to protect against certain common types of attacks. There are two general types of protection (DoS, Port Scan) that can be enabled on the Router, as well as filtering for specific packet types sometimes used by hackers. -
Page 73: Rip
DSL-2640T ADSL 2+ Router User Guide A DoS "denial-of-service" attack is characterized by an explicit attempt by attackers to prevent legitimate users of a service from using that service. Examples include: attempts to "flood" a network, thereby preventing legitimate network traffic, attempts to disrupt connections between two machines, thereby preventing access to a service, attempts to prevent a particular individual from accessing a service, or, attempts to disrupt service to a specific system or person. -
Page 74: Ppp
DSL-2640T ADSL 2+ Router User Guide When the WAN connection is configured for either PPPoA or PPPoE, you can configure the Router’s PPP session to remain on all the time, or to disconnect after some period of no activity. You may also choose to instruct the Router to connect each time you want to access the WAN or the Internet. -
Page 75: Adsl
DSL-2640T ADSL 2+ Router User Guide ADSL The ADSL Configuration window allows the user to set the configuration for ADSL protocols. For most ADSL accounts the default settings ADSL2+(Multi-mode) will work. This configuration works with all ADSL implementations. If you have been given instructions to change the Modulation method used, select the desired option from the Modulation Type drop-down menu and click the Apply button. -
Page 76: Atm Vcc
DSL-2640T ADSL 2+ Router User Guide ATM VCC The ATM VC Setting window is used to configure the WAN connection. If you are using multiple PVCs, you can change the configuration of any PVC in this window. To create new or additional PVCs, read the section on Multiple PVCs on page 53. -
Page 77: Qos
DSL-2640T ADSL 2+ Router User Guide QoS or Quality of Service is used to assign priority for qualified traffic that passes through the Router’s wired interfaces (LAN and WAN). The Router uses four priority levels with “1” being the highest priority while “4” is the lowest. - Page 78 DSL-2640T ADSL 2+ Router User Guide QoS Configuration window for Port Mapping QoS The Router can also be configured to use the QoS infomation contained in the header of IP packets. This will open the following window. To set IP QoS for the router, first click the IP QoS check box in the middle of the window. Then select the PVC to associate with the corresponding action and choose a maximum bandwidth and classification for this combination.
- Page 79 DSL-2640T ADSL 2+ Router User Guide QoS Configuration window IP QoS If you select Disable in the Classified by drop-down menu, you can assign a maximum allowed bandwidth of between 64 kbps and Auto to each of the PVCs configured on the router.
- Page 80 DSL-2640T ADSL 2+ Router User Guide Additional options become available when you select either ToS, Application, or User Define from the Classified by drop-down menu. Selecting ToS will display the following window. QoS Configuration window IP QoS for ToS From this window you can input a Weight in percentage and a priority range that will determine the mechanism by which the four priority levels are “mapped”.
- Page 81 DSL-2640T ADSL 2+ Router User Guide If you select Application from the Classified by drop-down menu, the following window appears. QoS Configuration window IP QoS for Application On this window, you can select the mechanism by which the four priority queues are emptied by assigning a weight, in percentage terms, to each priority queue, and then assigning a packet type that can be associated with an application type.
- Page 82 DSL-2640T ADSL 2+ Router User Guide If you select User Define in the Classified by drop-down menu, the following window appears. QoS Configuration window IP QoS for User Define On this window, you can assign a weight, on a percentage basis, to each of the four priority queues. In addition, you can specify the number of bytes from the beginning of a given packet’s IP header to set a pointer.
-
Page 83: Wireless Management
DSL-2640T ADSL 2+ Router User Guide Wireless Management The Wireless Management menu includes separate menus for Access List, Associated Stations display, Multiple SSID operation and WDS (Wireless Distribution System). Click the appropriate radio button to view the menu for any of these Wireless Management menus. -
Page 84: Associated Stations
DSL-2640T ADSL 2+ Router User Guide Associated Stations Use the Associated Stations list to view wireless stations currently associated with the access point. Wireless Management – Associated Stations display The Associated Stations list displays the MAC address of stations currently associated with the Access Point. Any station on the list can be banned and have the MAC address added to the Access List of MAC addresses denied access. -
Page 85: Multiple Ssid
DSL-2640T ADSL 2+ Router User Guide Multiple SSID The access point in the Router supports use of multiple SSIDs. Up to 4 SSIDs may be used. Use the Multiple SSID menu to enable, create and configure additional SSIDs for your wireless network. -
Page 86: Wireless Distribution System
DSL-2640T ADSL 2+ Router User Guide Wireless Distribution System The Router’s access point supports Wireless Distribution System (WDS) to enable interconnection with other access points through the wireless network. WDS facilitates roaming between different access points and connectivity to the Ethernet and Internet. - Page 87 DSL-2640T ADSL 2+ Router User Guide WDS Mode Parameters In bridge mode, the access point communicates only with other access points. No wireless clients can associate with an access point in bridge mode. In bridge mode, the access point has the option of acting as a Root (click the Activate as Root box to enable).
-
Page 88: Wireless Performance
DSL-2640T ADSL 2+ Router User Guide Wireless Performance The Wireless Performance window is used to configure settings for the Access Point feature of this device. Configuring these settings may increase the performance of your router but if you are not familiar with networking devices and protocols, this section should be left at its default settings. - Page 89 DSL-2640T ADSL 2+ Router User Guide Performance Parameter Description Beacons are emitted from the router in order to synchronize the wireless Beacon Interval network. You may set the Beacon Interval range between 20-100 microseconds per beacon sent. The default is 100.
-
Page 90: Tools
DSL-2640T ADSL 2+ Router User Guide Tools Click the Tools tab to reveal the window buttons for various functions located in this directory. The Administrator Settings window is the first item in the Tools directory. This window is used to change the system password used to access the web manager, to save or load Router configuration settings and to restore default settings. -
Page 91: Change System Password
DSL-2640T ADSL 2+ Router User Guide Change System Password Click the Admin button in the Tools directory to view the the Administrator Settings menu. Select the password level being changed, click the Modify admin password option to change Admistrator level password or Modify user password option to change the user level password. -
Page 92: Remote Web Management And Remote Telnet Access
DSL-2640T ADSL 2+ Router User Guide Remote Web Management and Remote Telnet Access The Administrator Settings window is also used to enable remote Telnet management, remote SSH management and remote web management access to the Router. In each case, the procedure to enable remote management of the Router is the same. First, select the State Enabled radio button for Remote Web Management, Remote Telnet Management, or Remote SSH Management, and then type the IP Address and Netmask of the remote network or system used for management. -
Page 93: Time
DSL-2640T ADSL 2+ Router User Guide Time The Router provides a number of options to maintain current date and time including SNTP. Time menu To configure system time on the Router, select the method used to maintain time. The options available include SNTP, using your computer’s system clock (default) or set the time and date manually. -
Page 94: Remote Log
DSL-2640T ADSL 2+ Router User Guide Remote Log Us the Remote Log Settings window to set up logging to servers or computers that are located outside the LAN or subnet of the Router. Remote Log Settings window Select the Log Level from the pull-down menu. The levels available are: Alert, Critical, Debug, Error, Info, Notice, Panic and Warning. -
Page 95: Save Or Load Configuration File
DSL-2640T ADSL 2+ Router User Guide Save or Load Configuration File Once you have configured the Router to your satisfaction, it is a good idea to back up the configuration file to your computer. To save the current configuration settings to your computer, click the System button in the Tools directory to display the System Settings window. -
Page 96: Firmware Upgrade
DSL-2640T ADSL 2+ Router User Guide Firmware Upgrade Performing a Firmware Upgrade can sometimes change the configuration settings. Be sure to back-up the Router’s configuration settings before upgrading the firmware. Note Use the Firmware Upgrade window to load the latest firmware for the device. Note that the device configuration settings may return to the factory default settings, so make sure you save the configuration settings with the System Settings window described above. -
Page 97: Miscellaneous Configuration
DSL-2640T ADSL 2+ Router User Guide Miscellaneous Configuration To perform a statndard Ping test for network connectivity, click the Misc. window button in the Tools directory to view the Miscellaneous Configuration window. Miscellaneous Configuration window Other functions available in Miscellaneous Configuration menu are a Ping test and IGMP enable/disable. -
Page 98: Diagnostic Test
DSL-2640T ADSL 2+ Router User Guide Diagnostic Test The Diagnostic Test window is used to test connectivity of the Router. A Ping test may be done through the local or external interface to test connectivity to known IP addresses. The diagnostics feature executes a series of test of your system software and hardware connections. -
Page 99: Status
DSL-2640T ADSL 2+ Router User Guide Status Use the various read-only windows to view system information and monitor performance. Device Info Use the Device Information window to quickly view basic current information about the LAN and WAN interfaces and device information including Firmware Version and MAC address. -
Page 100: Dhcp Clients
DSL-2640T ADSL 2+ Router User Guide DHCP Clients... -
Page 101: Log
DSL-2640T ADSL 2+ Router User Guide The system log displays chronological event log data. Use the navigation buttons to view or scroll log pages. You may also save a simple text file containing the log to your computer. Click the Save Log button and follow the prompts to save the file. -
Page 102: Statistics
DSL-2640T ADSL 2+ Router User Guide Statistics Use the Traffic Statistics window to monitor traffic on the Ethernet, or ADSL connection. Select the interface for which you want to view packet statistics and the information will appear below. Traffic Statistics window... -
Page 103: Adsl Status
DSL-2640T ADSL 2+ Router User Guide ADSL Status Use the ADSL Status window for troubleshooting the ADSL connection. ADSL Status information... -
Page 104: Help
DSL-2640T ADSL 2+ Router User Guide Help Help window Click the desired hyperlink to access help files. -
Page 105: Technical Specifications
DSL-2640T ADSL 2+ Router User Guide Technical Specifications General ADSL Standards ADSL2 Standards • ANSI T1.413 Issue 2 • ITU G.992.3 (G.dmt.bis) Annex A • ITU G.992.1 (G.dmt) Annex A • ITU G.992.4 (G.lite.bis) Annex A ADSL Standards: • ITU G.992.2 (G.lite) Annex A •... -
Page 106: Power Adapter
DSL-2640T ADSL 2+ Router User Guide Physical and Environmental DC Inputs: Input: 120V AC 60Hz Output: 12V AC, 1200mA Power Adapter: Power 10 Watts (max) Consumption: Operating 0° to 40°C Temperature: Storage -20° to 70°C Temperature Humidity: 5% to 95% (non-condensing) Dimensions: 109 mm x 142.8 mm x 32.1 mm... -
Page 107: Operating Range
DSL-2640T ADSL 2+ Router User Guide Wireless Standards IEEE 802.11g, IEEE 802.11b Modulation IEEE 802.11b: DQPSK, DBPSK, DSSS, and CCK IEEE 802.11g: BPSK, QPSK, 16QAM, 64QAM, OFDM Frequency 2.4 GHz to 2.46 GHz (2400 ~ 2484.5MHz ISM band) Operating Range Indoors –... -
Page 108: Configuring Ip Settings On Your Computer
DSL-2640T ADSL 2+ Router User Guide Configuring IP Settings on Your Computer In order to configure your system to receive IP settings from the Router it must first have the TCP/IP protocol installed. If you have an Ethernet port on your computer, it probably already has TCP/IP protocol installed. If you are using Windows XP the TCP/IP is enabled by default for standard installations. - Page 109 DSL-2640T ADSL 2+ Router User Guide Click Network and Internet Connections. In the Network and Internet Connections window, click Network Connections. Click Network Connections. 4. In the Network Connections window, right-click on Local Area Connection, then click Properties. Right-click Local...
- Page 110 DSL-2640T ADSL 2+ Router User Guide 5. In the General tab of the Local Area Connection Properties window, highlight Internet Protocol (TCP/IP) under “This connection uses the following items:” by clicking on it once. Click on the Properties button. Click Properties.
-
Page 111: Windows 2000
DSL-2640T ADSL 2+ Router User Guide Windows 2000 First, check for the IP protocol and, if necessary, install it: 1. In the Windows task bar, click the Start button, point to Settings, and then click Control Panel. 2. Double-click the Network and Dial-up Connections icon. - Page 112 DSL-2640T ADSL 2+ Router User Guide Windows 95 and Windows 98 First, check for the IP protocol and, if necessary, install it: 1. In the Windows task bar, click the Start button, point to Settings, and then click Control Panel. Double-click the Network icon.
- Page 113 DSL-2640T ADSL 2+ Router User Guide Your computer is now ready to use the Router’s DHCP server. Windows NT 4.0 Workstations First, check for the IP protocol and, if necessary, install it: 1. In the Windows NT task bar, click the Start button, point to Settings, and then click Control Panel.
-
Page 114: Low Pass Filters For Dsl
DSL-2640T ADSL 2+ Router User Guide Low Pass Filters for DSL Most ADSL clients will be required to install a simple device that prevents the ADSL line from interfering with regular telephone services. These devices are commonly referred to as microfilters or low pass filters. The two basic styles of low pass filters commonly used are described below. - Page 115 DSL-2640T ADSL 2+ Router User Guide Three Port Filter Another style of filter is installed at the same point where the Router connects to the telephone line. Only a single filter is required. The connection ports are typically labeled as follows: Line - This port connects to the wall jack.
-
Page 116: International Offices
DSL-2640T ADSL 2+ Router User Guide International Offices U.S.A Spain Turkey 17595 Mt. Herrmann Street Avenida Diagonal, 593-95, 9th floor Cetin Emec Bulvari, 74.sokak, ABC Plaza No:9/3 Fountain Valley, CA 92708 08014 Barcelona Ovecler/Ankara- TURKEY TEL: 1-800-326-1688 Spain TEL: 0090 312 473 40 55 URL: www.dlink.com...
Need help?
Do you have a question about the DSL-2640T and is the answer not in the manual?
Questions and answers