Table of Contents
Advertisement
Quick Links
- 1 Configuration Requirements
- 2 Connecting a Netscaler Sdx Appliance to the Network
- 3 Setting up Connectivity
- 4 Initial Configuration through the Management Service User Interface
- 5 To Configure the Netscaler Sdx Appliance by Using the Serial Console
- 6 Initial Configuration through the Serial Console
- 7 System Specifications
- Download this manual
See also:
Manual
Advertisement
Table of Contents

Subscribe to Our Youtube Channel
Related Manuals for Citrix SDX 11500

Summary of Contents for Citrix SDX 11500
- Page 1 Citrix NetScaler 10 Quick Start Guide: 11500/13500/14500/16500/18500/20500 Platform Citrix NetScaler 10...
- Page 2 XenCenter, XenClient, XenDesktop, XenEnterprise, XenServer, XenSource, Xen Data Center, and Zenprise are trademarks of Citrix Systems, Inc. and/or one of its subsidiaries, and may be registered in the U.S. and other countries. Other product and company names mentioned herein may be trademarks of their respective companies.
-
Page 3: Quick Installation And Configuration
Citrix NetScaler SDX 11500, SDX 13500, SDX 14500, SDX 16500, SDX 18500, and SDX 20500 The Citrix NetScaler models SDX 11500/13500/14500/16500/18500/20500 are 2U appliances. Each model has two 6-core processors for a total of 12 physical cores (24 cores with hyper-threading), and 48 gigabytes (GB) of memory. -
Page 4: Configuration Requirements
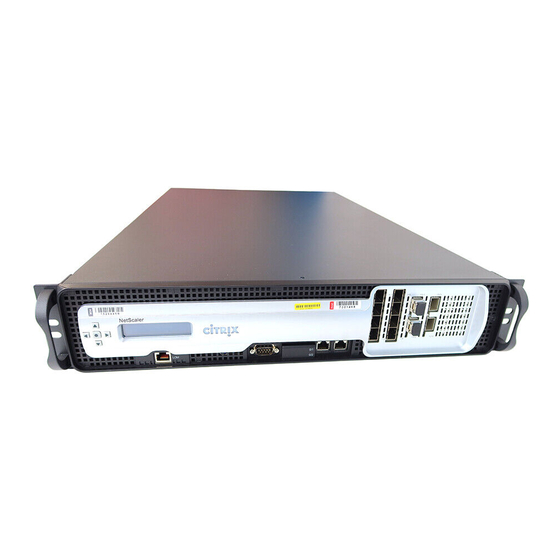
Quick Installation and Configuration Figure 1-1. Citrix NetScaler SDX 11500/13500/14500/16500/18500/20500 appliance, front panel The following figure shows the back panel of the SDX 11500/13500/14500/16500/18500/20500 appliance. Figure 1-2. Citrix NetScaler SDX 11500/13500/14500/16500/18500/20500 appliance, back panel Configuration Requirements Determine the following information for performing the initial configuration. -
Page 5: Installation
Citrix NetScaler 10 Quick Start Guide: SDX 11500/13500/14500/16500/18500/20500 Platform w Root password: The root user (nsroot) has full administrative privileges on the appliance. The root password is used to authenticate the root user. The default root password is nsroot. You can change this password during initial configuration of the appliance. -
Page 6: Rack Precautions
Installing Transceivers The SDX appliances support only fiber transceivers in the 10GE ports. Warning: Only those transceivers provided by Citrix Systems, Inc. are supported. You must not attempt to install third-party transceivers. Doing so voids the warranty. To install the transceiver 1. -
Page 7: Connecting A Netscaler Sdx Appliance To The Network
Citrix NetScaler 10 Quick Start Guide: SDX 11500/13500/14500/16500/18500/20500 Platform Connecting a NetScaler SDX Appliance to the Network Connect the interfaces on the appliance to the network ports on the appropriate switches by using Ethernet/fiber optic cables. Figure 1-4. Connecting a Citrix NetScaler SDX appliance to the network Warning: Connecting multiple network ports to the same switch or VLAN can result in a network loop. -
Page 8: Electrical Safety Precautions
Quick Installation and Configuration Note: Electrical Safety Precautions Caution: During installation or maintenance procedures, wear a grounding wrist strap to avoid ESD damage to the electronics of the appliance. Use a conductive wrist strap attached to a good earth ground or to the appliance. You can attach it to the connector beside the ESD symbol on the back. -
Page 9: Initial Configuration Through The Management Service User Interface
Citrix NetScaler 10 Quick Start Guide: SDX 11500/13500/14500/16500/18500/20500 Platform Initial Configuration through the Management Service User Interface To set up the appliance by using the Management Service user interface, connect a workstation or laptop to the same network as the appliance. -
Page 10: Initial Configuration Through The Serial Console
Quick Installation and Configuration Note: After changing the network configuration, close all browser instances and open a new browser instance to access the appliance. Initial Configuration through the Serial Console To perform initial configuration of the SDX appliance from outside the L2 domain, connect to the console port of the appliance and follow the instructions carefully. -
Page 11: Changing The Password Of The Default User Account
Citrix NetScaler 10 Quick Start Guide: SDX 11500/13500/14500/16500/18500/20500 Platform Changing the Password of the Default User Account The default user account provides complete access to all features of the Citrix NetScaler SDX appliance. Therefore, to preserve security, the nsroot account should be used only when necessary, and only individuals whose duties require full access should know the password for the nsroot account. -
Page 12: Power Cycling The Appliance
Quick Installation and Configuration 4. In the Password box, type nsroot. 5. In the Configuration tab, click Network and type values for the following parameters: • IP Address—IP address of the LOM port. • Subnet Mask—Subnet mask used to define the subnet of the LOM port. •... -
Page 13: Additional Information
Citrix NetScaler 10 Quick Start Guide: SDX 11500/13500/14500/16500/18500/20500 Platform Specifications 11500/13500/14500/16500/18500/205 Number of power supplies AC power supply input voltage, 100-240 VAC frequency, and current 50-60 Hz 6.5-3.5 A Maximum power consumption 650 W Heat dissipation 2200 BTU per hour... - Page 14 Quick Installation and Configuration 2. Click the Documentation tab. 3. To view a short description of each document, hover your cursor over the title. To open a document, click the title. To contact Citrix Support, call 1-800-4-CITRIX (1-800-424-8749), or log on to MyCitrix at http://www.citrix.com.
Need help?
Do you have a question about the SDX 11500 and is the answer not in the manual?
Questions and answers