Philips BTM2310 User Manual
Hide thumbs
Also See for BTM2310:
- Service manual (25 pages) ,
- Short user manual (2 pages) ,
- User manual (22 pages)

Subscribe to Our Youtube Channel
Related Manuals for Philips BTM2310


Summary of Contents for Philips BTM2310
- Page 1 Always there to help you Register your product and get support at www.philips.com/welcome BTM2310 Question? Question? Contact Contact Philips Philips User manual...
- Page 1 Always there to help you Register your product and get support at www.philips.com/support BTM2310 Question? Question? Contact Contact Philips Philips User manual...
-
Page 3: Table Of Contents
Contents 8 Troubleshooting 9 Notice 1 Important Safety 2 Your micro system Introduction What's in the box Overview of the main unit Overview of the remote control 3 Get started Connect speakers Connect power Demonstrate the features Prepare the remote control Set clock Turn on 4 Play... -
Page 4: Important
1 Important • Protect the power cord from being walked on or pinched, particularly at plugs, convenience receptacles, and the point where they exit from the device. • Only use attachments/accessories specified by the manufacturer. Safety • Use only with the cart, stand, tripod, bracket, or table specified by the manufacturer or sold with the device. -
Page 4: Important
1 Important • Protect the power cord from being walked on or pinched, particularly at plugs, convenience receptacles, and the point where they exit from the device. • Only use attachments/accessories specified by the manufacturer. Safety • Use only with the cart, stand, tripod, bracket, or table specified by the manufacturer or sold with the device. - Page 5 • Where the MAINS plug or an appliance coupler is used as the disconnect device, the disconnect device shall remain readily operable. Warning • Never remove the casing of this device. • Never lubricate any part of this device. • Never place this device on other electrical equipment.
- Page 5 • Where the MAINS plug or an appliance coupler is used as the disconnect device, the disconnect device shall remain readily operable. Warning • Never remove the casing of this device. • Never lubricate any part of this device. • Never place this device on other electrical equipment.
-
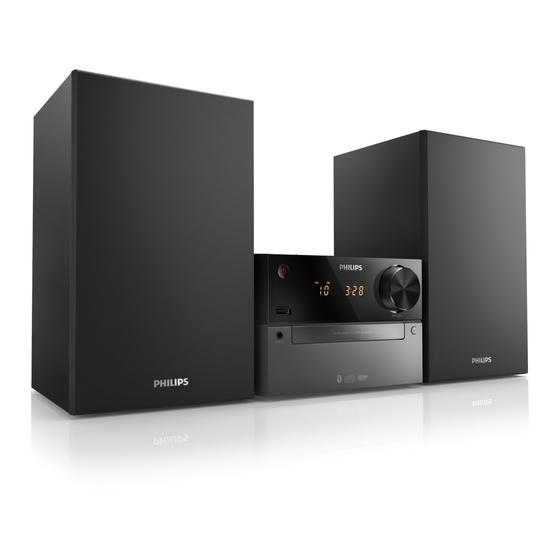
Page 6: Your Micro System
Main unit Congratulations on your purchase, and • 2 x speakers welcome to Philips! To fully benefit from the • Remote control (with one AAA battery) support that Philips offers, register your product • Short user manual at www.philips.com/welcome. • Safety and notice Introduction With this unit, you can: •... -
Page 7: Overview Of The Main Unit
Overview of the main unit h SOURCE • Select a source: DISC, USB, TUNER, • Turn on the product. AUDIO IN, BT (Bluetooth). • Switch to standby mode or Eco power standby mode. • Start, pause, or resume play. b Display panel • Show current status. -
Page 7: Overview Of The Main Unit
Overview of the main unit h SOURCE • Select a source: DISC, USB, TUNER, • Turn on the product. AUDIO IN, BT (Bluetooth). • Switch to standby mode or Eco power standby mode. • Start, pause, or resume play. b Display panel • Show current status. -
Page 8: Overview Of The Remote Control
f VOL +/- Overview of the remote • Adjust volume. control g MUTE • Mute or restore volume. h SOUND • Enrich sound effect with Digital Sound Control (DSC). i CLOCK AUDIO IN • Set the clock. PRESET/ALBUM • View clock information. j SLEEP/TIMER • Set sleep timer. -
Page 9: Get Started
Before you connect the AC power cord, ensure that you have completed all other connections. sequence. If you contact Philips, you will be asked for the model and serial number of this apparatus. The model number and serial number are on the back of the apparatus. -
Page 9: Get Started
Before you connect the AC power cord, ensure that you have completed all other connections. sequence. If you contact Philips, you will be asked for the model and serial number of this apparatus. The model number and serial number are on the back of the apparatus. -
Page 10: Set Clock
To insert the remote control battery: Turn on Open the battery compartment. Insert the supplied AAA battery with Press . correct polarity (+/-) as indicated. » The unit switches to the last selected Close the battery compartment. source. Switch to standby mode Press again to switch the unit to standby mode. -
Page 11: Play
4 Play Insert a USB device into the socket. » Play starts automatically. If not, press Play from disc Press CD to select the CD source. Press to open the disc compartment. Insert a disc with printed side facing upward. Press to close the disc compartment. -
Page 11: Play
4 Play Insert a USB device into the socket. » Play starts automatically. If not, press Play from disc Press CD to select the CD source. Press to open the disc compartment. Insert a disc with printed side facing upward. Press to close the disc compartment. -
Page 12: Control Play
Program tracks You can program a maximum of 20 tracks. Press PROG to activate the program mode. For MP3 tracks, press to select an album. Press to select a track, and then press PROG to confirm. Repeat steps 2-3 to program more tracks. Press to play the programmed tracks. -
Page 12: Control Play
Program tracks You can program a maximum of 20 tracks. Press PROG to activate the program mode. For MP3 tracks, press to select an album. Press to select a track, and then press PROG to confirm. Repeat steps 2-3 to program more tracks. Press to play the programmed tracks. - Page 13 Bluetooth and search for Bluetooth devices that can be paired (refer to the user manual of the device). Select 'PHILIPS BTM2310' on your Bluetooth enabled device and if necessary input '0000' as the pairing password. » After successful pairing and connection, the Bluetooth indicator turns solid blue, and the unit beeps.
- Page 13 Bluetooth and search for Bluetooth devices that can be paired (refer to the user manual of the device). Select 'PHILIPS BTM2310' on your Bluetooth enabled device and if necessary input '0000' as the pairing password. » After successful pairing and connection, the Bluetooth indicator turns solid blue, and the unit beeps.
-
Page 14: Listen To The Radio
5 Listen to the Program radio stations radio manually Tune to a radio station. Tune to a radio station Press PROG, and then press select a number from 1–20. Press PROG to confirm. » The preset number and the frequency • Position the antenna as far as possible from TV, VCR, or of the preset station are displayed. -
Page 15: Other Features
6 Other features Set the sleep timer To set the sleep timer, in turn on mode, press SLEEP/TIMER repeatedly to select a set period of time (in minutes). Set the alarm timer » When sleep timer is activated, displayed. Otherwise, disappears. -
Page 15: Other Features
6 Other features Set the sleep timer To set the sleep timer, in turn on mode, press SLEEP/TIMER repeatedly to select a set period of time (in minutes). Set the alarm timer » When sleep timer is activated, displayed. Otherwise, disappears. -
Page 16: Product Information
7 Product Tuner Sensitivity - Mono, 26dB S/N Ratio <22 dB u information - Stereo, 46dB S/N Ratio <45 dB u Search Selectivity <30 dB u Total Harmonic Distortion <3% Signal to Noise Ratio >45 dBA Note • Product information is subject to change without prior notice. -
Page 16: Product Information
7 Product Tuner Sensitivity - Mono, 26dB S/N Ratio <22 dB u information - Stereo, 46dB S/N Ratio <45 dB u Search Selectivity <30 dB u Total Harmonic Distortion <3% Signal to Noise Ratio >45 dBA Note • Product information is subject to change without prior notice. -
Page 17: Usb Playability Information
USB playability information Compatible USB devices: • USB flash memory (USB2.0 or USB1.1) • USB flash players (USB2.0 or USB1.1) • memory cards (requires an additional card reader to work with this unit) Supported USB formats: • USB or memory file format: FAT12, FAT16, FAT32 (sector size: 512 bytes) • MP3 bit rate (data rate): 32-320 Kbps and variable bit rate •... -
Page 17: Usb Playability Information
USB playability information Compatible USB devices: • USB flash memory (USB2.0 or USB1.1) • USB flash players (USB2.0 or USB1.1) • memory cards (requires an additional card reader to work with this unit) Supported USB formats: • USB or memory file format: FAT12, FAT16, FAT32 (sector size: 512 bytes) • MP3 bit rate (data rate): 32-320 Kbps and variable bit rate •... - Page 18 Cannot display some files in USB device requesting service. If the problem remains • unsolved, go to the Philips Web page (www. The number of folders or files in the USB philips.com/support). When you contact Philips, device has exceeded a certain limit. This phenomenon is not a malfunction.
- Page 18 Cannot display some files in USB device requesting service. If the problem remains • unsolved, go to the Philips Web page (www. The number of folders or files in the USB philips.com/support). When you contact Philips, device has exceeded a certain limit. This phenomenon is not a malfunction.
- Page 19 • This unit is already connected with another Bluetooth-enabled device. Disconnect that device and then try again. The paired mobile device connects and disconnects constantly. • The Bluetooth reception is poor. Move the device closer to this unit or remove any obstacle between them.
- Page 19 • This unit is already connected with another Bluetooth-enabled device. Disconnect that device and then try again. The paired mobile device connects and disconnects constantly. • The Bluetooth reception is poor. Move the device closer to this unit or remove any obstacle between them.
- Page 20 We have tried to make the packaging easy to requirements and other relevant provisions separate into three materials: cardboard (box), of Directive 1999/5/EC. You can find the polystyrene foam (buffer) and polyethylene Declaration of Conformity on www.philips.com/ (bags, protective foam sheet.) support. Your system consists of materials which can be recycled and reused if disassembled by a specialized company.
- Page 20 We have tried to make the packaging easy to requirements and other relevant provisions separate into three materials: cardboard (box), of Directive 1999/5/EC. You can find the polystyrene foam (buffer) and polyethylene Declaration of Conformity on www.philips.com/ (bags, protective foam sheet.) support. Your system consists of materials which can be recycled and reused if disassembled by a specialized company.
- Page 21 Note • The type plate is located on the back of the device.
- Page 21 Note • The type plate is located on the back of the device.
- Page 22 2014 © WOOX Innovations Limited. All rights reserved. Philips and the Philips’ Shield Emblem are registered trademarks of Koninklijke Philips N.V. and are used by WOOX Innovations Limited under license from Koninklijke Philips N.V. BTM2310_12_UM_V1.0...
- Page 22 2014 © WOOX Innovations Limited. All rights reserved. Philips and the Philips’ Shield Emblem are registered trademarks of Koninklijke Philips N.V. and are used by WOOX Innovations Limited under license from Koninklijke Philips N.V. BTM2310_12_UM_V3.0...
Need help?
Do you have a question about the BTM2310 and is the answer not in the manual?
Questions and answers
Bluetooth not working on stereo system, I am able to connect it to my speaker from my phone but on the stereo system it states “no BT” even while being connected on my Spotify. It allows me to play from my phone to the speaker but no volume comes out whatsoever
If Bluetooth is not working on your Philips BTM2310 stereo system, try the following:
1. Make sure the device supports the Bluetooth profiles required by the unit.
2. Enable the Bluetooth function on your device.
3. Move the device closer to the stereo system to improve reception.
4. Remove any obstacles between the device and the unit.
5. Disconnect and reconnect the AC power plug, then turn the unit on again.
This answer is automatically generated