Table of Contents
Advertisement
Advertisement
Table of Contents

Subscribe to Our Youtube Channel
Summary of Contents for In studio Cayman
- Page 1 Cayman – Wireless Stereo 900MHz Speaker System User Manual...
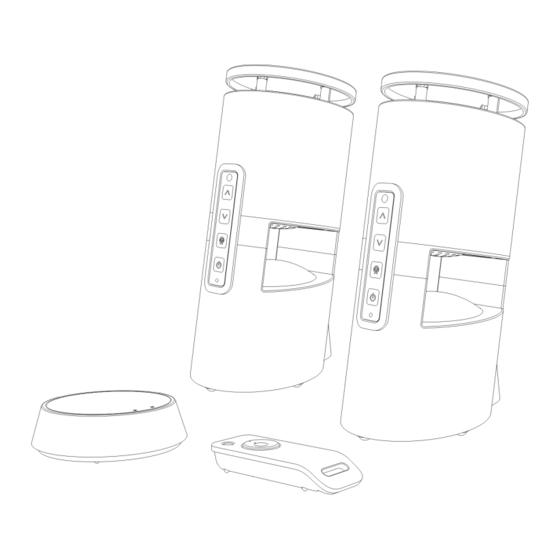
- Page 2 FEATURES • Automatic Phases Lock Loop (PLL) scanning system on speaker receivers and transmitter • 900 MHz RF technology panel-like speaker systems. • Operating distance up to 50 m (150 feet) • Virtually interference free stereo quality • Auto tuning function • Stereo (L and R) and Mono Selection • Remote Control PACKAGE INCLUDES 1 x Transmitter 1 x AC/DC 8V 200mA Power Adapter for Transmitter 2 x Speakers 2 x AC/DC 9V 1.2A Power Adapter for Speakers 1 x 1.5 m Audio Cable PRODUCT OVERVIEW TRANSMITTER SPEAKER RECEIVERS 1. Power LED Indicator REMOTE CONTROL 2. Signal LED Indicator 3. Audio In 4. Channel Selector 5. DC In For Transmitter 6. InfraRed Receiver 7. Volume Up 8. Volume Down 9. Tune...
- Page 3 INSTALLATION TRANSMITTER Power Outlet 1. Plug the supplied 8V AC/DC power adapter into the DC jack located on the rear of the transmitter. 2. Connect the supplied 8V AC/DC power adapter to an electrical wall outlet. The Power LED lights up. 3. Connect the transmitter to the audio output jack of your TV, Monitor, VCR, Radio, CD, MP3/iPod/iPhone, VCR or DVD player with the cables provided. The LED will glow when the transmitter detects an audio input signal from the source device. SPEAKER RECEIVERS 1. Remove the door of the battery compartment. 2. Insert 6 ‘AA’ size batteries into the battery compartment with the correct polarity. Replace the battery compart- ment cover, or connect the provided AC/DC 9V Adapter to the DC input jack, then plug it into the wall AC outlet. Note: 6 ‘AA’ size batteries are required for full wireless function REMOTE CONTROL 1. Remove the door of the battery compartment. 2. Insert 2 x AAA 1.5V batteries(not included) into the compartment. ...
- Page 4 OPERATION 1. Turn on the audio source to which the transmitter is connected with. The Signal LED on transmitter will light up. 2. Select a channel of the transmitter for best performance in your location. 3. Select the L/M/R (Left/Mono/Right) selector under the speakers, one to L (Left) and the other to R (Right) for the best stereo reception. In case the audio device only provides a Mono audio signal, select M (Mono) for the best mono reception. 4. Press the “POWER” button on the speaker to turn on the speaker. Press the “TUNE” button to get the best tuning reception in the speakers. When the button is pressed, frequency tuning starts automatically and it stops when a signal is detected. 5. Volume can be adjusted up from the speaker by pressing the “ ” button or down by pressing the button “ “, or by pressing “ + “ or “ – “ on the remote control, to the desired listening level. 6. Tuning a) Keep a distance of 7 meters between the speakers and transmitter, and then press the “ TUNE “ button for best tuning reception. b) If the frequency is poor, select another channel on the transmitter, then press the “ TUNE “ button again. 7. Switching Off a) For protection and power saving, the transmitter will sleep automatically if there is no signal from the audio source for 4 minutes. When the audio signal returns, the transmitter will restart automatically. b) Press the “POWER” button to turn off the speaker and the LED light goes off. NOTE : You should now be able to place the speakers freely anywhere indoors or outdoors without distortion. If the signal is interrupted, press the “TUNE” button under the speakers to maximize the reception. If you hear interference from other components, switch the channel control of transmitter, and then move the speakers to another location. You can re-adjust the tuning control by switching channels on the transmitter, then pressing the “TUNE” button on the speakers to improve reception. When transmitting / receiving over long distances, the signal from the system will become weaker. TROUBLE SHOOTING NO SOUND • Ensure the AC adapter is fully inserted into the AC outlet and the power connection input on the transmitter.
-
Page 5: Technical Specifications
TECHNICAL SPECIFICATIONS Carrier Frequency : 900 MHz Operation Voltage : Transmitter, AC/DC 8V 200 mA Power Adapter Speaker, AC/DC 9V 1.2 A Power Adapter, or 6 X ‘AA’ size batteries (not included) Remote Control, 2 x AAA batteries (not included) Frequency Response : 40 Hz – 12 KHz Distortion: 1.5% S/N Ratio: 65 dB Channel Separation: 30 dB Operation Distance: Up to 50 m/150 ft. (open area) Output Power: 2 x 4 W (RMS) WARNING : Batteries should not be exposed to excessive heat. The FCC Wants You to Know This equipment has been tested and found to comply with the limits for a Class B digital device, pursuant to Part 15 of the FCC Rules. These limits are designed to provide reasonable protection against harmful interference in a residential installation.
Need help?
Do you have a question about the Cayman and is the answer not in the manual?
Questions and answers