
Summary of Contents for Dukane SCR+
- Page 1 Telephone Operation Manual Model STARCall, STARCall Plus, STARCall Fusion, SCR+ and StarCare Systems Document No. 427-07-00017 (04)
- Page 3 NOTICE To ensure the performance of our products and systems, we may occasionally make tech- nological changes and updates. Therefore, the model number suffixes (A, B, C, etc.) listed in the manual or in the drawings may not always match the model you are using. Unless specifically noted, this will not affect the product or its installation, operation, or service.
- Page 5 Operating, installing, or servicing a product is difficult without accurate documentation. Please help us ensure that you get the best performance from your Dukane product by completing this form if you encounter any problems, or if you have any suggestions for the manual.
- Page 6 Page # _____ Description Page # _____ Description Page # _____ Description Please FAX (630) 836-3800, or mail this form (tri-folded so the address below is visible). Dukane Communication Systems Technical Writing Group 27545 Diehl Rd, Suite 200 Warrenville, IL 60555...
-
Page 7: Table Of Contents
Table Contents SECTION 1—GENERAL INFORMATION Introduction ..........1 Manual Contents . - Page 8 Table Contents Programmable Dedicated Function Keys ......12 EMERGENCY ........12 TONE.
- Page 9 Table Contents SECTION 4—USING THE SYSTEM Calling a Speaker Station ......... . 25 Answering Speaker Station Calls .
- Page 10 Table Contents Recall Timers (Fusion feature set only) ........41 Call Park Timeout .
- Page 11 Table Contents Distributing Tones ..........56 Distributing Tones to All Speakers .
- Page 12 Table Contents SECTION 5—CALL BUTTON OPERATIONS Call-In Priorities ..........73 Placing a Call-In .
- Page 13 Table 1: Programmable Tone Types........53 STARCall is a registered trademark and STARCall Plus, StarCall Fusion, and StarCare are trademarks of Dukane Communication Systems, a division of Edwards Systems Technology, Inc.
- Page 14 Notes SCR+ Telephone Operation Manual viii...
-
Page 15: Section 1-General Information
Each System is easy to use, with many of its features accessible through the STELs or standard telephones. Additional features are accessible through ATELs or CTELs. The STARCall Plus can also take advantage of the Dukane Model 110-3889 Network Interface Card (NIC) which can network together up to 16 systems, using one NIC per system. -
Page 16: System Acronyms
Related Documentation The following manuals contain additional information on the STARCall, STARCall Fusion, and StarCare Systems. The latest revisions are available from Dukane Communi- cation Systems, Warrenville, Illinois. Some of these documents are also available through our web site to registered Dukane distributors at www.dukane.com/csd and go to “For Distributors.”... -
Page 17: System Priorities
System Priorities If you need additional copies of this manual or the related documentation, contact your authorized Dukane distributor or call Dukane Communication Systems at (630) 836-3706, during normal central time business hours. In Canada, dial (519) 748-5352 during normal eastern time business hours. -
Page 18: Starcall Fusion Feature Set
STARCall Fusion Feature Set If you need to access functions in an emergency and your system administrator is unavail- able to assist you with a password, try the factory default password 1234 (this password can be changed). If your attempt to access a password-protected function is unsuccessful, hang up before trying again because the telephone must be on-hook for at least two seconds before you can attempt to access that function again. -
Page 19: Cyclical Hunt Groups
STARCall Fusion Feature Set Cyclical Hunt Groups A hunt group can be configured using RAPID such that if a call has not been answered within a specified number of rings (1 to 10), the call is routed to the next free extension within the hunt group. -
Page 20: Account Codes
STARCall Fusion Feature Set Account Codes The STARCall Fusion feature set supports up to 256 account codes. Each account code is a four-digit PIN (Personal Identification Number) that has both a day and night class of service assigned to it. Account codes may also be governed during the course of a day through the Event class of service function. -
Page 21: Interactive Voice Response (Ivr) System
STARCall Fusion Feature Set Interactive Voice Response (IVR) System Outside telephone calls routed to the IVR are greeted by the auto-attendant. The caller may then enter the extension they wish to reach, or they may access other IVR features. If a called extension is busy or does not answer, the IVR offers the appropriate options, including leaving a voice mail message or calling another extension. - Page 22 Notes SCR+ Telephone Operation Manual...
-
Page 23: Section 2-Atel Description And Features
ATEL Description and Features ATEL Description and Features The Dukane Model 7A1110 Administrative Telephone (ATEL) is shown in Figure 1. It provides user-friendly access to all System features. The 16-character alphanumeric LCD display shows all telephone, intercom, and paging status information related to the ATEL. -
Page 24: Display Window
Note: Many System telephone features are governed by the System programming. Contact your Dukane distributor if a feature is not enabled. Display Window When the ATEL is not in use and no calls are present, the display shows the date and time in either 12- or 24-hour mode. -
Page 25: Handset
ATEL Description and Features Handset The ATEL’s handset can be used for normal conversations (intercom or telephone) and for voice paging. See pages Calling a Speaker Station, page 25; Calling a Telephone, page 31; and Paging, page 48, for additional information. Lifting the handset switches the ATEL to handset operation, regardless of the state of the speaker/microphone. -
Page 26: Talk Key
ATEL Description and Features Talk Key The TALK key is used in intercom, telephone, or page mode to manually switch the voice direction when using the speaker/microphone. In intercom mode it is used to switch from listen to talk. Pressing the TALK key during telephone hands-free speaker phone operation switches the ATEL to push-to-talk operation and manually controls the voice direction. -
Page 27: Program
ATEL Description and Features PAGE The PAGE key initiates general voice pages to all speakers, any combination of speaker zones, or any combination of individual room speakers. Pressing this button automati- cally dials 72, which is the factory default setting to access paging functions. See Paging beginning on page 48 for full instructions. -
Page 28: Menu Key
System. These codes display as “SYSTEM ERROR” followed by a two-digit error code. When an error code appears, write down the exact display and contact your system ad- ministrator or authorized Dukane distributor for assistance. Selectively Answering Call-Ins (ATEL Only) -
Page 29: Exiting The Local Diagnostic/Programming Mode
Local Diagnostic/Programming Mode Exiting the Local Diagnostic/Programming Mode To exit the Local Diagnostic/Programming Mode, press the MENU key for 1-1/2 seconds. The time and date display should reappear. Displaying the ATEL Hardware Revision and Software Version Press the MENU key for 1-1/2 seconds to enter the Local Diagnostic/Programming Mode. -
Page 30: Programming The F1 Through F8 Function Keys
Local Diagnostic/Programming Mode 3. Enter the desired dial sequence using the numeric key pad. Up to 32 digits can be entered. Entering the first digit clears the display of any previously assigned dial sequence. See Appendix A on page 75 for a listing of 700 codes. 4. -
Page 31: Adjusting The Ringer Type And Volume
Local Diagnostic/Programming Mode 4. If a dial sequence is desired: a. Press and hold the function key until the F<#> + dial sequence and a flashing cursor are displayed. Release the key. b. Enter the desired dial sequence using the numeric key pad. Up to 32 digits can be entered. -
Page 32: Restoring Default Key Settings
This feature does not use a telephone link, so it can be left on all the time without reduc- ing available System resources. Note: This feature requires that the ATEL be connected to an ATC-E4 card. The ATC-B card does not support the ATEL background music function. See your Dukane distributor for assistance. SCR+ Telephone Operation Manual... -
Page 33: Section 3-Standard Telephone Operations
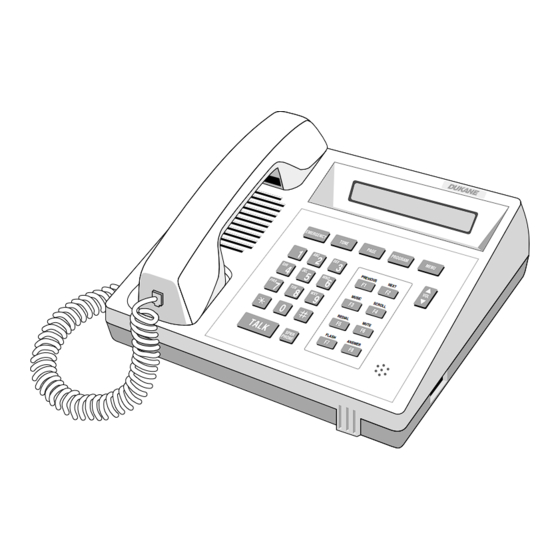
Telephone Card). STEL Description and Features The Dukane Model 7A1111 (STEL), is shown in Figure 2 on page 20. It has a standard 12-button telephone key pad, three programmable speed dial buttons, and four dedicated feature buttons (STORE, MEM DIAL, FLASH, and REDIAL). The handset allows private, telephone-style conversations. -
Page 34: Figure 2: Model 7A1111 Standard Telephone (Stel)
STEL Description and Features AREA CODE PHONE NUMBER MEM DIAL FLASH OPER TONE STORE REDIAL Figure 2: Model 7A1111 Standard Telephone (STEL) SCR+ Telephone Operation Manual... -
Page 35: Placing A Call-In
Placing a Call-In Placing a Call-In Instead of a call-in switch, you can use an STEL, DTMF telephone, or CTEL to place a call-in to the call-in location (e.g., school office, nurse station) with the incoming re- sponse heard on the speaker. Follow the directions below. 1. -
Page 36: Off-Hook Direct Telephone Call
Off-Hook Direct Telephone Call Off-Hook Direct Telephone Call A System telephone port can be programmed to initiate a direct telephone call to a configurable telephone extension when the handset is lifted. By default this option is dis- abled. If it is enabled, follow the directions below. Note: This feature may not apply to your System. -
Page 37: Off-Hook Page
Error Codes If there are no ATELs in the system, error codes are displayed by flashing four LEDs on the CPC. If an error code appears, contact your system administrator or authorized Dukane distributor for assistance. SCR+ Telephone Operation Manual... - Page 38 Notes SCR+ Telephone Operation Manual...
-
Page 39: Section 4-Using The System
Section Using the System Calling a Speaker Station All speaker stations have a three-, four-, or five-digit alphanumeric extension. The star key (*) is used to dial alpha characters. See the examples below. Note: ATELs do not display the alpha characters when dialing. 103*2 = 103A 103**2 = 103B 103***2 = 103C... -
Page 40: Answering Speaker Station Calls
Answering Speaker Station Calls 6. ATEL ONLY: When using the handset, pressing the MUTE function (F6 factory default) will alternately mute and unmute both the talk and listen operation of the handset. 7. ATEL ONLY: When using the speaker/microphone, you can adjust the speaker listen volume by pressing the VOL up/down key as needed. -
Page 41: Auto Answering A Call-In
Answering Speaker Station Calls Using the System priority defaults as an example, if call-in switch 1 is pressed, an ATEL receiving the call-in would display the calling room number and the call-in queue position. All phones (ATELs, STELs, DTMF telephones, or CTELs) in the call-in destination group for that call-in switch annunciate the call using a constant triple burst ring until answered. -
Page 42: Manually Answering A Call-In (Auto Answer Disabled)
Answering Speaker Station Calls 6. ATEL: Hang up the handset or press SPKR PHONE to end the call. Failure to replace the handset in the cradle will cause the ATEL to switch to an on-hook mode of operation after a preset duration. If the ATEL converts to an on-hook mode, it still rings as if the handset is in the cradle, therefore no calls are missed. -
Page 43: Answering The Highest Priority System Call-In
Answering Speaker Station Calls Answering the Highest Priority System Call-In To answer the highest priority call-in follow the steps below. 1. ATEL: Lift the handset or press SPKR PHONE. STEL, DTMF telephone, or CTEL: Lift the handset. 2. ATEL: Dial 745#, or press the function key programmed to dial that sequence. You are automatically connected to the first highest priority call-in, regardless of the call’s origin or programmed destination. -
Page 44: Canceling All Normal Call-Ins In The System
Transferring Intercom Calls Between Room Speakers and Associated System Phones Canceling All Normal Call-Ins in the System When a number of call-ins occur at the same time (e.g., a hallway accident, bathroom spill), or a building-wide challenge where groups race to call in with the correct answer, all normal call-ins in the System can be canceled at once by doing the following: 1. -
Page 45: Transferring From System Phone To Associated Speaker
Calling a Telephone Transferring from System Phone to Associated Speaker To transfer a call from a System phone to the associated room speaker follow the steps below. 1. ATEL: Press and release the hookswitch or press and release the function key programmed as FLASH. -
Page 46: Calling A System Telephone Extension
Calling a Telephone Calling a System Telephone Extension A System telephone is a Dukane-supplied ATEL or STEL; or an “off-the-shelf” DTMF telephone or CTEL. If your System has been networked to other Systems using a NIC, you can call any telephone in the networked Systems. If your System has not been net- worked, you can only call the telephones in your own System. -
Page 47: Busy Station Intercom (Fusion Feature Set Only)
Model 437-00127 Call Management Feature Package 1. This function also requires proper setup of both the PBX/KSU and the System. If this function does not work, contact your Dukane distributor. 1. ATEL: Lift the handset for a private conversation or press SPKR PHONE for speaker/microphone conversation. -
Page 48: Outside Line Access (Fusion Feature Set)
Calling a Telephone 5. ATEL ONLY: Pressing the MUTE function (F6 factory default) will alternately mute and unmute both the transmitter and receiver in handset operation, or mute and unmute the panel microphone in speaker/microphone operation. 6. ATEL ONLY: If push-to-talk speaker/microphone operation is desired, press and release TALK to manually control the audio direction. - Page 49 Calling a Telephone 3. Dial the desired telephone number, then wait. After 3 to 5 seconds the System will assume you have completed dialing the number. 4. If you hear a double tone burst, the number dialed is toll restricted and this extension’s toll restriction and permit level do not allow calling this number.
-
Page 50: Calling An Outside Line Connected Via A Pbx
Calling a Telephone Calling an Outside Line Connected via a PBX For STARCall, STARCall Plus and STARCall Fusion systems connected to outside lines through a PBX from another manufacturer. 1. ATEL: Lift the handset for a private conversation or press SPKR PHONE for speaker/microphone conversation. -
Page 51: Placing An Outside Call Connected Via A Pbx On Hold
Calling a Telephone Placing an Outside Call Connected via a PBX on Hold 1. ATEL: Press and release the function key programmed as FLASH (default is F7) or press and release the hookswitch. STEL, DTMF telephone, or CTEL: Press and release FLASH (if present) or press and release the hookswitch. -
Page 52: Answering Telephone Or Outside Line Calls
Answering Telephone or Outside Line Calls Answering Telephone or Outside Line Calls Answering a Call From Another Telephone or Outside Line If your System has been networked to other Systems using a NIC, you can receive calls from any other telephone in the networked System. If your System has not been net- worked, you can only receive calls from telephones in your own System. -
Page 53: Call Holding (Telephone And Outside Line)
Call Holding (Telephone and Outside Line) Call Holding (Telephone and Outside Line) Placing a Call on Hold To place a call on hold, follow the steps below. 1. ATEL: If using the handset or speaker/microphone, while engaged in a call, press and release the function key programmed as FLASH (default is F7). -
Page 54: Outside Line Call Park (Fusion Feature Set Only)
Outside Line Call Park (Fusion feature set only) Outside Line Call Park (Fusion feature set only) You can park a call by first placing the call on hold (see Placing a Call on Hold on the preceding page) and dialing 763#. Your extension is now free to perform other opera- tions. -
Page 55: Outside Line Camp On (Fusion Feature Set Only)
Outside Line Camp On (Fusion feature set only) Outside Line Camp On (Fusion feature set only) If a system user transfers a call to a busy extension and the caller wants to wait for that busy extension to become free, the call can be “camped-on” that extension by dialing 765[extension number]#. -
Page 56: Call Transferring (Telephone And Direct Outside Line)
Call Transferring (Telephone and Direct Outside Line) Call Transferring (Telephone and Direct Outside Line) When an extension is engaged in a telephone conversation with either another System telephone or an outside line, the call can be transferred to another System extension. 1. -
Page 57: Call Conferencing
Call Conferencing Call Conferencing The System can support two simultaneous three-party conference calls. Conferences can include three System telephones or two System telephones and one outside line. Speaker stations cannot be used in conferencing. Note: Conference calling requires the Expanded Audio Routing Card (ARC-E, Model 110-3524B) in the System card shelf and the optional Model 437-00122 Classroom Telephone Feature Package 1. -
Page 58: Call Forwarding
Call Forwarding Call Forwarding Call forwarding lets you send calls routed to one extension to another extension or hunt group. Forwarding Restrictions A System extension cannot forward calls when: It does not have call forward access class of service enabled. •... -
Page 59: Forwarding Calls To Voice Mail (Fusion Feature Set Only)
Call Forwarding Forwarding Calls to Voice Mail (Fusion feature set only) 1. ATEL: Lift the handset or press SPKR PHONE. —OR— Press the Do Not Disturb function key (skip the steps below). STEL, DTMF telephone, or CTEL: Lift the handset. 2. -
Page 60: Audible Forwarding Indicators
Call Forwarding Audible Forwarding Indicators There are several audible indications that are used to indicate the forwarding status of a System extension. When an extension has been successfully forwarded to another extension, the forward dial tone is heard. This tone consists of a 1-second confirmation tone followed by the nor- mal dial tone. -
Page 61: Message Waiting Indicator
Message Waiting Indicator Message Waiting Indicator Manually Setting the Message Waiting Indicator The call assurance LED in a room can flash to act as a message waiting indicator. This flash pattern (three rapid flashes, three seconds off) shows a message is waiting to be re- trieved by calling some predetermined extension. -
Page 62: Paging
Paging Paging Paging from an STEL, CTEL, or DTMF telephone phone requires the installation of op- tional feature packages. The Model 437-00122 Classroom Telephone Feature Package 1 must be present. When the Model 437-00123 Classroom Telephone Feature Package 2 is added, the following paging features are provided: All call Zone page including zones... -
Page 63: Emergency Paging Selected Zones
Paging 3. ATEL ONLY: If muting is also desired while using the microphone, press TALK to change from hands-free to push-to-talk paging. Thereafter, pushing TALK allows the page audio, and releasing TALK mutes the microphone. The MUTE button can also be used to toggle between mute and unmute. -
Page 64: Emergency Paging All But Excluded Zones
Paging Emergency Paging All But Excluded Zones To make an emergency page that excludes selected zones, follow the steps below. If your System has been networked to other Systems using a NIC, you can make an exclusionary emergency page to certain zones in all networked Systems. If your System has not been networked, you can only page zones in your own System. -
Page 65: Off-Hook Emergency Zone Page (Stel, Dtmf Telephone, And Ctel Only)
Paging Off-Hook Emergency Zone Page (STEL, DTMF Telephone, and CTEL Only) A System telephone port can be configured to initiate an automatic emergency page to any combination of zones when the telephone handset is lifted. By default this option is disabled. -
Page 66: Paging Selected Zones
Paging Paging Selected Zones To make a page to selected zones, follow the steps below. If your System has been net- worked to other Systems using a NIC, you can page certain selected zones in all networked Systems. If your System has not been networked, you can only page zones in your System. -
Page 67: Paging All But Excluded Zones
Paging Paging All But Excluded Zones To make a zone page that excludes selected zones, follow the steps below. If your System has been networked to other Systems using a NIC, you can page zones in all networked Systems. If your System has not been networked, you can only page zones in your own System. -
Page 68: Paging Selected Rooms
Paging Paging Selected Rooms To make a page to selected rooms, follow the steps below. Regardless of whether or not your System is networked to other Systems, you can only page selected rooms in your own System. 1. ATEL: Lift the handset or press SPKR PHONE. STEL, DTMF telephone, and CTEL: Lift the handset. -
Page 69: Paging All But Excluded Rooms
Distributing Tones 3. ATEL: Enter the room numbers to be excluded and press #. STEL, DTMF telephone, and CTEL: Same as ATEL. Note: A double tone burst after pressing # indicates restricted access to this feature from this phone. You must enter a four-digit password after the tone to complete this operation. -
Page 70: Distributing Tones
Distributing Tones 3. ATEL: Enter the tone number (01–26) (see Table 1 below) and press #. STEL, DTMF telephone, or CTEL: Same as ATEL. Notes: • Tones 1 through 9 must be preceded by a 0 (entered as 01 through 09). A double tone burst after pressing # indicates restricted access to this feature from •... -
Page 71: Distributing Tones To Selected Zones
Distributing Tones Distributing Tones to Selected Zones To distribute a tone to selected zones, follow the steps below. Even if your System is net- worked, you can only distribute tones in your own System. 1. ATEL: Lift the handset or press SPKR PHONE. STEL, DTMF telephone, or CTEL: Lift the handset. -
Page 72: Distributing Tones To Selected Rooms
Distributing Tones 3. ATEL: Enter the tone number (01–26) (see Table 1 on page 56), then enter the zone numbers (01–32) to be excluded, and press #. STEL, DTMF telephone, or CTEL: Same as ATEL. Notes: Tones 1 through 9 must be preceded by a 0 (entered as 01 through 09). •... -
Page 73: Distributing Tones To All But Excluded Rooms
Distributing Tones Distributing Tones to All But Excluded Rooms To distribute a tone to all rooms excluding those selected, follow the steps below. Even if your System is networked, you can only distribute tones in your own System. 1. ATEL: Lift the handset or press SPKR PHONE. STEL, DTMF telephone, or CTEL: Lift the handset. -
Page 74: Distributing Audio Programs
Distributing Audio Programs Distributing Audio Programs Distributing an Audio Program to All Speakers To distribute an audio program to all speakers, follow the steps below. Regardless of whether or not your System is networked to other Systems, you can only distribute audio programs in your own System. -
Page 75: Distributing An Audio Program To All But Excluded Zones
Distributing Audio Programs 3. ATEL: Enter the audio program source (01 or 02), then the zone numbers (01–32), and press #. STEL, DTMF telephone, or CTEL: Same as ATEL. Notes: If only one audio program source is available, 01 will be the only source you can •... -
Page 76: Distributing An Audio Program To Selected Rooms
Distributing Audio Programs 4. ATEL: The audio program continues until you cancel it (see Canceling Audio Program Distribution, page 65). STEL, DTMF telephone, or CTEL: Same as ATEL. 5. ATEL: Hang up the handset or press SPKR PHONE. STEL, DTMF telephone, or CTEL: Hang up the handset. Distributing an Audio Program to Selected Rooms To distribute an audio program to selected rooms, follow the steps below. -
Page 77: Distributing An Audio Program To All But Excluded Rooms
Distributing Audio Programs Distributing an Audio Program to All But Excluded Rooms To distribute audio programming to all rooms excluding those selected, follow the steps below. Even if your System is networked, you can only distribute audio programs in your own System. -
Page 78: Removing Rooms From Audio Program Distribution In Progress
Distributing Audio Programs 3. ATEL: Enter the audio program source (01 or 02), then the room numbers, and press #. STEL, DTMF telephone, or CTEL: Same as ATEL. Notes: If only one audio program source is available, 01 will be the only source you •... -
Page 79: Canceling Audio Program Distribution
Distributing Audio Programs Canceling Audio Program Distribution To cancel an audio program currently being distributed, follow the steps below. 1. ATEL: Lift the handset or press SPKR PHONE. STEL, DTMF telephone, or CTEL: Lift the handset. 2. ATEL: Press PROGRAM then press 7, or dial 737. STEL, DTMF telephone, or CTEL: Dial 737. -
Page 80: Selecting A Source For Music-On-Hold And Atel Background Music
Temporarily Excluding Rooms Selecting a Source for Music-on-Hold and ATEL Background Music This feature lets you select one of the two available audio program sources to provide System-wide music-on-hold and background music for ATELs. Both features share the same programming. At least one audio program source must be connected to the System for this feature to work. -
Page 81: Clearing Selected Temporary Room Exclusions
Temporarily Excluding Rooms 3. ATEL: Press # after entering the last room number. STEL, DTMF telephone, or CTEL: Same as ATEL. 4. ATEL: Hang up the handset or press SPKR PHONE. STEL, DTMF telephone, or CTEL: Hang up the handset. Clearing Selected Temporary Room Exclusions To allow selected rooms to again receive audio events, follow the steps below. -
Page 82: Setting The Time Of Day
Setting the Time of Day Setting the Time of Day To set the time of day at your phone or local System, follow the steps below. If your System has been networked to other Systems using a NIC, the time you set will only be valid until a new time is set in the primary System, or until 2:58 a.m., when the primary System updates all secondary Systems. -
Page 83: Activating And Deactivating The Schedules
Activating and Deactivating the Schedules 2. ATEL: Dial 751 and enter the date (seven digits, weekday/mm/dd/yy, e.g., 1 09 16 01, which translates to Sunday, September 16, 2001), then press #. STEL, DTMF telephone, or CTEL: Same as ATEL. Notes: Days of the week are represented by a single digit, 1–7. -
Page 84: Controlling I/O System Outputs
Controlling I/O System Outputs Controlling I/O System Outputs This feature lets you control I/O System outputs connected to external devices such as lights, bells, or door locks. Output assignments are programmable and can vary, so contact your system administrator for details. 1. -
Page 85: Overriding Night Mode
Overriding Night Mode Overriding Night Mode This feature lets you override the System’s night mode configuration. The night mode al- lows speaker station call-ins to be directed to particular extensions at certain times, such as at night when staff levels are reduced. The night mode override lets you temporarily override this System-wide redirection of call-ins, turn the night mode on early, or cancel previous choices and allow the night mode to begin at its programmed time. - Page 86 Notes SCR+ Telephone Operation Manual...
-
Page 87: Section 5-Call Button Operations
Section Call Button Operations Call-In Priorities Each speaker in a room can be equipped with up to three call-in switches. Each call-in switch is programmed with a priority level. Priority 1 is the highest, 6 is the lowest, and 7 is used to cancel the call. -
Page 88: Canceling A Call-In
Canceling a Call-In Canceling a Call-In Press and release the designated CANCEL button. This will cancel all call-ins from that call-in switch EXCEPT those of Emergency 1 priority. An Emergency 1 priority call-in can only be canceled by being answered. Call Confirmation The optional call assurance LED on the speaker station flashes at a slow, steady rate when a normal call has been registered. -
Page 89: Section A-700 Codes Quick Reference
Appendix 700 Codes Quick Reference The 700 codes are used to access the system functions listed in the charts. They can be dialed from ATELs, STELs, DTMF telephones, and CTELs. You must go off-hook and wait for a dial tone before using any of the codes below, except when using the ATEL’s preprogrammed EMERGENCY, TONE, PAGE, PROGRAM, or F keys. - Page 90 TONE DISTRIBUTION DIAL SEQUENCE DEFAULT ATEL DIAL FUNCTION SEQUENCE Tone to All 710, tone no., # TONE, 0, tone no., # Tone, Including Zones 711, tone no., zone nos., # TONE, 1, tone no., zone nos., # Tone, Excluding Zones 712, tone no., zone nos., # TONE, 2, tone no., zone nos., # Tone, Including Rooms...
- Page 91 Follow Me 766, forward type, extension 766, forward type (see below), no., # extension no., # (see ATEL at right for forward 1—forward always types) 2—forward on busy 3—forward on no answer 4—forward on busy or no answer Remove Follow Me 767, # 767, # Trunk-on-Hold Pickup...
- Page 92 I/O Output Control 754, command, output no., # 754, command (see below), output no., # (See ATEL at right for command definitions.) 0—off 1—on 2—momentary (one second) OCC Output Control 764, command, OCC output no., # 764, command (see below), OCC output no., # (See ATEL at right for command definitions.)
-
Page 93: Section B-Programmable Function Keys Reference
Appendix Programmable Function Keys Reference Record any changes to the default function key settings in the table below for future reference. KEY NAME NEW FUNCTION/SPEED DIAL NUMBER EMERGENCY TONE PAGE Appendix: Programmable Function Keys Reference... - Page 94 Notes Appendix: Programmable Function Keys Reference...
-
Page 95: Section C-Software Versions
Appendix Software Versions This manual reflects the operations and features available with the following software: System Embedded Software Software versions 5.00 or later are required for: Model 110-3524B ARC-E main node only • Models 110-3527 and 110-3527A ATC-E4 main and secondary nodes •... - Page 96 Notes Appendix: Software Versions...
- Page 98 DUKANE COMMUNICATION SYSTEMS A DIVISION OF EST, INC. — 27545 Diehl Rd, Suite 200, Warrenville, IL 60555 © 1999–2004. Printed in USA. All specifications subject to change without notice.
Need help?
Do you have a question about the SCR+ and is the answer not in the manual?
Questions and answers
How do I change the time - have lifted the handset, pressed 750 but then nothing happens when I input the new time
To change the time on a Dukane SCR+, follow these steps:
1. ATEL: Lift the handset or press the SPKR PHONE button.
STEL, DTMF telephone, or CTEL: Lift the handset.
2. Dial 750 and enter the time using the following format:
- For a 24-hour format, enter the four-digit time (e.g., 1355 for 1:55 p.m.).
3. Hang up the handset or press SPKR PHONE to complete the process.
This answer is automatically generated