Seagate GoFlex Cinema User Manual
Multimedia drive
Hide thumbs
Also See for GoFlex Cinema:
- Quick start manual (32 pages) ,
- Specification (2 pages) ,
- Specfications (2 pages)
Table of Contents
Advertisement
Quick Links
Advertisement
Table of Contents

Related Manuals for Seagate GoFlex Cinema


Summary of Contents for Seagate GoFlex Cinema
- Page 1 GoFlex Cinema™ Multimedia Drive User Guide...
- Page 2 © 2011 Seagate Technology LLC. All rights reserved. Seagate, Seagate Technology, the Wave logo, GoFlex, GoFlex Cinema, and FreeAgent are trademarks or registered trademarks of Seagate Technology LLC, or one of its affiliates. All other trademarks or registered trademarks are the property of their respective owners.
-
Page 3: Table Of Contents
About the Seagate GoFlex Cinema™ Multimedia Drive ... 6 GoFlex Cinema Multimedia Drive Features ......6 What You Can Do With the GoFlex Cinema™... - Page 4 Viewing Photos from a Digital Camera ......33 Managing the GoFlex Cinema™ Multimedia Drive ....34 Understanding the Multimedia Drive’s LEDs .
- Page 5 Index ........... . 53 GoFlex Cinema™ Multimedia Drive User Guide...
-
Page 6: About The Seagate Goflex Cinema™ Multimedia Drive
This chapter describes: • The features of the GoFlex Cinema multimedia drive (see next section). • What you can do with the GoFlex Cinema multimedia drive (see page 7). • What’s included with the GoFlex Cinema multimedia drive (see page 8). •... -
Page 7: What You Can Do With The Goflex Cinema™ Multimedia Drive
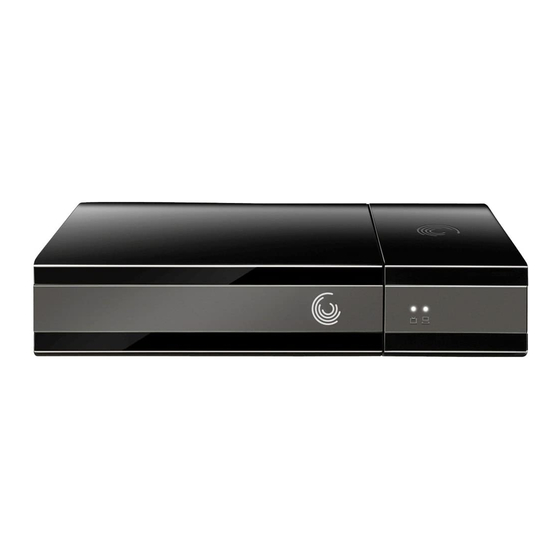
What You Can Do With the GoFlex Cinema™ Multimedia Drive GoFlex Cinema drive connected to..GoFlex Cinema dock Power Port Optical Audio Port HDMI Port Composite Ports (3) Figure 2: GoFlex Cinema Multimedia Drive—Rear View Caution: To avoid overheating the multimedia drive, do not place anything on top of it (such as a cable box or USB device). -
Page 8: What's In The Box
AC power adapter with changeable plugs • USB cable • Extra rubber feet to use when adding more storage to GoFlex Cinema (see “Adding More Storage Capacity to the GoFlex Cinema™ Multimedia Drive” on page 38) • Quick Start Guide and Warranty Caution: Use GoFlex Cinema with the provided power supply only. -
Page 9: Getting Started
Cinema multimedia drive the same way you would any other disk drive connected to your computer. Note: If the GoFlex Cinema multimedia drive is currently connected to your TV, disconnect it before starting. See “Disconnecting the Multimedia Drive from Your TV” on page 36 to disconnect safely. -
Page 10: Powering On
Copying Files Using a GoFlex Desk External Drive Dock If you have a GoFlex Desk external drive, you can also copy files to the GoFlex Cinema™ multimedia drive using the GoFlex Desk dock. (You would do this instead of connecting the multimedia drive to your computer with the USB cable.) -
Page 11: Connecting External Usb Devices
Connecting External USB Devices Note: The GoFlex Cinema multimedia drive indexes newly added media files each time it’s powered on. If you’ve added only a few new files, indexing will happen quickly. If you’ve added a lot of new files, indexing will take longer. -
Page 12: Navigating Goflex Cinema™ Screens And Menus
USB device (for instance, with digital videos and photos contained in the same folder). See “Moving or Copying Files with the GoFlex Cinema™ Multimedia Drive” on page 20 for more information. - Page 13 OK. • Select Settings, then press OK to manage your multimedia drive settings. (See “Managing the GoFlex Cinema™ Multimedia Drive” on page 34.) • Select the Resume icon, then press OK to restart file transfers. (See “Suspending and Restarting a File Transfer”...
- Page 14 Navigating GoFlex Cinema™ Screens and Menus The Menus Some screens, like the Videos, Photos, Music, and Browse screens, have special menus that open when you press Menu on the remote. The menu opens across the top of the screen, like the example shown in Figure 4.
- Page 15 Photo Menu Figure 5: Photo Menu (Example Only) Finding On-screen Information Almost every GoFlex Cinema screen includes an Information icon in the top right corner. Press the at any time to find on-screen help for the screen you’re viewing. GoFlex Cinema™ Multimedia Drive User Guide...
- Page 16 Navigating GoFlex Cinema™ Screens and Menus Using the Remote The only way to navigate the GoFlex Cinema screens is with the included remote. This section describes the functions of the remote control. Power Home Menu Arrow Buttons Back Information Reverse...
-
Page 17: Next Steps
For video playback, press to switch aspect ratio. Next Steps Now that the GoFlex Cinema multimedia drive is set up and you understand how to navigate its screens and menus, it’s time to start enjoying your media files. The remainder of this User Guide describes how to: •... -
Page 18: Powering Off
Solve any problems you might encounter (see page 47). Powering Off To power off the GoFlex Cinema™ multimedia drive, press the Power button on the remote. Finding More Help Seagate Support provides a broad range of resources (including FAQs, a knowledge base and a community forum) to help you solve any problem you might have while using the GoFlex Cinema multimedia drive. -
Page 19: Managing Files On The Goflex Cinema™ Multimedia Drive
OK to enter it.) The full file name is not required; a partial name also works. Select Done, then press OK. The multimedia drive lists all files with matching titles. If no files appear in the list, no file name matched the word(s) you entered. GoFlex Cinema™ Multimedia Drive User Guide... -
Page 20: Moving Or Copying Files With The Goflex Cinema™ Multimedia Drive
By connecting the multimedia drive to your computer using the included USB cable, then managing your files and folders the same way you would on any disk drive. • By following the instructions in this section to manage your files from the GoFlex Cinema screens. Note: You can also follow the instructions in this section to transfer your files manually from a USB device to the multimedia drive (see “Connecting External USB Devices”... -
Page 21: Suspending And Restarting A File Transfer
The transfer is paused. The Resume icon appears on the Home screen (see Figure on page 13). This icon only appears when a transfer has been suspended. When you are ready to resume the transfer, press Home, select the Resume icon, then click The transfer resumes. GoFlex Cinema™ Multimedia Drive User Guide... -
Page 22: Re-Indexing Files On The Goflex Cinema™ Multimedia Drive
300 older photos from your last holiday. • Follow the instructions in “Moving or Copying Files with the GoFlex Cinema™ Multimedia Drive” on page 20. GoFlex Cinema™ Multimedia Drive User Guide... -
Page 23: Deleting Files From The Multimedia Drive
By connecting the multimedia drive to your computer using the included USB cable, then deleting your files the same way you would on any disk drive. • By following the instructions in this section to delete files from the GoFlex Cinema screens. Note: When you delete a file, it is permanently removed from the multimedia drive. -
Page 24: Watching Videos
Before You Begin 4. Watching Videos This chapter explains how to find and play your digital videos from the GoFlex Cinema™ multimedia drive. Follow the instructions in this chapter to: • Get started watching videos (see "Before You Begin" below). -
Page 25: Playing A Video
Jumping Ahead or Back in a Video To jump a playing video ahead in 20-minute increments, press the right arrow button. To move the video backwards in 20-minute increments, press the left arrow button. GoFlex Cinema™ Multimedia Drive User Guide... -
Page 26: Controlling A Video's Dvd Features
To select a different language for the video dialog: While watching a DVD file, press Menu. The video pauses and the Videos menu opens. Select Audio..Select the language you want, then press OK. GoFlex Cinema™ Multimedia Drive User Guide... -
Page 27: Displaying Video Thumbnails On The Videos Screen
Once your files have been transferred, on the Home screen, select your camcorder, then press OK. Navigate to the video you want to watch, then press Play/Pause () or OK to start the video. (If a file on your camcorder won’t open, it’s in an incompatible format.) GoFlex Cinema™ Multimedia Drive User Guide... -
Page 28: Listening To Music
Before You Begin 5. Listening to Music This chapter explains how to find and play your digital music from the GoFlex Cinema™ multimedia drive. Follow the instructions in this chapter to: • Get started listening to music (see "Before You Begin" below). -
Page 29: Playing Music
To play all the songs in the folder once, select Play All, then press OK. • To continuously play all songs in the folder, select Continuous Play, then press OK. • To play all the songs in a random order, select Shuffle Loop, then press OK. GoFlex Cinema™ Multimedia Drive User Guide... -
Page 30: Displaying Album Art On The Music Screen
USB device to the multimedia drive. (See “Connecting External USB Devices” on page 11 for more information.) Navigate to the Music screen (see “Playing Music” on page 29). The album art appears in thumbnail view on the Music screen. GoFlex Cinema™ Multimedia Drive User Guide... -
Page 31: Viewing Photos
Before You Begin 6. Viewing Photos This chapter explains how to find and view your digital photos on the GoFlex Cinema™ multimedia drive. Follow the instructions in this chapter to: • Get started viewing photos (see "Before You Begin" below). -
Page 32: Viewing Photos In A Slideshow
To play the photos in random order and in a continuous slideshow, select Slideshow Mode, select Shuffle Loop, then press OK, then press Play/Pause () to resume the slideshow. Press Stop to stop the slideshow and return to the Photos screen. GoFlex Cinema™ Multimedia Drive User Guide... -
Page 33: Viewing Photos From A Digital Camera
Navigate to the photos you want to see, then press OK to open an individual photo, or press Play/Pause () to start a slideshow. (If a file on your camera won’t open, it’s in an incompatible format.) GoFlex Cinema™ Multimedia Drive User Guide... -
Page 34: Managing The Goflex Cinema™ Multimedia Drive
Understand the status LEDs on the multimedia drive (see next section). • Disconnect a USB drive, camera, or camcorder (see page 35). • Disconnect the GoFlex drive from the GoFlex Cinema™ dock (see page 35). • Disconnect the multimedia drive from your TV (see page 36). •... -
Page 35: Disconnecting A Usb Drive, Camera, Or Camcorder
Disconnecting the GoFlex Cinema™ Drive from the GoFlex Cinema Dock The GoFlex Cinema multimedia drive has two main parts—the GoFlex Cinema dock and the GoFlex Cinema drive. (See Figure 1 on page 6.) To disconnect the GoFlex Cinema drive from the GoFlex Cinema dock: Turn off the multimedia drive by pressing Power on the remote. -
Page 36: Disconnecting The Multimedia Drive From Your Tv
Disconnecting the Multimedia Drive from Your TV Separate the two parts by carefully pulling the GoFlex Cinema dock straight out from the GoFlex Cinema drive. Figure 7: Disconnecting the GoFlex Cinema Dock from the GoFlex Cinema Drive To reconnect the GoFlex Cinema drive to the GoFlex Cinema dock, align the connectors and carefully slide them together until they’re fully seated. -
Page 37: Updating The Goflex Cinema™ Multimedia Drive Firmware
Updating the GoFlex Cinema™ Multimedia Drive Firmware Follow the instructions in this section to update the firmware on the GoFlex Cinema multimedia drive. For the best experience with the multimedia drive, update its firmware whenever a new version becomes available. Go to Seagate Support at www.seagate.com/ support to check for firmware updates. -
Page 38: Adding More Storage Capacity To The Goflex Cinema™ Multimedia Drive
When prompted, click OK to restart the multimedia drive. Adding More Storage Capacity to the GoFlex Cinema™ Multimedia Drive If you need additional storage capacity on GoFlex Cinema multimedia drive in the future, you ® can upgrade to a new or larger-capacity GoFlex Desk drive. -
Page 39: Returning The Multimedia Drive To Its Factory Default Settings
However, files stored on the multimedia drive are not deleted or affected. You can return the multimedia drive to its factory default settings two ways: • From the GoFlex Cinema™ menus (see page 39) • Pressing the manual button on the GoFlex Cinema multimedia drive... - Page 40 Drive for TVs in Other Countries” on page 45 for more information. If you accidentally change the multimedia drive’s TV System setting, press and hold the button again for more than 10 seconds to change it back. FACTORY DEFAULT GoFlex Cinema™ Multimedia Drive User Guide...
-
Page 41: Customizing The Goflex Cinema™ Multimedia Drive
On the Home screen, select Settings, then press OK. Scroll right or left to find the System screen. Select Menu Language, then press OK. Select the language you want, then press OK. The menu language changes. GoFlex Cinema™ Multimedia Drive User Guide... -
Page 42: Changing The Automatic Usb Imports Destination
• Brightness and Contrast (see page 43) Adjusting the Aspect Ratio To adjust the aspect ratio: On the Home screen, select Settings, then press OK. Scroll right or left to find the Display screen. GoFlex Cinema™ Multimedia Drive User Guide... -
Page 43: Customizing The Audio Settings
Digital Output Settings—Controls how audio is delivered to the speakers Controlling the Volume on the Multimedia Drive On the Home screen, select Settings, then press OK. Scroll right or left to find the Sound screen. GoFlex Cinema™ Multimedia Drive User Guide... - Page 44 HDMI Raw—Is not decoded by the multimedia drive. When you use this setting, you must connect the multimedia drive to a receiver with decoding capabilities. • S/PDIF (Optical) PCM—Converts multi-channel audio into stereo. • S/PDIF (Optical) RAW—Plays digital audio without decoding. The setting is changed. GoFlex Cinema™ Multimedia Drive User Guide...
-
Page 45: Adjusting The Wait Time Before Automatic Power-Off
To set the multimedia drive for the resolution your TV: On the Home screen, select Settings, then press OK. Scroll right or left to find the Display screen. Select TV System, then press OK. GoFlex Cinema™ Multimedia Drive User Guide... - Page 46 If the TV System settings are grayed out on the multimedia drive, you can toggle among PAL, NTSC and HDMI settings by pressing and holding the button for more FACTORY DEFAULT than 10 seconds. GoFlex Cinema™ Multimedia Drive User Guide...
-
Page 47: Solving Problems
9. Solving Problems This chapter provides solutions to the most common problems you may encounter while setting up and using the GoFlex Cinema™ multimedia drive. General Troubleshooting Tips If you have problems setting up or using the multimedia drive, check these things first: •... - Page 48 10 seconds. FACTORY DEFAULT If the multimedia drive was originally set to PAL, it switches to default NTSC settings. If the multimedia drive was set to NTSC, it switches to default PAL settings. GoFlex Cinema™ Multimedia Drive User Guide...
- Page 49 Monkey’s Audio .FLAC FLAC .M4A AAC-LC .M4B AAC-LC .MP3 Layer1, Layer2, Layer3, MPEG2.5 .MPA Layer2 .OGG OGG, Vorbis .WAV PCM, LPCM, ADPCM .WMA WMA v2 Supported music playlist file formats: .M3U .PLS .WPL (static only) GoFlex Cinema™ Multimedia Drive User Guide...
- Page 50 Drive for TVs in Other Countries” on page 45 for more information. If you accidentally change the multimedia drive’s TV System setting, press and hold the button again for more than 10 seconds to change it back. FACTORY DEFAULT GoFlex Cinema™ Multimedia Drive User Guide...
-
Page 51: Recovering After A Firmware Update Failure
My video’s sound track is not playing. The GoFlex Cinema multimedia drive does not support DTS audio. If the main language on the video you are playing is in DTS audio, no sound will play. You need an external DTS audio decoder (sold separately). -
Page 52: Manually Returning The Multimedia Drive To Its Factory Default Settings
“Returning to the Factory Default Settings Manually” on page 40 for complete instructions. Finding More Help Seagate Support provides a broad range of resources (including FAQs, a knowledge base and a community forum) to help you solve any problem you might have while using the GoFlex Cinema multimedia drive. -
Page 53: Index
Digital Rights Management (DRM) 28 Backward Skip button 16 digitized DVDs 26 Brightness setting 43 disconnecting GoFlex Cinema drive from GoFlex Cinema dock browsing for files 20 multimedia drive from computer 36 camcorders multimedia drive from TV 36 playing videos from 27... - Page 54 13 USB imports destination folder 42 video formats 24 video subtitle formats 25 Idle Time Before Auto Power Off setting 45 video thumbnails 51 Idle Time Before Screen Saver setting 42 Menu button 16 GoFlex Cinema™ Multimedia Drive User Guide...
- Page 55 36 Home screen 13 disconnecting a device 35 illustration 14 disconnecting from your computer 36 Index 22 disconnecting the GoFlex Cinema drive 35 Information 15 Drive LED (illustration) 6 Move 21 factory default button 52 Music 29 factory default button (illustration) 6...
- Page 56 31 playing music continuously 29 sorting the photo list 31 Repeat One setting 29 supported photo file formats 31 searching for a song 19 thumbnails 31 Shuffle Loop setting 29 GoFlex Cinema™ Multimedia Drive User Guide...
- Page 57 Resume icon 21 Firmware Upgrade setting 37 Resume icon (illustration) 13 Firmware Version Information 37 Reverse button 16 Idle Time Before Auto Power Off 45 reversing a video 25 Idle Time Before Screen Saver 42 GoFlex Cinema™ Multimedia Drive User Guide...
- Page 58 See videos automatically 11 copying files to the multimedia drive manually 12 destination folder for imported files 42 Zoom buttons 16 folder structure 12 zooming photos 32 solving problems 48 supported devices 8 GoFlex Cinema™ Multimedia Drive User Guide...
Need help?
Do you have a question about the GoFlex Cinema and is the answer not in the manual?
Questions and answers