
Related Manuals for Miele Gas cooktop


Summary of Contents for Miele Gas cooktop
- Page 1 Operating and Installation Instructions Gas cooktop To prevent accidents and machine damage, read the Operating Manual before installation or use. en - US M.-Nr. 09 596 090...
- Page 2 WARNING: If the information in this manual is not followed exactly, a fire or explosion may result causing property damage, personal injury or death. – Do not store or use gasoline or other flammable vapors and liquids in the vicinity of this or any other appliance.
-
Page 3: Table Of Contents
Contents IMPORTANT SAFETY INSTRUCTIONS....... . . 4 Description of the appliance ......... 8 Before the first use . -
Page 4: Important Safety Instructions
Only use this gas cooktop for residential purposes such as cooking This gas cooktop conforms to all and keeping food warm. uniform safety codes and Other uses are not permitted and can regulations. - Page 5 Before servicing, turn off the gas valve and disconnect the power supply Installation, repair and maintenance by either removing the fuse, unplugging work should be performed by a Miele the unit or manually "tripping" the circuit authorized service technician in breaker.
- Page 6 IMPORTANT SAFETY INSTRUCTIONS Safety Do not store items on the appliance when not in use. Items could melt or The appliance is hot during use and catch fire from residual heat or if the remains so for some time after being appliance is turned on inadvertently.
- Page 7 Place the grates on vertically to working properly by an authorized prevent any scratches. expert. The use of a gas cooktop leads to Before discarding an old appliance, the formation of heat, moisture and disconnect it from the gas and...
-
Page 8: Description Of The Appliance
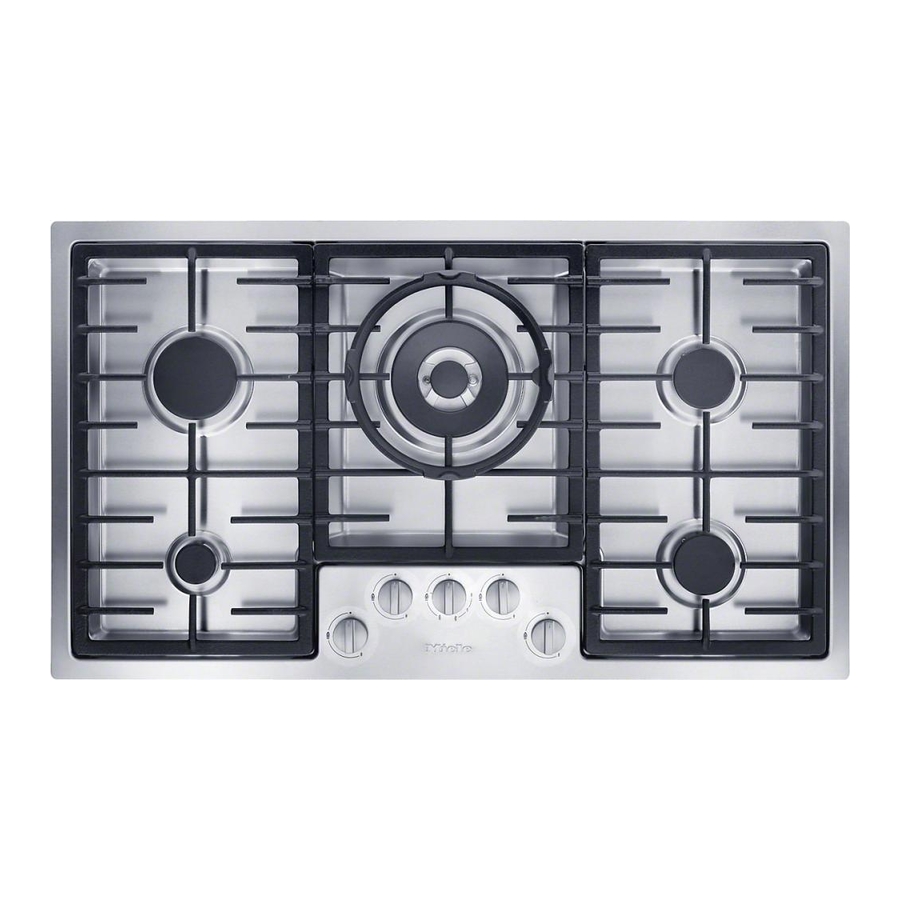
Description of the appliance Cooktop a Auxiliary burner Controls: b High-speed burner g Front left c Double-insert super burner h Back left d Normal burner i Middle e Normal burner j Back right f Grate (three pieces) k Front right... - Page 9 Description of the appliance Burners Double-insert super burner Auxiliary, normal and high-speed burners a Burner cap b Burner head c Ignition safety device a Outer burner cap d Ignitor b Inner burner cap e Burner base c Burner head d Burner base e Ignition safety device f Ignitor...
- Page 10 Description of the appliance Standard accessories You can re-order standard accessories and optional accessories as needed. Wok ring The wok ring (supplied) is included for added stability, especially for woks with round bases. Trivet For small and large pans, see "Cookware".
-
Page 11: Before The First Use
Before the first use Adhere the data plate sticker, which is Metal components have a protective included with the appliance coating which may give off a slight odor documents, on the appropriate place the first time your new appliance is marked in "Technical Service". -
Page 12: Using The Cooktop
Using the cooktop Double-insert super burner To turn the burner on, press and turn the knob toward the LEFT only. To turn the burner off, turn the knob to the RIGHT only. The outer burner of the double-insert super burner requires you to press the knob down while turning it in order to get from the high flame to the low flame zone. -
Page 13: Turning On
Using the cooktop Turning on Turning on in the event of a power failure Do not leave the appliance If there is a power loss, you can ignite unattended whilst it is being used. the flame manually, e.g. with a match. ^ Press the burner control knob and ^ To light the burner, press the turn it to the left to the largest flame... -
Page 14: Regulating
Using the cooktop Regulating The inner and outer burners of the double-insert super burner are both The flame should be regulated so that it controlled by one control knob. There is never protrudes beyond the pot. Since a stop at the 6 o’clock position that the outer part of the gas flame is much requires you to press the knob down hotter than the center of the flame, the... -
Page 15: Cookware
Cookware Pan size Pan placement – Select the cookware to match the – Always place the cookware on the burner: grate. The cookware must not be large diameter = large burner placed directly on the burner. small diameter = small burner. –... -
Page 16: Energy Saving Tips
Energy saving tips – If possible, cook in covered pots or pans. This prevents unnecessary heat loss. – Cook with less water. – The cooking time can be significantly reduced by using a pressure cooker. – After cooking or frying, promptly set to a lower flame. -
Page 17: Safety Feature
Safety feature Ignition safety control The appliance is equipped with an Ignition safety control. This control cuts the gas supply if the flame goes out, e.g. from a boilover or a draft. Any further escape of gas is prevented. ^ To reignite the burner knob clockwise to "ß"... -
Page 18: Cleaning And Care
Cleaning and care To better maintain your appliance Never use a steam cleaner to avoid the following: clean this cooktop. Pressurized – cleaners containing soda, ammonia, steam could cause permanent thinners, or chlorides, damage to the surface and to – cleaners containing descaling components. -
Page 19: Ignition Safety Control
Soiling, particularly salty food soiled again, we recommend treatment with or liquid and olive oil, can the Miele stainless steel care product. Using a cause damage if left on the soft cloth, apply the product in a thin, even printed surfaces for too long. - Page 20 Cleaning and care Auxiliary, normal and high-speed To assemble the double-insert super burners burner ^ Place the burner head b on to the burner base e so that the ignition safety device c and the ignitor d extend through their respective holes in the burner head.
-
Page 21: Frequently Asked Questions
Frequently asked questions Repairs should only be carried out by an authorized technician in accordance with local and national safety regulations. Unauthorized repairs could cause injury or appliance damage. Problem Cause and solution The burner doesn't There might be air in the gas pipe. ^ Repeat lighting several times ignite when lit for the first time, or when it... - Page 22 The burner parts are not positioned correctly. ^ Position the burner parts correctly. The burner ignitor is The circuit breaker has tripped. ^ Contact Miele Technical Service. not working – There is food residue between the ignitor and the burner cap.
-
Page 23: Technical Service
Please note that unless expressly approved in writing by the Miele Service department, Extended Service Contracts offered by other providers for Miele products will not be recognized by Miele. Our goal is to prevent unauthorized (and untrained) service personnel from working on your Miele products, possibly doing further damage to them, you and/or your home. -
Page 25: Installation Instructions
Technical Service Installation Instructions IMPORTANT: SAVE FOR THE LOCAL ELECTRICAL INSPECTOR'S USE Information is subject to change. Please refer to our website to obtain the most current product specification, technical & warranty information. To prevent accidents and appliance damage read these instructions before installation or use. -
Page 26: Important Installation Safety Instructions
IMPORTANT INSTALLATION SAFETY INSTRUCTIONS Installation The power cord and a flexible gas connection line must be attached in The minimum distances given in such a way that they are not in contact these Installation instructions are to with moving parts of kitchen elements (e.g. -
Page 27: Safety Distances Above The Appliance
IMPORTANT INSTALLATION SAFETY INSTRUCTIONS Safety distances above the If there are several appliances appliance beneath a hood, and they have different minimum safety distances always observe the greatest distance. The minimum safety distance given by the hood manufacturer must be maintained between the cooktop and the hood above it. - Page 28 IMPORTANT INSTALLATION SAFETY INSTRUCTIONS Safety distances When installing a gas cooktop, there may be cupboard or room walls of any size on the rear side and on one side (right or left) (see illustrations). The following minimum safety distances must be maintained: Not allowed a 2"...
-
Page 29: Installation Dimensions
Installation dimensions a Appliance front Please take careful note of the detailed diagrams for the cut-out b Installation height dimensions in granite and marble c Gas connection countertops. dPower supply box with connection cable, L = 4 ft (1.2 m) e Stepped cut-out for granite or marble worktops... -
Page 30: Installation
Installation The cooktop may be installed: Flush mounted gas cooktops are – in a suitable cut-out in a granite or only suitable for installation in marble countertop. granite, marble, tiled or solid wood – in a suitable cut-out in a tiled or solid countertops. - Page 31 Installation ^ Make the countertop cut-out as Granite and marble countertops shown in "Installation dimensions". Remember to maintain the minimum safety distances (see "IMPORTANT INSTALLATION SAFETY INSTRUCTIONS"). ^ Feed the power cord down through the cut-out. ^ Center the cooktop b in the cut-out. ^ Connect the cooktop to the mains (see "Electrical connection").
- Page 32 Installation ^ Make the countertop cut-out as Solid wood and tiled worktops shown in "Building-in dimensions". Remember to maintain the minimum safety distances (see "IMPORTANT INSTALLATION SAFETY INSTRUCTIONS"). ^ Fix the wooden frame d 1/16" (2 mm) below the top edge of the countertop (see diagram).
-
Page 33: Securing The Appliance
Securing the appliance After installation Secure the appliance as shown, using the fixing brackets supplied. Check that all the burners are operating correctly. 3/4" (20 mm) countertop The flame must not go out on the lowest setting, or when the control is turned quickly from a high to a low setting. -
Page 34: Electrical Connection
Electrical connection This appliance must be grounded This appliance is equipped with a according to local or national codes. three-prong grounding plug to prevent shock hazards. It should be All electrical work should be plugged directly into a properly performed by a qualified electrician grounded outlet. -
Page 35: Wiring Diagram
Electrical connection Wiring diagram Caution: Label all wires prior to disconnection when servicing controls. Wiring errors can cause improper and dangerous operation. Verify proper operation after servicing. -
Page 36: Gas Connection
Gas connection Installation and service must be The gas connection must be made performed by a qualified installer, in accordance with local codes or, service agency or gas supplier. in the absence of local codes, with In Massachusetts installation must the National Fuel Gas Code, be performed by a licensed ANSI Z 21.1 / NFPA 54... -
Page 37: Gas Pressure Regulator
- 4" w.c. LP gas - 10" w.c. Do not use any regulator unless it has been supplied by Miele. Doing so may cause a gas leak. If there is any doubt concerning installation contact the Miele Technical Service Department. -
Page 38: Conversion To Another Type Of Gas
If the appliance is to be connected to a type of gas other than it was originally configured for, both the regulator and burners must be converted. A conversion kit is available as an optional accessory from the Miele Technical Service Department. -
Page 39: Burner Performance
Burner performance Rated load at high setting Burner Type of gas KM 2355 BTU/hr Auxiliary burner Natural gas (NG) 3,900 1.14 Liquid gas (LP) 3,000 0.88 Normal burner Natural gas (NG) 5,900 1.73 Liquid gas (LP) 6,000 1.76 High-speed Natural gas (NG) 9,800 2.87 burner... -
Page 40: Help Protect Our Environment
Help protect our environment Disposal of packing materials Disposal of an old appliance The cardboard box and packing Old appliances contain materials that materials are biodegradable and can be recycled. Please contact your recyclable. Please recycle. local recycling authority about the possibility of recycling these materials. - Page 44 KM 2355 en - US M.-Nr. 09 596 090 / 00...
Need help?
Do you have a question about the Gas cooktop and is the answer not in the manual?
Questions and answers