Miele G 658 SCVi Operating Instructions Manual
Hide thumbs
Also See for G 658 SCVi:
- Operating instructions manual (52 pages) ,
- Operating instructions manual (56 pages)

Subscribe to Our Youtube Channel
Related Manuals for Miele G 658 SCVi


Summary of Contents for Miele G 658 SCVi
-
Page 1: Operating Instructions
Operating instructions Incognito G 658 SCVi G 858 SCVi To prevent accidents and machine damage, read these instructions before installation or use. M.-Nr. 05 431 331... -
Page 2: Table Of Contents
Contents IMPORTANT SAFETY INSTRUCTIONS CONSIGNES DE SÉCURITÉ IMPORTANTES Caring for the environment Energy saving washing ..........10 Guide to the dishwasher Wash cabinet . - Page 3 Contents Operation Adding detergent..........31 Running the dishwasher .
-
Page 4: Important Safety Instructions
Installation Keep these operating instructions in Installation and repair work should a safe place and pass them on to be performed by a Miele any future user. authorized service technician. Work by unqualified persons could be dangerous and could void the warranty. - Page 5 Do not tamper an installation in these applications. with the controls. Please contact the nearest Miele dealer To reduce the risk of injury, do not or the Miele Technical Service allow children to play in, on, or Department with specific requirements.
- Page 6 IMPORTANT SAFETY INSTRUCTIONS Disposal of an appliance When loading tableware, place sharp items away from the door If the appliance is removed from its seal to prevent damage to the seal. installation and will not be used, Load knives pointing downwards to the door to the wash cabinet should be prevent injuries.
-
Page 7: Consignes De Sécurité Importantes
CONSIGNES DE SÉCURITÉ IMPORTANTES AVERTISSEMENT – Sécurité électrique Avant l’installation, assurez-vous Lorsque vous utilisez votre que la tension et la fréquence lave-vaisselle, veuillez prendre des indiquées sur la plaque signalétique précautions essentielles, y compris correspondent bien à celles de ce qui suit. l’alimentation électrique de la résidence afin de prévenir les blessures et d’éviter Lisez attentivement l’ensemble des... - Page 8 électriques qui pourraient certaines circonstances. Veuillez causer des blessures ou des communiquer vos exigences dommages matériels. particulières au détaillant Miele le plus près de chez vous ou au Service technique.
- Page 9 CONSIGNES DE SÉCURITÉ IMPORTANTES Utilisation Au moment de charger la vaisselle, ne disposez pas les articles N’utilisez le lave-vaisselle que coupants à proximité du joint lorsque tous les panneaux sont d’étanchéité de la porte afin d’éviter de bien en place. l’endommager.
-
Page 10: Caring For The Environment
Caring for the environment Energy saving washing This dishwasher is exceptionally economical in the use of water and electricity. For best results follow these tips: ^ For lowest energy consumption and the gentlest washing of china and crystal, connect the dishwasher to a cold water source. -
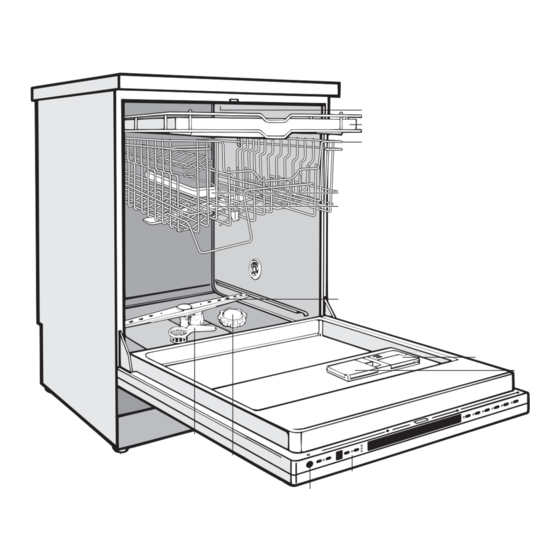
Page 11: Guide To The Dishwasher
Guide to the dishwasher Wash cabinet Upper spray arm (not visible) Detergent dispenser Cutlery tray Data plate Upper basket Control panel Water feed for middle spray arm Optic indicator Middle spray arm Salt reservoir Lower spray arm Triple Filter System Rinse aid reservoir Four height adjustable feet... -
Page 12: Control Panel
Guide to the dishwasher Control panel On button / Indicator Top Solo button / Indicator Off button Check / Refill indicators Delay Start display Program list Delay Start button Program selection buttons / indicators Note: Remove the protective film from the program list before the first use. -
Page 13: Before Using For The First Time
Before using for the first time To open the door To close the door ^ Push the baskets in. ^ Lift the door and push until it clicks into position. ^ Pull the handle. If the door is opened during operation, the dishwasher will stop running. -
Page 14: Water Softener
Before using for the first time Water softener If your water hardness is consistently lower than 8 gr/gal (140 ppm), you do To achieve good cleaning results, the not need to add dishwasher salt. dishwasher needs soft water. Hard However, the dishwasher must still be water results in calcium deposits on programmed to correspond with the dishware and in the dishwasher. -
Page 15: Programming The Water Softener
Before using for the first time Programming the water softener 1 - 12 gr/gal: Your water hardness level must be An indicator corresponding to a preset programmed into the dishwasher using water hardness will light (see Table 1). the buttons on the control panel. Table 1: The programming can be canceled gr/gal*... -
Page 16: Checking The Programmed Water Hardness
Before using for the first time 13 - 70 gr/gal: Checking the programmed water hardness ^ Press the f button. ^ Open the door. The f indicator will light. ^ Turn off the dishwasher. An indicator corresponding to a set ^ Press and hold the a and c buttons. - Page 17 The salt reservoir must be filled with 2 quarts (2 l) of water before adding The proper salt can be purchased from salt for the first time. Water does your Miele dealer or Miele. not have to be added with subsequent refills. Inadvertently filling the salt...
-
Page 18: Salt Indicator
Before using for the first time Salt indicator Bypassing the salt indicator When the salt reservoir is empty, the If your water is soft (below 8 gr/gal) the "Salt-PC" indicator will light, indicating salt reservoir should not be filled with that it should be refilled with salt. -
Page 19: Rinse Aid
Before using for the first time Rinse aid Rinse aid is recommended to prevent spotting on dishes and glassware. Filling the rinse aid reservoir with detergent will damage the reservoir. Only pour rinse aid formulated for residential dishwashers into the reservoir. -
Page 20: Adjusting The Dosage
Before using for the first time Adjusting the dosage Rinse aid indicator The dosage selector is preset to 3. This The rinse aid indicator on the control dispenses approximately 3 ml of rinse panel will light when the rinse aid aid per program. -
Page 21: Loading The Dishwasher
Loading the dishwasher ^ The spray arms must not be blocked Do not wash items soiled with by items that are too tall or hang ash, sand, wax, grease or paint in through the baskets. Check the dishwasher. clearance by manually rotating the Ash and sand do not dissolve and spray arms. -
Page 22: Items Not Recommended For Dishwashing
Loading the dishwasher Items not recommended for Glassware: dishwashing – There are no standard guidelines for washing glassware but, when in – Cutlery with wooden handles. doubt wash by hand. – Wooden cutting boards. – Wash delicate glassware with a low –... -
Page 23: Cutlery Tray (Sc Units)
Loading the dishwasher Cutlery tray (SC units) Spoon heads should be placed in contact with at least one of the serrated The removable cutlery tray makes retainers of the cutlery tray to ensure unloading flatware easy. Simply carry that water runs off freely. the cutlery tray to where the flatware is stored and put the entire basket away in one trip. -
Page 24: Upper Basket
Loading the dishwasher Upper basket Adjusting the upper basket On select models, the upper basket can be raised or lowered to accommodate tall items. ^ Slide out the upper basket. Load the upper basket with small, lightweight, or delicate items such as cups, saucers, glasses, dessert bowls and flat pans. -
Page 25: Adjustable Cup Racks
Loading the dishwasher Adjustable cup racks Coffee bar Raise the rack to make room for tall To allow water to run off the bottom of glasses. Lower it to double stack coffee mugs, place slanted on top of smaller pieces. the coffee bar. -
Page 26: Lower Basket
Loading the dishwasher Lower basket Height limit For larger and heavier items such as plates, serving platters, sauce pans, bowls. Dishwasher with cutlery tray The guide at the front of the upper basket determines the maximum height for items placed in the lower basket so that the middle spray arm is not blocked. -
Page 27: Lower Basket Inserts
Lower basket inserts Various removable inserts are available for the lower basket to accommodate special items to be washed. Removing an insert ^ To remove an insert, gently pull up on the handle. Inserting an insert ^ Slide the hitches of the insert under the vertical struts of the lower basket. -
Page 28: Foldable Spike Insert
Lower basket inserts Foldable spike insert A highly flexible design holds tableware securely. It can be folded out of the way for pots, pans and other large items. This insert secures plates and platters. Foldable spikes Two rows of spikes can be folded down, to create more room for larger dishware e.g. -
Page 29: Plateguard Plus Insert
Lower basket inserts PlateGuard Plus insert A unique design cradles plates at 3 points and can be used for washing cups, glasses, plates, bowls and pots. ^ Hook the PlateGuard Plus insert into the left half of the lower basket, the area marked in white. -
Page 30: Basket Accessories
Basket accessories Additional inserts for the upper and lower baskets may be purchased from your Miele dealer or the Miele Technical Service Department. Vase / Bottle holder To wash milk or baby bottles, attaches to the lower basket. Tall Glassware Insert To wash a large number of glasses, attaches to the lower basket. -
Page 31: Operation
Operation Adding detergent Dishwasher detergents contain irritant and corrosive ingredients. Keep children away from detergent. Do not fill the detergent dispenser until you are ready to start the dishwasher. Only use powder detergents or tablets formulated for residential dishwashers. The use of gel or liquid detergent is not recommended. -
Page 32: Running The Dishwasher
Operation Running the dishwasher Waterproof System ^ Open the door. All Miele dishwashers are specially designed to shut off the water intake ^ Make sure the spray arms are not and drain the wash cabinet in the rare blocked. event of an internal water valve failure. -
Page 33: Interrupting A Program
Operation Interrupting a program Changing a program A program is interrupted as soon as the If the door has not been closed yet: door is opened. ^ Press the program button of the new If the door is closed, the program will program. -
Page 34: Program Guide
Operation Program guide Program When to use Program cycle Pre- Main Interim Final Dry- wash wash rinse rinse Pots & Pans For heavily soiled pots and pans with dried on food Main wash temperature 170 °F (75 °C) Run-time 142 min Sani Wash Extended wash time For sanitizing normally soiled dishware with dried... -
Page 35: Additional Features
Operation Additional features ^ Press the "On" button (15). "Top Solo" (2) Using "Top Solo" will save water and The "On" indicator (15) will light. energy. ^ Select a program using the program This program is recommended when selection buttons (22). there is only a small load to clean. -
Page 36: Delay Start (D)
Operation ^ Press the "On" button (15). Delay start (d) ^ Select a program using the program The start time of a program can be delayed from 1 to 9 hours. selection buttons (22). The delay start is set in one hour steps. The selected program indicator will light. - Page 37 Operation To start a program before the delay start period has elapsed: ^ Open the door. ^ Press the "Off" button (16). ^ Press the "On" button (15). ^ Select a program using the program selection buttons (22). ^ Select "Top Solo", if needed. ^ Close the door.
-
Page 38: Frequently Asked Questions
The "Intake/Drain" – Open the water valve. starting a program and indicator flashes/lights. – Clean the water inlet the optic indicator filter, see maintenance flashes? instructions. The waterproof system has activated. – Call the Miele Technical Service Department. -
Page 39: Frequently Asked Questions
Frequently asked questions What if … Possible fault shortly after starting a Water intake error. The water pressure is less program, the dishwasher The "Intake/Drain" than 4.5 psi (0.3 bar). stops running and indicator flashes. Contact a plumber. the optic indicator Drain error, water remains –... - Page 40 If the indicators flash flash? again after the next program cycle, call Miele Technical Service. there is a knocking The spray arm is hitting Interrupt the program, noise in the wash an item in the basket.
-
Page 41: Frequently Asked Questions
Frequently asked questions What if … Possible fault dishes are not clean? The dishes were not See "Loading the loaded correctly. dishwasher". The program was not Select a more intensive powerful enough. program, see the "Program guide". Not enough detergent Use more detergent, see was used. -
Page 42: Frequently Asked Questions
Frequently asked questions What if … Possible fault tea or lipstick stains The wash temperature of Select a program with a the selected program was higher temperature. have not been completely removed? too low. Not enough detergent Use more detergent. was used. -
Page 43: Frequently Asked Questions
Frequently asked questions What if … Possible fault plastics are discolored? Natural dyes e.g. from Use more detergent, see vegetables may be the "Adding detergent". cause. Not enough Discoloration is detergent was used to permanent. break down natural dyes. there are rust stains on The salt reservoir cap was Reseat and screw the cap cutlery? -
Page 44: After Sales Service
The Program Correction (PC) allows a Miele products will not be recognized technician to update the dishwasher to by Miele. Our goal is to prevent make use of new technology. unauthorized (and untrained) service personnel from working on your Miele... -
Page 45: Transport
Transport To transport the dishwasher, e.g. when moving to a new home, note the following: – Empty the dishwasher. – Secure any loose parts, e.g. hoses, cables, cutlery baskets. – Transport the dishwasher in the upright position. If unavoidable it may be transported on its back. -
Page 47: User Maintenance Instructions
User Maintenance Instructions To prevent accidents and machine damage, read these instructions before installation or use. -
Page 48: Cleaning And Care
Cleaning and Care Triple filter system The triple filter system in the base of the wash cabinet prevents food from being redeposited on dishes. It also protects the circulation pump from damage caused by foreign objects (e.g. broken glass, bones). The filter system should be cleaned every 4 - 6 months or whenever a foreign object is trapped. - Page 49 Cleaning and Care ^ Return the filter so it lies flat in the To clean the underside of the filter, the flap must be opened: base of the wash cabinet. ^ Pull back the yellow clip. ^ Lock the filter by turning the handle clockwise.
-
Page 50: Cleaning The Spray Arms
Cleaning and Care ^ Remove the lower basket. Cleaning the spray arms Sometimes particles of food get stuck in the spray arm jets. The spray arms should be inspected and cleaned every 4 - 6 months. ^ Turn off the dishwasher before cleaning. -
Page 51: Cleaning The Wash Cabinet
They will damage the surface. a dishwasher cleaner such as Dis Cleaner available from your Miele Plastic dealer or the Miele Technical Service All plastic surfaces and the control Department. panel can be cleaned with warm water and liquid dish soap applied with a soft Cleaning the door and door sponge. -
Page 52: Cleaning The Water Inlet Filter
^ Unscrew the intake hose. intake hose connection is ^ Carefully remove the rubber seal. recommended. These filters can be purchased from Miele. ^ Remove the filter using needle nose pliers and rinse under running water. ^ Return the filter and seal. Make sure they are seated correctly. -
Page 53: Cleaning The Drain Pump And Non-Return Valve
Cleaning and Care Cleaning the drain pump and non-return valve If the dishwasher is not completely drained at the end of a program, the drain pump or non-return valve may be blocked. ^ Turn off the dishwasher. ^ Remove the triple filter (see "Cleaning the filter in the wash cabinet"). - Page 56 Alterations rights reserved / G 851 Plus 2505 M.-Nr. 05 431 331 / 02...
Need help?
Do you have a question about the G 658 SCVi and is the answer not in the manual?
Questions and answers