
Related Manuals for 3M SCP725


Summary of Contents for 3M SCP725
- Page 1 Super Close Projection System SCP725 Operator’s Guide January 2011 • 78-6971-1572-9 • Copyright © 2011, 3M Company. All Rights Reserved.
-
Page 3: Table Of Contents
Super Close Projection System SCP725 Operator’s Guide ™ Contents Introduction Thank You for Choosing 3M Equipment ......................5 Trademarks ..............................5 Important Notice ............................5 Warranty; Limited Remedy; Limited Liability ....................5 Product Patents ..............................7 Regulatory Notices ............................7 Safety Information Intended Use ..............................9 Safety Labels ...............................12 Contents of Shipping Box Keep Your Packing Materials ........................13... - Page 4 Operator’s Guide Super Close Projection System SCP725 ™ Menu Navigation Main Menu ..............................22 Input Menu ..............................23 Picture Menu ..............................24 Advanced Picture Menu ..........................25 Audio Menu ..............................26 Setup Menu ..............................27 Advanced Setup Menu ..........................28 Information Menu ............................29 Machine Specifications Maintenance Lamp Replacement ............................31 Cleaning the Air Vents ..........................32...
-
Page 5: Thank You For Choosing 3M Equipment
The lamp component of the 3M Product is warranted to be free from defects in material and manufacture for a period of ninety (90) days after the date of purchase of the 3M Product or 180 hours of lamp usage, whichever occurs first. - Page 6 This warranty is not transferable. h. 3M is not responsible for warranty service should the 3M label or logo or the rating label or serial number be removed unless otherwise stated in writing for the purpose of private labeling for partnership requirements.
-
Page 7: Product Patents
™ What 3M Will Do To Correct Problems: • I f your 3M Product requires service, 3M will ask you to bring or send the 3M Product, securely packaged in its original container or equivalent, along with proof of the date of original purchase, to your 3M Service Dealer or 3M Service Center. • 3 M will, at its option, repair or replace the defective unit without charge for parts or labor. Return of the 3M Product will be at 3M’s expense. - Page 8 RoHS, as amended:(a) 0.1% (by weight) for lead, mercury, hexavalent chromium, polybrominated biphenyls or polybrominated diphenyl ethers; or (b) 0.01% (by weight) for cadmium. This information represents 3M’s knowledge and belief, which may be based on information provided by third party suppliers to 3M.
-
Page 9: Safety Information
Before operating the machine, please read the entire manual thoroughly. This product was designed, built and tested for use indoors, using 3M lamps and hardware. The use of other replacement lamps, outdoor operation or different voltages has not been tested and could damage the projector or peripheral equipment and/or create a potentially unsafe operating condition. - Page 10 To reduce the risk associated with hazardous voltage and/or fire: • Replace power cord if damaged. • Contact a 3M authorized service provider if the projector becomes damaged. • Use a grounded extension cord with a rating at least equal to that of the projector.
- Page 11 To reduce the risk associated with impact of a falling projector: • Use only the 3M brand wall/ceiling mounting hardware kit if wall or ceiling mounting is desired. • Installation of the 3M brand wall/ceiling kit must only be performed by qualified personnel.
-
Page 12: Safety Labels
Operator’s Guide Super Close Projection System SCP725 ™ Safety Labels The following safety labels are used on this product. © 3M 2011. All Rights Reserved. -
Page 13: Contents Of Shipping Box
6. USB A-B cable, 1.8m (not shown) Keep Your Packing Materials Save the shipping box and packing materials in the event this product should require shipping to a 3M Service Center for repair. Use packing material to protect projector. What’s Next? Take a few minutes to review the machine characteristics before you setup and operate the projector. -
Page 14: Product Description
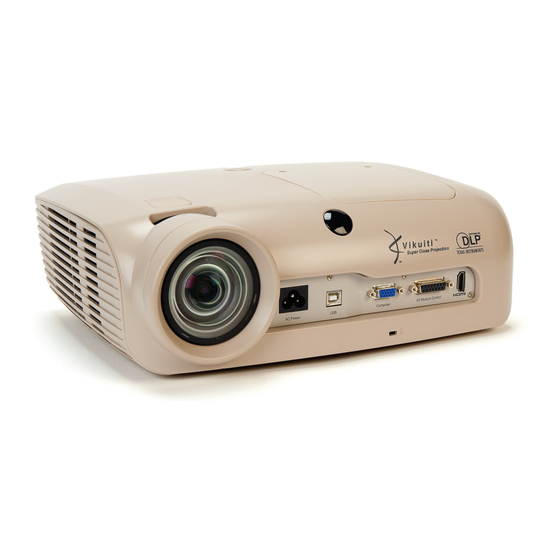
Super Close Projection System SCP725 ™ Product Description The 3M SCP725 integrates short-arc lamp and Digital Light Processing™ (DLP) technology. It accepts input from computer and/or video sources and projects a bright image through 3M™ Vikuiti™ Super Close Projection technology. -
Page 15: Projector Distance From Screen And Image Size
Super Close Projection System SCP725 Operator’s Guide ™ Projector Distance from Screen and Image Size Refer to the chart below for the projector-to-screen distance and corresponding projected image size values. Image Size Distance (D) Offset Min (S) Offset Max (S) -
Page 16: Parts Identification
Connect projector control port to computer serial port with RS232 adapter or the 3M I/O Module and control the projector. HDMI Connect the projector a HDMI video source or DVI-D video source. The SCP725 does not connect audio through the HDMI port. © 3M 2011. All Rights Reserved. -
Page 17: I/O Module Control Panel (Optional Accessory)
CONTROL Connect IO/Module to projector I/O Module CONTROL terminal. Signal Connect I/O Module to projector COMPUTER port. Audio Out Connect IO/Module to external speakers or speakers in 3M Folding Wall Mount FWMSV2. © 3M 2011. All Rights Reserved. -
Page 18: Bottom Terminal Panel On I/O Module
Use the Bottom Terminal Panel to connect the I/O Module box to the Computer/Video source. I/O Module Bottom Terminal Panel Function Audio Power Supplies power to 3M Folding Wall Mount speakers from the power supply included with the 3M Folding Wall Mount. Computer2/Component2 Input for computer or component video device. Serial RS-232 Passes control commands from a computer or control system to the projector. -
Page 19: Remote Control Functions
Remote Control Functions Use a USB cable to connect from the PC to the SCP725 or SCP I/O Module (if equipped) and aim the remote control toward the projection screen or at the IR sensor on the projector. Press desired remote control button to send a signal to the projector. -
Page 20: Installing Batteries In Remote Control
Operator’s Guide Super Close Projection System SCP725 ™ Installing Batteries in Remote Control 1. Push down on cover to unlatch it. Slide cover off. 2. Install new AAA batteries with the correct polarities. 3. Reinstall battery cover. Note: Verify the battery cover is fully latched before using the remote control. -
Page 21: Operating Instructions
Operating Instructions Projector Start Up Read the Important Safeguards before operating the SCP725. After all cable connections have been completed, refer to Setup and Configuration, the projector can be powered up. For best results, please observe the following start up sequence. -
Page 22: Menu Navigation
Operator’s Guide Super Close Projection System SCP725 ™ Menu Navigation To display the on screen menus, press the MENU button on the remote control or I/O Module. Use the remote control Up/Down ARROW buttons to select the desired menu (see table below), then pull the TRIGGER button (bottom of remote control) to display it. -
Page 23: Input Menu
Super Close Projection System SCP725 Operator’s Guide ™ Input Menu The Input Menu, shown below, is used to select the desired computer or video input source to be displayed on the projector. Input Input Source: Computer 1 Computer 1 / Component 1 ✓... -
Page 24: Picture Menu
Operator’s Guide Super Close Projection System SCP725 ™ Picture Menu The Picture Menu, shown below, is used to adjust the picture settings to display the best possible image. Picture Input Source: Computer 1 Picture Mode Enhanced Photo Brightness 50 |·······················| |·······················|... -
Page 25: Advanced Picture Menu
Super Close Projection System SCP725 Operator’s Guide ™ Advanced Picture Menu The Picture Menu with the Advanced option selected, shown below, is used to adjust the projected image for Computer and Component inputs only. Picture Input Source: Computer 1 Over Scan 97 |···········●············|... -
Page 26: Audio Menu
Operator’s Guide Super Close Projection System SCP725 ™ Audio Menu (Menu displays only if I/O Module is connected) The Audio Menu, shown below, is used to adjust the audio settings and select the audio input source to play through the projector. -
Page 27: Setup Menu
Super Close Projection System SCP725 Operator’s Guide ™ Setup Menu The Setup Menu, shown below, is used to configure the basic projector operating parameters. Setup Input Source: Computer 1 Language English Auto Shutoff Minutes Off |······················| Keystone 0 |······················| Reset Lamp Hrs ... -
Page 28: Advanced Setup Menu
Operator’s Guide Super Close Projection System SCP725 ™ Advanced Setup Menu The Advanced Setup Menu, shown below, is used to initiate the PIN code feature (turn On/Off) and set the PIN code. Advanced Setup Input Source: Computer 1 PIN Authentication ►... -
Page 29: Information Menu
Super Close Projection System SCP725 Operator’s Guide ™ Information Menu The Information Menu, shown below, is used to display current projector configuration settings. Information Input Source: Computer 1 Input Resolution 1024 x 768 H Frequency 31.75 KHz V Frequency 60 Hz... -
Page 30: Machine Specifications
Operator’s Guide Super Close Projection System SCP725 ™ Machine Specifications Item Specification Bright Mode: Typical 34 dB(A) Acoustic Noise Level Normal Mode: Typical 32 dB(A) ECO Mode: Typical 28.5 dB(A) Automatically recognizes the connection of I/O module Auto Detect & Install... -
Page 31: Maintenance
Super Close Projection System SCP725 Operator’s Guide ™ Maintenance Lamp Replacement www.lamprecycle.org Note: Refer to the Setup Menu to reset the lamp hour timer after replacing the lamp. © 3M 2011. All Rights Reserved. -
Page 32: Cleaning The Air Vents
Super Close Projection System SCP725 ™ Cleaning the Air Vents For best performance, 3M recommends that you periodically dust the projector and vacuum all air vents on the projector. Follow the procedures below. 1. Return projector to standby mode. After the Standby button turns amber and the fan stops, unplug the power cord from the wall outlet. -
Page 33: Cleaning The Lamp Module And Lamp Compartment
For best lamp performance, there must be adequate air flow through and around the lamp module. A build up of dust or dirt will reduce the air flow and shorten lamp life and lamp performance. 3M recommends at every lamp change or at least once a year that air vents, lamp module and lamp compartment be cleaned with a vacuum. - Page 34 Operator’s Guide Super Close Projection System SCP725 ™ 4. Install the lamp taking care to seat it fully into the lamp socket connection and tighten the lamp retaining screws. 5. Replace the lamp door and secure it with the retaining screws.
-
Page 35: Troubleshooting
Super Close Projection System SCP725 Operator’s Guide ™ Troubleshooting Identifying an Expired Lamp Module Lamp Module Parts 1. Top of Lamp Module 2. Lamp Connector 3. Air Vents 4. Lamp Wires 5. Bulb Envelope - This is the shape of the bulb inside the lamp module. -
Page 36: I/O Module Troubleshooting
Operator’s Guide Super Close Projection System SCP725 ™ I/O Module Troubleshooting Symptom Possible Cause Solution The Standby button on the I/O The communication cable is not Connect a communication cable (15 module does not light while the connected or is damaged. - Page 37 Super Close Projection System SCP725 Operator’s Guide ™ Symptom Standby Button State Possible Cause Action The projector is cooling Wait until the projector down. completes its cooling cycle. Once the Standby button turns amber, you can press the Standby button again.
- Page 38 Operator’s Guide Super Close Projection System SCP725 ™ Symptom Standby Button State Possible Cause Action The desired input source Press the remote control is not selected. Input button to select a desired input source. The cables from the input Connect the cable to source are not connected.
-
Page 39: Projector Indicator Lights
Super Close Projection System SCP725 Operator’s Guide ™ Symptom Standby Button State Possible Cause Action The input source is not Connect an active input active. A signal must be source to unit. present for the input to be Desired input source selected. -
Page 40: Replacement Parts And Accessories
78-6969-9996-6 Optional Accessories (not shown) Name of Part 3M Part Number 3M Fixed Wall Mount SCPFXW.V2 78-6969-9986-7 3M Folding Wall Mount with Speakers SCPWMS.V2 78-6969-9988-3 3M I/O Module V3 78-6972-0012-5 RS232 Adapter for projector control without the I/O Module 78-6969-9934-7... - Page 41 Super Close Projection System SCP725 Operator’s Guide ™ © 3M 2011. All Rights Reserved.
- Page 42 Operator’s Guide Super Close Projection System SCP725 ™ © 3M 2011. All Rights Reserved.
- Page 43 Super Close Projection System SCP725 Operator’s Guide ™ © 3M 2011. All Rights Reserved.
- Page 44 You assume all risks and liability associated with such use. Any statements related to the product which are not con- tained in 3M’s current publications, or any contrary statements contained on your purchase order shall have no force or effect unless expressly set forth in a written agreement signed by an authorized officer of 3M.
Need help?
Do you have a question about the SCP725 and is the answer not in the manual?
Questions and answers