Advertisement
Table of Contents
- 1 Table of Contents
- 2 Generator Safety
- 3 Caution Label Location
- 4 Component Identification
- 5 Pre-Operation Check
- 6 Starting the Engine
- 7 Generator Use
- 8 Stopping the Engine
- 9 Maintenance
- 10 Transporting/Storage
- 11 Troubleshooting
- 12 Wiring Diagram
- 13 Speclflckjtlons
- 14 Warranty Service
- Download this manual
See also:
Owner's Manual
Advertisement
Table of Contents

Related Manuals for Honda EX2200


Summary of Contents for Honda EX2200
- Page 2 generator is a potential source of electrical shock misused. Do not-&pose the generator to moisture, rain or snow. Do not let the generator get wet, and do not operate it with wet hands.,...
- Page 3 Honda dealer. are designed to instructions. operating the generator. damage. of the EX2200 generator. written permission. words: injury or loss of injury or equipment damage if to give safe and dependable Read and understand Failure...
-
Page 4: Table Of Contents
CONTENTS CONTENTS 1. GENERATOR SAFETY..2. CAUTION LABEL LOCATION..3. COMPONENT IDENTIFICATION.. 4. PRE-OPERATION CHECK..5. STARTING THE ENGINE ... 6. GENERATOR USE ... STOPPING THE ENGINE ... 8. MAINTENANCE 9. TRANSPORTING/STORAGE.. 10. TROUBLESHOOTING 11. WIRING DIAGRAM ... 12. -
Page 5: Generator Safety
To ensure safe operation- Place the generator equipment during operation. Operate the generator If the generator is tilted, Exhaust gas contains Never run the generator Be sure to provide Know how to stop the generator of all controls. Never proper instructions. -
Page 6: Caution Label Location
2. CAUTION LABEL LOCATION EXHAUST ECHAPPEMENT CHAUD... - Page 7 WARN’lNG DO NOT USE INDOORS. EXHAUST GAS CONTAINS’ POISONOUS CARBON MONOXIDE. . ,,JTI()N NE PAS UTILISER DANS UN ENDROIT FERME A CAUSE DU RISQUE D’EMPOISONNENT ATENCl()N NO LO USE EN LUGARES CERRADOS POI _ MONOXIDE DE CARBON0 ES VENENOSO: ..:.: 7 ,.:::::, .::g;:;::.
-
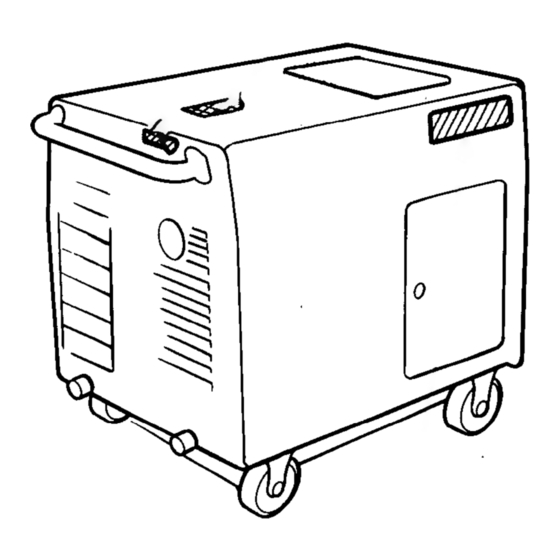
Page 8: Component Identification
3. COMPONENT VOLTAGE ADJUSTMENT KNOB AC RECEPTACLES KNOB - CHOKE ENGINE SWITCH llnterlocked with fuel valve) STARTER GRIP- FRONT MAINTENANCE COVER IDENTIFICATION L ----------- OIL ALERT LAMP DAMPER RUBBER TERMINAL OIL FILLER CAP... - Page 9 FUEL TANK SPARK PLUG UPPER MAINTENANCE COVER AIR CLEANER REAR MAINTENANCE COVER OIL DRAIN BOLT 1...
-
Page 10: Pre-Operation Check
4. PRE-OPERATION CAUTION: Be sure to check engine stopped. 1. Check the engine oil level. CAUTION: Engine oil is a major factor service life. Non-detergent Use Honda 4-stroke oil, or an equivalent motor oil certified to meet or exceed U.S. automobile quirements for Service Classification SG, SF/CC, CD will show this designation... - Page 11 2. Check the fuel level. Check the fuel gauge and refill the tank if the fuel level is low. Your engine is designed octane number octane number of 91 or higher. Gasoline pumps at service station normally display the pump octane number. We recommend that you use unleaded fuel because it produces fewer engine and spark plug deposits and extends the life of exhaust system...
- Page 12 Gasoline is extremely conditions. Refuel in a well-ventilated or allow flames or sparks where gasoline is stored. Do not overfill the fuel tank (there should After refueling, make sure the tank cap is closed properly Be careful not to spill fuel when ignite.
-
Page 13: Starting The Engine
5. STARTING THE ENGINE 1. Turn off the AC circuit breaker. BREAKER CIRCUIT 2.Turn on the engine switch. ENGliE SWITCH... - Page 14 3. Pull the choke knob out to close. I II 4. Pull the starter rope lightly until resistance is felt, then pull briskly. CAUTION: Do not allow the starter Do not let the starter wear out prematurely. NOTE: Make sure the pilot lamp comes on. If not, check the bulb filament. CHO/KE KNOB grip to snap back.
- Page 15 5. Push the choke knob in as the engine warms up. Oil Alert System Before the oil level in the crankcase can fall below a safe limit, the Oil Alert System will automatically when the recoil starter grip is pulled. To restart, add enough recommended engine oil to bring the oil level to the upper level mark on the dipstick (See page 81, and restart the engine.
-
Page 16: Generator Use
6. GENERATOR USE To prevent electrical be grounded. Connect minal and an external Connections for standby made by a qualified and electrical codes. from the generator electrocute utility company ing a power outage, may explode, burn, or cause fires in the building’s CAUTION Limit operation requiring... - Page 17 AC applications 1. Start the engine and make sure the pilot lamp comes on. If not, check the filament. 2. Switch on the AC Circuit Breaker. NOTE: Although voltage justments may be made by turning the voltage adjustment generator at the specified voltage (12OV). 3.
- Page 18 DC application ’ The DC terminals may be used for charging batteries only. battery gives cigarettes away. Provide batteries in an enclosed The battery contains eyes may cause severe shield. - If electrolyte gets on your skin, flush electrolyte gets minutes and call a physician Electrolyte...
-
Page 19: Stopping The Engine
7. STOPPING THE ENGINE To stop the engine in an emergency, turn the engine switch OFF. 1 .Turn off the AC circuit breaker. .AC CIRCUIT BREAKER 2.Turn off the engine switch. ENGINE SWITCH... -
Page 20: Maintenance
8. MAINTENANCE The purpose of the maintenance generator in the best operating condition. Inspect or service as scheduled in the table on the next page. cmml Shut off the engine engine must be run, make sure the area is well ventilated. tains poisonous carbon CAUTION:... - Page 21 Maintenance Schedule REGULAR SERVICE PERIOD Performed Check level Engine oil Chance Check Air cleaner Clean Spark plug Clean-Readjust Spark arrester Clean Fuel sediment cup Clean Valve clearance Check-Readjust Fuel tank and strainer Clean Check (Replace Fuel line if necessary) NOTE: (1) Service more frequently (2) These...
- Page 22 Changing Drain the oil while the engine is still warm to assure rapid and complete draining. 1. Open the front maintenance 2. Remove the drain bolt and filler cap, and drain the oil. Retighten the bolt securely. 3. Refill with the recommended 4.
- Page 23 Air cleaner service A dirty air cleaner will restrict air flow to the carburetor. buretor malfunction, more frequently when operating the generator in extremely Never use gasoline air cleaner element. A fire or explosion CAUTION: Never run the generator wear will result. 1.
- Page 24 Spark plug service Recommended spark plug: BPRGES (NGK)’ To ensure proper engine operation, the spark plug must be properly gapped and free of deposits. 1. Open the rear maintenance 2. Remove the spark plug cap. 3. Clean any dirt from around the spark plug base. 4.
- Page 25 7. Inspect the plug washer and then thread the plug in by hand to prevent cross threading. 8. After a new spark plug has been seated by hand, it should be tightened l/2 turn with a wrench to compress its washer. If a used plug is being reinstalled, after being seated.
- Page 26 Fuel sediment cup service The filter prevents dirt or water which may be in the fuel tank from entering the carburetor. If the engine has not been run for a long time, the filter should be cleaned. 1. Open the front maintenance 2.
- Page 27 Spark arrester maintenance If the generator Allow it to cool before CAUTION: The spark arrester tain its efficiency. 1. Remove the nine 6 mm bolts, the handle and right side cover. 2. Remove the two 5 mm pan screws, and the spark arrester. has been running, proceeding.
- Page 28 3. Use a brush to remove carbon-deposits from the spark arrester screen. NOTE: Inspect the spark airester screen for holes or tears. Replace if necessary. 4. Reinstall the spark arrester, right side cover and handle.
-
Page 29: Transporting/Storage
When transporting and keep the generator fuel may ignite. Before storing the unit for an extended period: 1. Be-sure the storage area is free of excessive .humidity.and 2. Drain the fuel- a. Open the rear maintenance b. Turn the engine switch to ON and then loosen the carburetor screw. -
Page 30: Troubleshooting
10. TROUBLESHOBTBNG When the engine will not start: Is there fuel in the tank? Is the engine switch Is there enough in the engine? Is the1 re a spark 1 from the spark plug? Be sure there is no spilled fuel around the spark plug. - Page 31 No electricity at the AC receptacles: Is the AC circuit breaker Check the electrical appliance or equip- ment for any defects. NO DEFECTS DEFECTS Turn the AC, circuit breaker Take the generator b to an authorized Honda dealer. Replace the elect rical appliance equipment.
-
Page 32: Wiring Diagram
11. WIRING DIAGRAM 1 BI 1 BLACK... -
Page 33: Speclflckjtlons
Dimensions Length x Width x Height Dry Weight Engine Model Engine Type Displacement [Bore x Stroke1 Compression Ratio Engine Speed Cooling System Ignition System Oil Capacity Fuel Tank Capacity Spark Plug Generator Rated voltage Rated frequency Rated ampere AC output Rated output Maximum output .I 2. -
Page 34: High Altitude Operation
High altitude operation At high altitude, the standard carburetor air-fuel mixture will be excessively rich. Performance will decrease, and fuel consumption High altitude performance main fuel jet in the carburetor and readjusting the pilot screw. If you always operate the generator at altitudes higher than 6,000 feet above sea level, have your authorized modifications. -
Page 35: Warranty Service
Owner Satisfaction Your satisfaction and goodwill Honda warranty details are explained in the Distributor’s ty. Normally, any problems concerning the product will be handled by your dealer’s service department. been handled to your satisfaction, action: Discuss your problem with a member of dealership management. complaints can be quickly already been reviewed with the Service Manager, contact the owner of... - Page 36 MEMO...
- Page 37 MEMO...
- Page 38 MEMO...
Need help?
Do you have a question about the EX2200 and is the answer not in the manual?
Questions and answers