FujiFilm FinePix S602 ZOOM Service Manual
Hide thumbs
Also See for FinePix S602 ZOOM:
- Owner's manual (92 pages) ,
- Brochure & specs (5 pages) ,
- Catalog (11 pages)
Table of Contents
Advertisement
Advertisement
Table of Contents

Related Manuals for FujiFilm FinePix S602 ZOOM


Summary of Contents for FujiFilm FinePix S602 ZOOM
- Page 1 DIGITAL CAMERA FinePix S602 ZOOM SERVICE MANUAL U/E/EG-Model WARNING THE COMPONENTS INDENTIFIED BY MARK IN THE PARTS LIST SHOULD BE REPLACED ONLT BY THE COMPONENTS SPECIFIED IN THE PARTS LIST. RISK OF FIRE AND ELECTRIC SHOCK. Ref.No.:ZM00441-100 FUJI PHOTO FILM CO., LTD.
- Page 2 FinePix S602 ZOOM SERVICE MANUAL SAFETY CHECK-OUT After correcting the original problem, perform the following safety check before returning the product to the customer. 1. Check the area of your repair for unsoldered or Caution: poorly soldered connections. Check the entire For continued protection against board surface for solder splasher and bridges.
-
Page 3: Table Of Contents
TABLE OF CONTENTS FinePix S602 ZOOM SERVICE MANUAL TABLE OF CONTENTS 4-3.About the Adjustment PC Soft ........44 1.Specifications 4-3-1.Attention at DSC jig driver ........44 1-1.Product Specifications ............4 4-3-2.Attention at PC adjustment soft ......45 1-2.Camera Features ..............6 4-3-3.Attention at Firmware .......... -
Page 4: Specifications
1. Specifications FinePix S602 ZOOM SERVICE MANUAL 1. Specifications 1-1. Product Specifications System Model Digital camera FinePix S602 ZOOM Number of effective pixels 3.1million pixels CCD sensor 1/1.7 inch Super CCD in an interwoven pattern Number of total pixels 3.3 million pixels Number of recorded pixels 2832 x 2128 pixels (6.03 million pixels) /2048 x 1536 pixels/1280 x 960 pixels/640 x 480 pixels... - Page 5 MG-128SW : 128MB, 3.3V, ID AC-5VH/AC-5VHS AC Power Adapter Fujifilm Rechargeable Battery 2HR-3UF Fujifilm Battery Charger with Battery BK-NH (Not Available in U.S.A./Canada) FD-A2 Floppy Disk Adapter (FlashPath) Windows 95/98/98 SE/Me/NT 4.0, Mac OS 7.6.1 to 9.1 SM-R2 Image Memory Card Reader Compatible with Windows 98/98 SE, Windows Me, Windows 2000 Professional or iMac or Power Macintosh and models that support USB as standard.
-
Page 6: 1-2.Camera Features
AF/AE Lock: On the FinePix S602 ZOOM, pressing the shutter button down half way locks the focus and exposure settings (AF and AE lock). If you want to focus on a subject that is not centered in the frame or change the picture composition after the exposure is set, you can obtain good results by changing the composition after the AF and AE settings are locked. -
Page 7: 1-3.Names Of External Components
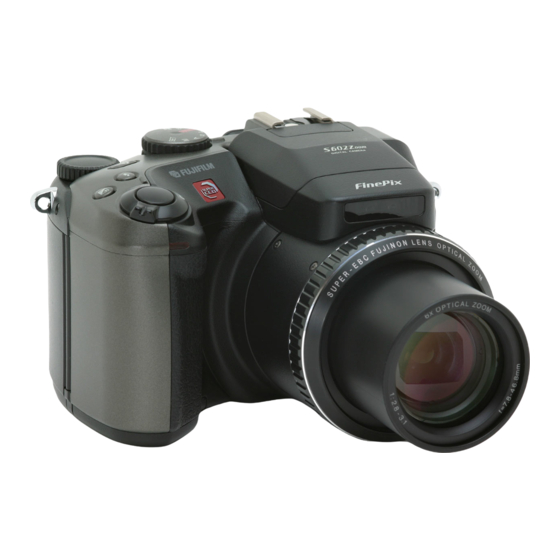
1. Specifications FinePix S602 ZOOM SERVICE MANUAL 1-3. Names of External Components Hot shoe Focusing ring Power switch Shutter button Exposure compensation button Flash button Continuous shooting button Mode dial Command dial Self-timer lamp (Focus Check) button EVF/LCD (viewfinder/ monitor) button... - Page 8 1. Specifications FinePix S602 ZOOM SERVICE MANUAL Flash control sensor Flash pop-up button Flash Microphone AF sensor INFO (information check) button Strap mount (USB) socket Speaker A/V OUT (Audio/visual output) socket Terminal cover (One-touch AF) button DC IN 5V (power input) socket...
-
Page 9: Disassembly
2. Disassembly FinePix S602 ZOOM SERVICE MANUAL 2. Disassembly 2-1. Names of Internal Components C DIAL UNIT KEY PWB ASSY R CABI ASSY ST ASSY CONST EVF CONST LCD ASSY SPEAKER ASSY TOP CABI ASSY MODE DIAL UNIT LCD FRAME... -
Page 10: 2-2.How To Remove R Cabi Const
2. Disassembly FinePix S602 ZOOM SERVICE MANUAL 2-2. How to remove R CABI CONST [Procedure] 1. Remove screw (M1.7x8.0). 2. Remove screw (M1.7x5.5). 3. Remove six screws (M1.7x5.0). 4. Remove R CABI CONST in the direction of the arrow. 5. Remove FFC(x2). -
Page 11: 2-3.Decomposition Of R Cabi Const
2. Disassembly FinePix S602 ZOOM SERVICE MANUAL 2-3. Decomposition of R CABI CONST [Procedure] 1. Remove FFC from KEY PWB ASSY. 2. Remove screw (M1.7x4.0). 3. Remove C DIAL UNIT in the direction of the arrow. 4. Push STRAP L from the direction of the arrow and remove. -
Page 12: 2-4.How To Remove Lcd Assy
2. Disassembly FinePix S602 ZOOM SERVICE MANUAL 2-4. How to remove LCD ASSY [Procedure] 1. Detach the undermentioned parts. R CABI CONST 2. Put tweezers etc. in the LCD FRAME hook on LCD right side and remove LCD ASSY from LCD FRAME. -
Page 13: 2-5.How To Remove Top Cabi Const
2. Disassembly FinePix S602 ZOOM SERVICE MANUAL 2-5. How to remove TOP CABI CONST [Procedure] 1. Detach the undermentioned parts. R CABI CONST, LCD ASSY 2. Push ST BUTTON, and improve the flash in pop. 3. Detach AF PLATE to the space between AF PLATE and F CABI CONST with a needle etc. - Page 14 2. Disassembly FinePix S602 ZOOM SERVICE MANUAL 6. Remove the speaker side of TOP CABI CONST in the direction of the arrow. 7. Lift the SHUTTER BUTTON side of TOP CABI CONST in the direction of the arrow and remove.
- Page 15 2. Disassembly FinePix S602 ZOOM SERVICE MANUAL 9. Remove Wire Harness (3) from TOP CABI CONST and FFC (1). 10. Pull out SHEET FRAME from LCD FRAME. 11. Remove Wire Harness (2). There is no dread of the electric shock and do not touch the terminal when you remove Wire Harness...
- Page 16 2. Disassembly FinePix S602 ZOOM SERVICE MANUAL [Assembly procedure] Assemble it according to a reverse procedure. 1. Combine intuition on the tip of the AF sensor when you connect all Wire Harness with FFC. 2. Combine the speaker side of TOP CABI CONST in intuition in the hook of F CABI CONST.
-
Page 17: 2-6.Decomposition Of Top Cabi Const
2. Disassembly FinePix S602 ZOOM SERVICE MANUAL 2-6. Decomposition of TOP CABI CONST [Procedure] 1. Remove two screws (M1.7x4.0), and remove HOLDER EVF. 2. Remove four screws (M1.7x4.0), and remove MODE DIAL UNIT. 3. Remove EVF CONST. 4. Remove SPEAKER ASSY. - Page 18 2. Disassembly FinePix S602 ZOOM SERVICE MANUAL 6. Remove ST SHUFT(x2). 7. Lift while pressing ST ASSY CONST against the SHUTTER BUTTON side and remove. [Assembly procedure] Assemble it according to a reverse procedure. [Notes of assembly] Note the taking turning of the flash hiss harness.
-
Page 19: 2-7.How To Remove Lcd Frame Const
2. Disassembly FinePix S602 ZOOM SERVICE MANUAL 2-7. How to remove LCD FRAME CONST [Procedure] 1. Detach the undermentioned parts. R CABI CONST, LCD ASSY, ST PLATE, ST BUTTON, TOP CABI CONST 2. Remove FFC Wire Haness (4)(2). 3. Remove main body A and part B, and remove LCD FRAME CONST. -
Page 20: 2-8.Decomposition Of Lcd Frame Const
2. Disassembly FinePix S602 ZOOM SERVICE MANUAL 2-8. Decomposition of LCD FRAME CONST [Procedure] Confirm the main capacitor of DCST PWB ASSY has been discharged without fail before work is started. 1. Remove two screws (M1.7x3.0), and remove CONTACT PLT and DCST PWB ASSY. -
Page 21: 2-10.How To Remove Sheet Frame
2. Disassembly FinePix S602 ZOOM SERVICE MANUAL 2-10. How to remove SHEET FRAME [Procedure] 1. Remove SHEET FRAME from LCD FRAME. [Assembly procedure] Assemble it according to a reverse procedure. [Notes of assembly] Note the damage of SHEET FRAME when you install SHEET FRAME in LCD FRAME. -
Page 22: 2-12.How To Remove Battery Holder Unit
2. Disassembly FinePix S602 ZOOM SERVICE MANUAL 2-12. How to remove BATTERY HOLDER UNIT [Procedure] 1. Detach the undermentioned parts. R CABI CONST, LCD ASSY, ST PLATE, ST BUTTON, TOP CABI CONST, LCD FRAME CONST BATTERY LID 2. Remove screw (M1.7x5.0). -
Page 23: 2-14.How To Remove Lens Frame
2. Disassembly FinePix S602 ZOOM SERVICE MANUAL 2-14. How to remove LENS FRAME [Procedure] 1. Detach the undermentioned parts. R CABI CONST, LCD ASSY, ST PLATE, ST BUTTON, TOP CABI CONST, LCD FRAME CONST BATTERY LID, BATTERY HOLDER UNIT, CAM PWB ASSY 2. -
Page 24: 2-16.How To Remove Lens Cabi Assy
2. Disassembly FinePix S602 ZOOM SERVICE MANUAL [Assembly procedure] Assemble it according to a reverse procedure. [Notes of assembly] Make the cutting lack of the rib and LENS CONST of F CABI CONST combined in intuition, and build it in when you build in LENS CONST. -
Page 25: 2-17.How To Remove Side Module Unit
2. Disassembly FinePix S602 ZOOM SERVICE MANUAL 2-17. How to remove SIDE MODULE UNIT [Procedure] 1. Detach the undermentioned parts. R CABI CONST, LCD ASSY, ST PLATE, ST BUTTON, TOP CABI CONST, LCD FRAME CONST BATTERY LID, BATTERY HOLDER UNIT, CAM PWB ASSY, LENS FRAME, LENS CONST LENS CABI ASSY 2. -
Page 26: 2-18.How To Remove Af Sensor Unit
2. Disassembly FinePix S602 ZOOM SERVICE MANUAL 2-18. How to remove AF SENSOR UNIT [Procedure] 1. Detach the undermentioned parts. R CABI CONST, LCD ASSY, ST PLATE, ST BUTTON, TOP CABI CONST, LCD FRAME CONST BATTERY LID, BATTERY HOLDER UNIT, CAM PWB ASSY, LENS FRAME, LENS CONST LENS CABI ASSY 2. -
Page 27: Schematic
3. Schematic FinePix S602 ZOOM SERVICE MANUAL 3. Schematic 3-1.Cautions <Caution when replaceing chip (leadless) parts.> * Do not re-use the removed parts, but use new parts. Be careful that the negativ side of the tantalum capacitors are susceptible to heat. -
Page 28: 3-3.Functions Of Primary Blocks
3. Schematic FinePix S602 ZOOM SERVICE MANUAL 3-3.Functions of Primary Blocks 3-3-1.Technical Outline Use of [the 3rd Generation Super CCD Honeycomb] has improved still photography performance. The 3,100,000 effective pixels, and [the Honeycomb Signal Processing System], allows recording and reproduction of high-quality images of up to 2832 x 2128 (6,030,000) pixels. -
Page 29: 3-4.Block Diagram
3. Schematic FinePix S602 ZOOM SERVICE MANUAL O.LPF 32bit/75MHz IMAGE 32bit/75MHz MICON 32bit/75MHz IMAGE 32bit/75MHz BRIDGE R/G/B... -
Page 30: 3-5.Overall
3. Schematic FinePix S602 ZOOM SERVICE MANUAL... -
Page 39: Adjustment
4. Adjustment FinePix S602 ZOOM SERVICE MANUAL 4. Adjustment 4-1.Adjustments to Primary Components Following Replacement The adjustments indicated by 'Number' below are required to follow when the component bellow is replaced. AF sensor CCD data input Photography Zoom AF Flash Battery Mode dial Final setup... -
Page 40: 4-2.Preparation For Adjustments
Note 1 : Please do the expansion copy to the A3 size and use the Siemens Star Chart. Note 2 : This is a holder set for holding the conversion lens. For details, see the figure below. Note 3 : Please download them from the web server (http://fujifilm-di.intranets.com/). -
Page 41: 4-2-3.Connection
4. Adjustment FinePix S602 ZOOM SERVICE MANUAL Conversion lens complete set Lens Holder Lens Stand Lens Base Plate Attention when conversion lens is used. Convex side : Subject side. Plane : Camera lens side. 4-2-3.Connection USB Cable Video Cable FinePix S602Zoom... -
Page 42: 4-2-4.Environmental Settings For Adjustment
4. Adjustment FinePix S602 ZOOM SERVICE MANUAL 4-2-4.Environmental Settings for Adjustment 1. Remove the chart from the pattern box, and adjust the color temperature and luminance of the light source. Firmly attach the LB140 filter to the surface of the pattern box. -
Page 43: 4-2-7.Environmental Settings For Af Adjustment
4. Adjustment FinePix S602 ZOOM SERVICE MANUAL 4-2-7.Environmental settings for AF adjustment 1. It sets it by using the f=600mm conversion lens and siemens star chart as shown below. 2. It illuminate on the siemens star chart by using the 2 light source. When the illuminance is insufficient, it is not possible to adjust it by "Brightness shortage". -
Page 44: 4-3.About The Adjustment Pc Soft
When FinePix S602Zoom adjusted, the installation of the DSC jig driver is necessary. The download, decompression and installation procedure is recorded as follows. [Download and decompression] 1) Download the compressed DSC jig driver from Web server (http://fujifilm-di.intranets.com/). 2) Defrost the downloaded compression file. (Note) The DSC jig driver in this server is compression file of ZIP form. -
Page 45: 4-3-2.Attention At Pc Adjustment Soft
(FFW.exe). A basic program is FinePix S602Zoom exclusive use. The download, decompression and installation procedure is recorded as follows. [Download and decompression] 1) Download the compressed PC adjustment software from Web server (http://fujifilm-di.intranets.com/). 2) Defrost the downloaded compression file. (Note) The PC adjustment software in this server is compression file of ZIP form. -
Page 46: 4-3-3.Attention At Firmware
4-3-3.Attention at Firmware The firmware is not needing downloaded as long as there is usually no instruction. [Download and decompression] 1) Download the compressed firmware from Web server (http://fujifilm-di.intranets.com/). 2) Defrost the downloaded compression software. 3) The folder named ZJ00482-100 can be made by simply defrosting <Fig.3-7>. -
Page 47: 4-3-4.Content Of Adjustment Software
4. Adjustment FinePix S602 ZOOM SERVICE MANUAL 4-3-4.Content of Adjustment Software This adjustment software uses the basic program (FFW.exe), together with a number of specialized user programs, for Adjustment. FxS602Z.ff has the following nine components. [F1] : Battery voltage adjustment... -
Page 48: 4-3-6.Customizing Of Adjustment Software
4. Adjustment FinePix S602 ZOOM SERVICE MANUAL 4-3-6.Customizing of Adjustment Software Customizing for the adjustment software is explained below. c:\finepix_s602zoom\fxS602z.ff 1.Compiles FinePix_S602Zoom FxS602Z.ff Procedure <Fig.3-12> 1) Click on Mode Setting from the basic software program’s menu bar. The “Customize” dialog box will be displayed. - Page 49 4. Adjustment FinePix S602 ZOOM SERVICE MANUAL 4.Other Procedure <Fig.3-15> 1) Select “Other” from the “Customize” dialog box. 2) Select the “Other Conditions” setting. 3) Conditions Auto measurement count Don't show OK/NG Check <Fig.3-15> Other 5.Save Procedure <Fig.3-16> *: If all the settings have been completed, be sure to click on the “Apply” button and save the settings.
-
Page 50: 4-3-7.Use Of Each Command
4. Adjustment FinePix S602 ZOOM SERVICE MANUAL 4-3-7.Use of each command An explanation and the use of each command when it changes the user's program. FxS602Z.ff Menu Command Content Operation Start General operation command (starts the user program). Stop General operation command (ends the user program). -
Page 51: 4-4.Adjustment Of Components (For Pc Adjustment)
3) Press the [Enter] key on the PC and set the camera in the jig mode in accordance with the instructions on the screen. FxS602Z.ff FinePix S602 Zoom PC adjustment software <Notes when using adjustment software> 1) The content of the adjustment is different because of replaced parts. -
Page 52: 4-4-3.Af Sensor Adjustment
Turn the adjustment screw while viewing the WAVE No.0 dialog box to increase the speed of adjustment. FxS602Z.ff FxS602Z.ff FinePix S602 Zoom PC adjustment software AF sensor adjustment <Adjustment items select menu> <Adjustment preparation (1)>... - Page 53 4. Adjustment FinePix S602 ZOOM SERVICE MANUAL 9) When [Adjustment OK!] appears on the screen, press the [Enter] key on the PC and make adjustment prepa- rations (900 mm) in accordance with the instructions from the adjustment software. 900mm conversion lens setup distance : 100mm+/-5mm from front face of AF sensor window.
-
Page 54: 4-4-4.Ccd Data Input
6) When the CCD data has been entered correctly, press the [Enter] key on the PC to return to the Adjustment Items Select Screen. FxS602Z.ff FxS602Z.ff FinePix S602 Zoom PC adjustment software CCD data input <Adjustment items select menu> [F1] : Battery voltage adjustment <Preparation>... -
Page 55: 4-4-5.Preparing The Ccd Defect Data (Fd)
1. Always ensure that the CCD serial number is read correctly. If the file name is read incorrectly, the defect data for the that file name (ie defect data for another CCD) will be used. 2) Download the ZIP file of top four digits from Web server (http://fujifilm-di.intranets.com/). Open ZJ00535-100[(Fig.17-(1)] in the CCD defect data folder, and download "1484.zip[Fig.17-(2)]". -
Page 56: 4-4-6.Cam Adjustment
5) When CAM adjustment is complete, press the [Enter] key on the PC to return to the Adjustment Items Select Screen. FxS602Z.ff FxS602Z.ff CAM adjustment FinePix S602 Zoom PC adjustment software Confirm the color temperature and brightness of pattern box. <Adjustment items select menu> Temperature : 6100+/-50K (with LB140 filter) -
Page 57: 4-4-7.Zoom/Af Adjustment
5) When Zoom/AF adjustment is completed normally, press the [Enter] key on the PC to return to the Adjustment Items Select Screen. FxS602Z.ff FxS602Z.ff Zoom adjustment... FinePix S602 Zoom PC adjustment software <Adjustment items select menu> [F1] : Battery voltage adjustment [F2] : Mode dial voltage adjustment [F4] : CCD data input... -
Page 58: 4-4-8.Flash Adjustment
6) When flash adjustment is completed normally, press the [Enter] key on the PC to return to the Adjustment Items Select Screen. FxS602Z.ff FxS602Z.ff FinePix S602 Zoom PC adjustment software Flash adjustment <Adjustment items select menu> Set the gray chart 1000mm+-10mm from Flash luminescence face. -
Page 59: 4-4-9.Battery Adjustment
65h-85h E4 (BATT_END) 5Fh-7Fh FxS602Z.ff FxS602Z.ff FinePix S602 Zoom PC adjustment software Battery adjustment <Adjustment items select menu> 1) Input 3.80V(+0.02V,-0.00V) from the battery cable jig. Press the [Enter] key when it is possible to prepare. [F1] : Battery voltage adjustment... -
Page 60: 4-4-10.Mode Dial Voltage Adjustment
Data limits E5 (MODE) D1h-F1h FxS602Z.ff FxS602Z.ff FinePix S602 Zoom PC adjustment software Mode dial voltage adjustment <Adjustment items select menu> 1) The mode dial is [SET-UP] position. [F1] : Battery voltage adjustment 2) Input 5.00V(+/-0.01V) from the battery cable jig. -
Page 61: 4-4-11.End Setting
Caution : The camera is not in the Jig mode following end setting. Set the camera in the camera Jig mode again to make further adjustments. FxS602Z.ff FxS602Z.ff FinePix S602 Zoom PC adjustment software USB ID The model is selected from an undermentioned list. <Adjustment items select menu>... -
Page 62: Inspection
5. Inspection FinePix S602 ZOOM SERVICE MANUAL 5. Inspection 5-1.Preparation for inspection 5-1-1.Measuring Equipments Names Remark Stabilized Power Supply General inspection Pattern Box Comparable to the PTB450 or equivalent Waveform Monitor General inspection Vector Monitor General inspection TV Monitor NTSC_TV monitor 600 resolutions (14-21inch) -
Page 63: 5-1-3.Connection
5. Inspection FinePix S602 ZOOM SERVICE MANUAL 5-1-3.Connection FinePix S602 Zoom Vector Monitor Waveform Monitor TV Monitor Stabilized Power Supply Ammeter Voltmeter <Fig.5-1> Connection... -
Page 64: 5-2.Inspection
5. Inspection FinePix S602 ZOOM SERVICE MANUAL 5-2.Inspection 5-2-1.External Inspection Procedure and Checks 1) Check the camera visually for damage to the exterior. 2) Check that there are no problems (eg dust, clouding) with the EVF and LCD monitors. 5-2-2.Power Supply Switch Check Procedure and Checks 1) Use the power supply cable jig to supply 4.50V (+/-0.05V) from the DC-IN... -
Page 65: 5-2-5.Resolution Check
5. Inspection FinePix S602 ZOOM SERVICE MANUAL 5-2-5.Resolution Check Procedure and Checks 1) Prepare the resolution inspection chart. 2) Insert the smart media into the camera. 3) Set the zoom position to TELE END. · Check that the zoom operates smoothly. -
Page 66: 5-2-6.Y Level Check
5. Inspection FinePix S602 ZOOM SERVICE MANUAL 5-2-6.Y Level Check Procedure and Checks 1) Prepare the pattern box. · Color temperature : 6100+/-50°K (with LB140 filter fitted) · Luminance : 160+/-5cd/m2 (with LB140 filter fitted) 2) Insert the smart media into the camera. -
Page 67: 5-2-7.Flash Photography Check
5. Inspection FinePix S602 ZOOM SERVICE MANUAL 5-2-7.Flash Photography Check Procedure and Checks 1) Prepare the gray chart. 2) Make the necessary settings for flash photography. · Distance between gray chart and camera : 1000mm from surface of flash · Recording pixels : VGA (640 x 480) ·... -
Page 68: 5-2-8.Manual Focus Check
5. Inspection FinePix S602 ZOOM SERVICE MANUAL 5-2-8.Manual Focus Check Procedure and Checks 1) Set the AF/MF selector switch to MF. · Check that the MF symbol remains on the LCD monitor. 2) Turn the focusing ring. · Check that the focus moves. -
Page 69: 5-2-14.Low Battery Check
5. Inspection FinePix S602 ZOOM SERVICE MANUAL 5-2-14.Low Battery Check Procedure and Checks 1) Set to the preend check voltage. · 3.70+/-0.01V · Check that the preend symbol is displayed on the LCD monitor. 2) Set to the end check voltage. -
Page 70: 5-2-17.Evf Display Image Check
5. Inspection FinePix S602 ZOOM SERVICE MANUAL 5-2-17. EVF Display Image Check Procedure and Checks 1) Insert a microdrive containing images, and playback completely black. · Check that there is no noticeable dust or contamination (eg lumines- cent spots) on the EVF monitor screen. -
Page 71: 5-2-19.Settings At Shipment
5. Inspection FinePix S602 ZOOM SERVICE MANUAL 5-2-19.Settings at Shipment Procedure and Checks 1) Mode dial : Auto photography 2) Check that the battery and memory card are not inserted. 3) Card cover : Closed 4) Battery cover : Closed... -
Page 72: 6-1.U-Model
6. Parts List FinePix S602 ZOOM SERVICE MANUAL 6. Parts List 6-1. U-Model 6-1-1. Packing and Accessories (U) A110 A111 A117 A105 A113 A114 A115 A119 A118 A103 A120 A109 A106 A102 A107 A121 A108 A107 A112 A104 A101 Ref No. - Page 73 6. Parts List FinePix S602 ZOOM SERVICE MANUAL 6-1-2.Cabinet F (U) M212 M210 M214 M211 M213 M210 M216 M209 M207 M204 M202 M208 M201 M206 M203 M205 M202 M215 Ref No. Parts No. Description Common Ref No. Parts No. Description...
- Page 74 6. Parts List FinePix S602 ZOOM SERVICE MANUAL 6-1-3. Internal (U) M317 M316 M315 M320 M318 M323 M305 M314 M316 M304 M312 M311 M322 M321 M318 M319 M306 M318 M301 M306 M302 M306 M303 M308 M309 M310 M307 M306 M313 Ref No.
- Page 75 6. Parts List FinePix S602 ZOOM SERVICE MANUAL 6-1-4. Cabinet R (U) M410 M401 M403 M405 M404 M411 M409 M406 M402 M407 M409 M408 Ref No. Parts No. Description Common Ref No. Parts No. Description Common M401 BU01958-100 R CABI ASSY...
- Page 76 6. Parts List FinePix S602 ZOOM SERVICE MANUAL 6-1-5. External (U) M507 M502 M503 M501 M506 M508 M501 M505 M504 M501 M510 M509 Ref No. Parts No. Description Common Ref No. Parts No. Description Common M501 BB13148-200 SCREW M1.7X5.0BC (x6)
-
Page 77: 6-2.E-Model
6. Parts List FinePix S602 ZOOM SERVICE MANUAL 6-2. E-Model 6-2-1. Packing and Accessories (E) A108 A109 A119 A105 A111 A112 A113 A121 A120 A103 A118 A122 A107 A116 A102 A123 A117 A106 A114 A115 A110 A104 A101 Ref No. - Page 78 6. Parts List FinePix S602 ZOOM SERVICE MANUAL 6-2-2.Cabinet F (E) M212 M210 M214 M211 M213 M210 M216 M209 M207 M204 M202 M208 M201 M206 M203 M205 M202 M215 Ref No. Parts No. Description Common Ref No. Parts No. Description...
- Page 79 6. Parts List FinePix S602 ZOOM SERVICE MANUAL 6-2-3. Internal (E) M317 M316 M315 M320 M318 M323 M305 M314 M316 M304 M312 M311 M322 M321 M318 M319 M306 M318 M301 M306 M302 M306 M303 M308 M309 M310 M307 M306 M313 Ref No.
- Page 80 6. Parts List FinePix S602 ZOOM SERVICE MANUAL 6-2-4. Cabinet R (E) M410 M401 M403 M405 M404 M411 M409 M406 M402 M407 M409 M408 Ref No. Parts No. Description Common Ref No. Parts No. Description Common M401 BU01958-100 R CABI ASSY...
- Page 81 6. Parts List FinePix S602 ZOOM SERVICE MANUAL 6-2-5. External (E) M507 M502 M503 M501 M506 M508 M501 M505 M504 M501 M509 Ref No. Parts No. Description Common Ref No. Parts No. Description Common M501 BB13148-200 SCREW M1.7X5.0BC (x6) M502 BB13148-300 SCREW M1.7X8.0BC...
-
Page 82: 6-3.Eg-Model
6. Parts List FinePix S602 ZOOM SERVICE MANUAL 6-3. EG-Model 6-3-1. Packing and Accessories (EG) A115 A108 A109 A105 A111 A112 A113 A117 A116 A103 A118 A114 A102 A107 A119 A106 A110 A104 A101 Ref No. Parts No. Description Common Ref No. - Page 83 6. Parts List FinePix S602 ZOOM SERVICE MANUAL 6-3-2.Cabinet F (EG) M212 M210 M214 M211 M213 M210 M216 M209 M207 M204 M202 M208 M201 M206 M203 M205 M202 M215 Ref No. Parts No. Description Common Ref No. Parts No. Description...
- Page 84 6. Parts List FinePix S602 ZOOM SERVICE MANUAL 6-3-3. Internal (EG) M317 M316 M315 M320 M318 M323 M305 M314 M316 M304 M312 M311 M322 M321 M318 M319 M306 M318 M301 M306 M302 M306 M303 M308 M309 M310 M307 M306 M313 Ref No.
- Page 85 6. Parts List FinePix S602 ZOOM SERVICE MANUAL 6-3-4. Cabinet R (EG) M410 M401 M403 M405 M404 M411 M409 M406 M402 M407 M409 M408 Ref No. Parts No. Description Common Ref No. Parts No. Description Common M401 BU01958-100 R CABI ASSY...
- Page 86 6. Parts List FinePix S602 ZOOM SERVICE MANUAL 6-3-5. External (EG) M507 M502 M503 M501 M506 M508 M501 M505 M504 M501 M509 Ref No. Parts No. Description Common Ref No. Parts No. Description Common M501 BB13148-200 SCREW M1.7X5.0BC (x6) M502 BB13148-300 SCREW M1.7X8.0BC...
-
Page 87: Parts List
6. Parts List FinePix S602 ZOOM SERVICE MANUAL 6-4. Electrical Parts (U/E/EG-Model commonness) [NOTE] * Due to standardization,replacement in the parts list may be The components indicated by mark are critical for safety. When indicated parts by reference number,please include different form the parts list specified in the circuit or the the board name. -
Page 88: Appendix
7. Appendix FinePix S602 ZOOM SERVICE MANUAL 7. Appendix 7-1.List of Related Technical Updates Issued To ensure that after-sales srevice is performed accuratety, keep a record here of the technical updates issued that cover this device. Technical Update No. Date... - Page 89 FUJI PHOTO FILM CO., LTD. 26-30, Nishiazabu 2-chome, Minato-ku, Tokyo 106-8620, Japan.