Table of Contents
Advertisement
Quick Links
Advertisement
Table of Contents

Related Manuals for iOptron SmartStarMiniTower II


Summary of Contents for iOptron SmartStarMiniTower II
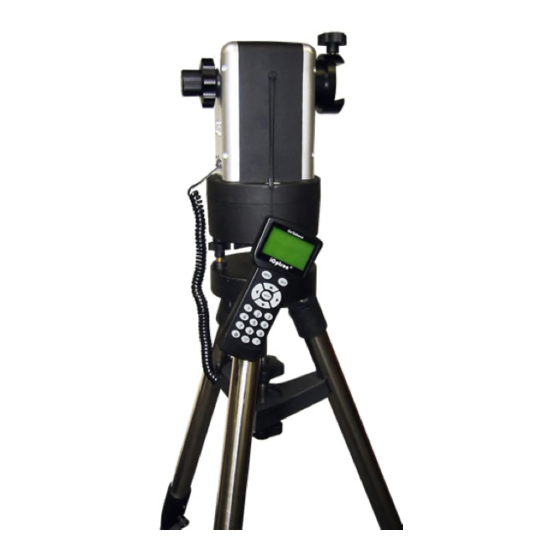
- Page 1 ® SmartStar MiniTower Instruction Manual...
-
Page 2: Table Of Contents
Table of Content Table of Content ..........................2 1. MiniTower II Overview......................4 1.1. MiniTower II -- The Next Generation MiniTower............4 1.2. MiniTower II Contents ....................6 2. MiniTower II Assembly......................7 2.1. Assembly Term........................7 2.2. MiniTower II Assembly....................... 8 2.3. - Page 3 Looking at or near the Sun will cause instant and irreversible damage to your eye. Children should always have adult supervision while observing. V1.0 iOptron reserves the rights to revise this instruction without notice. Actual color/contents/design may differ from those described in this instruction.
-
Page 4: Minitower Tm Ii Overview
II will consistently bring the celestial object of your choice to the center of the eye- piece and keep tracking for hours. 30 lbs. of Payload Born out of the popular iOptron Cube , the MiniTower II is the ultimate observing solution for people who are searching for a capable and portable GOTO telescope mount to counter light pollution in their backyards and for travel convenience. - Page 5 Additional Unique Features Powered with other features such as automatic over-current protection, automatic clutch protection for both axes, easy 3-point level adjustment, anti-cord wrapping, dual scope setup with two dovetails and much more -- The MiniTower II is one of the most user-friendly GOTO mounts available today.
-
Page 6: Minitower Tm Ii Contents
12V DC adaptor cable with car lighter plug • One controller Cable • One USB cable • Hard travel case ONLINE CONTENTS (click under “Support” menu) www.iOptron.com • This manuals • Tips for set up and application • Hand controller firmware upgrades (check online for latest version) •... -
Page 7: Minitower Tm Ii Assembly
2. MiniTower II Assembly There are two shipping boxes. One box contains the hard case and mount components. The other box contains the tripod and counterweight. 2.1. Assembly Term Figure 3. MT2 assembly term 1. Tripod Lock 10. Primary Dovetail Saddle 2. -
Page 8: Minitower Ii Assembly
Next, slide tripod support spread (#2) onto bottom of bolt (#4). Position the three edges to fit against the three tripod legs. Then hand tighten tripod lock knob (#1) to secure the tripod support spread in place. Figure 7 iOptron Corp. | 6E Gill Street | Woburn, MA 01801 USA | (781) 569‐0200 | Toll Free (866) 399‐4587 | www.iOptron.com ... - Page 9 (1:1X) to the fastest (9:MAX). The other HBX is reserved for accessories, such as electronic Figure 9 focuser, laser pointer and autoguider adapter. DO NOT plug non-iOptron accessories into the unit to avoid damaging the mount or accessories. Step 7. #12 ...
-
Page 10: Ota Mounting And Balancing
#16 Figure 13 2.3. OTA Mounting and Balancing The iOptron MiniTower™ II can handle various OTAs. A 1.75” Vixen-style dovetail plate is needed to mount an OTA onto the MT2 mount. A Losmandy-D dovetail saddle is also available from iOptron. -
Page 11: Operate A Minitower Ii On Batteries
The battery operation time varies depending on the battery quality and operation conditions. It could last from couple of hours to tens of hours. Use only fresh batteries and do not mix fresh and old batteries. Insufficient battery power may cause error messages. iOptron Corp. | 6E Gill Street | Woburn, MA 01801 USA | (781) 569‐0200 | Toll Free (866) 399‐4587 | www.iOptron.com ... -
Page 12: Gotonova 8401 Hand Controller
RA direction. Brows the menu or move the cursor in operating menu. • Number Keys: Input numerical values. Also used to adjust speeds (1: 1X; 2: 2X; 3: 8X; 4: 16X; 5: 64X; 6: 128X; 7: 256X; 8: 512X; 9: MAX) iOptron Corp. | 6E Gill Street | Woburn, MA 01801 USA | (781) 569‐0200 | Toll Free (866) 399‐4587 | www.iOptron.com ... -
Page 13: The Lcd Screen
HBX (Handbox) port: connect the HC to MiniTower II mount using a 6P4C RJ11 cable. • USB port: connect the HC to a computer via a USB cable. 3.2. The LCD Screen The 8401 HC is designed to use for both iOptron’s equatorial (EQ) mount, such as the ® ® SmartStar... -
Page 14: Getting Started
(#8) a little and manually turn the Mount to face south. Then tighten the azimuth clutch lock again. The other is turn on Figure 19 the mount. Turn the mount facing south using hand iOptron Corp. | 6E Gill Street | Woburn, MA 01801 USA | (781) 569‐0200 | Toll Free (866) 399‐4587 | www.iOptron.com ... -
Page 15: Setting Up The Hand Controller
Press ENTER. The longitude and latitude coordinates will be updated when the GPS picks up satellite signals. “W/E” means west/east hemisphere; “N/S” means northern/southern hemisphere; “d” means degree; “m” means minute; and “s” means second. Set up site info: Longitude: W071d27m47s Latitude: N42d15m40s Min. behind iOptron Corp. | 6E Gill Street | Woburn, MA 01801 USA | (781) 569‐0200 | Toll Free (866) 399‐4587 | www.iOptron.com ... -
Page 16: Set Up Daylight Saving Time
4.3.2. Set Up Daylight Saving Time Scroll up and select “Set up local Time” Set up Local Time Set up site Set N/S hemisphere Set display contrast Set Eyepiece light Set Backlight Set anti-backlash Set Key Beep Press ENTER. iOptron Corp. | 6E Gill Street | Woburn, MA 01801 USA | (781) 569‐0200 | Toll Free (866) 399‐4587 | www.iOptron.com ... -
Page 17: Check Mount Type
To park the telescope press the MENU button, scroll down to “Park Telescope” and press ENTER. Once the telescope returns to Park Position turn the power off. Otherwise, just turn the mount power off. iOptron Corp. | 6E Gill Street | Woburn, MA 01801 USA | (781) 569‐0200 | Toll Free (866) 399‐4587 | www.iOptron.com ... -
Page 18: Complete Functions Of Gotonova Hnad Controller
5.1.4. Asteroids This catalog contains up to 4096 asteroids. This database is customer upgradeable. 5.1.5. Stars: • Named Stars: consists of 191 stars with their common names. They are listed alphabetically. A list is attached in Appendix C. iOptron Corp. | 6E Gill Street | Woburn, MA 01801 USA | (781) 569‐0200 | Toll Free (866) 399‐4587 | www.iOptron.com ... -
Page 19: Constellations
“Sync to Target” does the same thing as one star alignment except that you choose the object to “sync” to. One star alignment chooses the star/object for you. 5.3. Electric Focuser Reserved. 5.4. Set Up Controller 5.4.1. Set Up Local Time Refer to 4.2.2. 5.4.2. Set Up Site Refer to 4.2.1. iOptron Corp. | 6E Gill Street | Woburn, MA 01801 USA | (781) 569‐0200 | Toll Free (866) 399‐4587 | www.iOptron.com ... -
Page 20: Set N/S Hemisphere
5.4.4. Set Display Contrast Use arrow keys to adjust LCD display contrast. 5.4.5. Set Eyepiece Light To adjust the light intensity of an iOptron laser pointer or illuminated-reticule eyepiece or polar scope. 5.4.6. Set Backlight Adjust LCD and keypad backlight. -
Page 21: Set Key Beep
Select Alt/Azi mount and press ENTER to go back the previous screen. 5.4.10. Reset All Reset all settings to factory default data. 5.4.11. Update Firmware Firmware updating using iOptron Downloader through USB port on hand controller. (Refer to Appendix E.) 5.4.12. Set Gear Ratio Not applicable. -
Page 22: Align
If the mount operates using AA batteries or iOptron PowerWeight battery pack, turn this function off to save the battery. 5.5. Align This function is used for aligning the telescope. 5.5.1. One Star Align From the main menu select “Align”. Select “One Star Align”. Use ▲ and ▼ buttons to select a star and press ENTER. -
Page 23: Pec Option
Remove the batteries from the battery holder if they were installed. 6.2. Troubleshooting The following suggestions may be helpful for the operation of the MiniTower. More information can be found in our online FAQ section (www.iOptron.com then click on “support”). iOptron Corp. | 6E Gill Street | Woburn, MA 01801 USA | (781) 569‐0200 | Toll Free (866) 399‐4587 | www.iOptron.com ... - Page 24 Using the battery? Is the battery fresh? How long it has been used? (frequent slew and GOTO will deplete battery power very quickly) • Using AC or DC adapter? Check the plugs to the mount and to the power outlet. iOptron Corp. | 6E Gill Street | Woburn, MA 01801 USA | (781) 569‐0200 | Toll Free (866) 399‐4587 | www.iOptron.com ...
-
Page 25: Ioptron Customer Service
Also check all the plugs and connections. 6.3. iOptron Customer Service If you have a question concerning your MiniTower II, contact the iOptron Customer Service Department. Customer Service hours are 9:00 AM to 5:00 PM, Eastern Time, Monday through Friday. -
Page 26: Appendix A. Technical Specifications
10 lb Tripod 1.5” Stainless Steel Carrying case Battery AA x 8(Not Included) Power Requirement DC 12V±2V, >1.5A USB Port Protocol ASCOM Firmware Upgrade PC Computer Control Weight with tripod 48 lbs. (shipping weight) Warranty Two year limited iOptron Corp. | 6E Gill Street | Woburn, MA 01801 USA | (781) 569‐0200 | Toll Free (866) 399‐4587 | www.iOptron.com ... -
Page 27: Appendix B. Gotonova
GCVS Variable Stars SAO Catalog Constellations Constellations User Objects User Objects Enter R.A. and DEC Enter R.A. and DEC Sync. To Target Sync. To Target Electric Focuser Electric Focuser Electric Focuser Focus Focus Focus Set Anti-backlash Set Anti-backlash Set Anti-backlash iOptron Corp. | 6E Gill Street | Woburn, MA 01801 USA | (781) 569‐0200 | Toll Free (866) 399‐4587 | www.iOptron.com ... - Page 28 Delete One Record Delete One Record Delete One Record Erase All Records Erase All Records Erase All Records Auto Guide Auto Guide Auto Guide Park Scope Park Scope Park Scope To Park Position To Park Position To Park Position iOptron Corp. | 6E Gill Street | Woburn, MA 01801 USA | (781) 569‐0200 | Toll Free (866) 399‐4587 | www.iOptron.com ...
-
Page 29: Appendix C. Gotonova Star List
Eight-Burst Nebula 3132 Eskimo Nebula 2392 Flaming Star Nebula Ghost of Jupiter 3242 Great Cluster 6205 Helix Nebula 7293 Hercules Galaxy Cluster 2151 Hind's Variable Nebula 1555 Hubble's Variable Nebula 2261 Integral Sign Galaxy 3697 Jewel Box Cluster 4755 iOptron Corp. | 6E Gill Street | Woburn, MA 01801 USA | (781) 569‐0200 | Toll Free (866) 399‐4587 | www.iOptron.com ... - Page 30 4038 Rosette Nebula 2237 Saturn Nebula 7009 Sextans B Dwarf 5373 Small Magellanic Cloud Sombrero Galaxy 4594 Spindle Galaxy 3115 Tank Track Nebula 2024 Trifid Nebula 6514 Ursa Minor Dwarf 9749 Whirlpool Galaxy 5194 Wild Duck Cluster 6705 iOptron Corp. | 6E Gill Street | Woburn, MA 01801 USA | (781) 569‐0200 | Toll Free (866) 399‐4587 | www.iOptron.com ...
- Page 31 Sagitta Corvus Sagittarius Crater Scorpius Crux Sculptor Cygnus Scutum Delphinus Serpens Dorado Sextans Draco Taurus Equuleus Telescopium Eridanus Triangulum Fornax Triangulum Australe Gemini Tucana Grus Ursa Major Hercules Ursa Minor Horologium Vela Hydra Virgo Hydrus Volans Indus Vulpecula iOptron Corp. | 6E Gill Street | Woburn, MA 01801 USA | (781) 569‐0200 | Toll Free (866) 399‐4587 | www.iOptron.com ...
- Page 32 044 Ankaa 092 Groombridge 1830 140 Polaris 188 Zavijava 045 Antares 093 Grumium 141 Pollux 189 Zosma 046 Arcturus 094 Hamal 142 Porrima 190 Zubenelgenubi 047 Arkab 095 Homan 143 Procyon 191 Zubeneschamali 048 Arneb 096 Izar 144 Propus iOptron Corp. | 6E Gill Street | Woburn, MA 01801 USA | (781) 569‐0200 | Toll Free (866) 399‐4587 | www.iOptron.com ...
- Page 33 Beta 252019 HR 5089 204545 Alpha 252838 Zeta 101145 Gamma 225938 Gamma 83958 159665 Alpha 184415 Antares Lambda 121658 Marfic Zeta 65485 160332 Sabik 123107 Zeta 187600 Ascella Delta 48796 Beta 106316 Rotanev 71121 Epsilon 67310 double double iOptron Corp. | 6E Gill Street | Woburn, MA 01801 USA | (781) 569‐0200 | Toll Free (866) 399‐4587 | www.iOptron.com ...
-
Page 34: Appendix D. Set Up Usb-Pc Connection
Appendix D. Set Up USB-PC Connection 1. Download USB2COM driver (cp2102.zip file for 8401) from iOptron Website 2. Install cp2101(usb2com) driver Choose the appropriate driver for your OS. In this case is a Windows XP operation system. Double click on it, and you will see: Click “Next”. - Page 35 Select “I accept the terms of license agreement”, and click “Next” Using the default installation path, c:\SiLabs\MCU\CP210x, or specify your own path by click “Change”. Click “Next”. Then click “Install”. iOptron Corp. | 6E Gill Street | Woburn, MA 01801 USA | (781) 569‐0200 | Toll Free (866) 399‐4587 | www.iOptron.com ...
- Page 36 3. Plug the USB cable to the USB port on your PC, plug the other end of the USB cable to hand controller. Turn on the power on the mount. 4. Install the Hardware The computer will find a new hardware and show the following screen Select “No, not this time” and click “Next”. iOptron Corp. | 6E Gill Street | Woburn, MA 01801 USA | (781) 569‐0200 | Toll Free (866) 399‐4587 | www.iOptron.com ...
- Page 37 Select “Install from a list or specific location” and click “Next”. Select “Search for the best driver in these locations,” and check “Include this location in the search.” Click on “Browse” and select the cp210x driver from directory c:\SiLabs\MCU\CP210x\Win2K_XP, click OK. iOptron Corp. | 6E Gill Street | Woburn, MA 01801 USA | (781) 569‐0200 | Toll Free (866) 399‐4587 | www.iOptron.com ...
- Page 38 Click “Next”. The computer will start to install the driver for the USB2COM. When the installation is done, click “Finish”. If the computer shows “find a new hardware” screen again, just repeat the steps in this section again. iOptron Corp. | 6E Gill Street | Woburn, MA 01801 USA | (781) 569‐0200 | Toll Free (866) 399‐4587 | www.iOptron.com ...
- Page 39 Now your computer should be ready for Firmware Upgrading; computer communication with the mount via ASCOM platform; and planetarium software applications. However, you need to find assigned COM port number for the USB connection. To do so, right click “My Computer”, and click “Properties” Click “Hardware”, click “Device Manager” iOptron Corp. | 6E Gill Street | Woburn, MA 01801 USA | (781) 569‐0200 | Toll Free (866) 399‐4587 | www.iOptron.com ...
- Page 40 Double click on “Ports (COM & LPT)”. Find the COM number and write it down (in the following figure, it is COM4) iOptron Corp. | 6E Gill Street | Woburn, MA 01801 USA | (781) 569‐0200 | Toll Free (866) 399‐4587 | www.iOptron.com ...
-
Page 41: Appendix E. Firmware Upgrade
Appendix E. Firmware Upgrade 1. Download and install Firmware Downloader from iOptron Website 2. Double click and open “iOptron Downloader” On the interface, select appropriate port using pull-down menu (in this case, COM4): iOptron Corp. | 6E Gill Street | Woburn, MA 01801 USA | (781) 569‐0200 | Toll Free (866) 399‐4587 | www.iOptron.com ... - Page 42 Click “Start Download” It shows “Please reset GOTONOVA[GOTOSTAR], waiting for connection…” On the hand controller, press “MENU”, and using ▼▲ scroll to select “Set u controller”, press “ENTER”, then select “Upgrade firmware”, press “ENTER” and the upgrade will start. iOptron Corp. | 6E Gill Street | Woburn, MA 01801 USA | (781) 569‐0200 | Toll Free (866) 399‐4587 | www.iOptron.com ...
- Page 43 2. Screen is now blank: Wrong “.bin” file: make sure you have the correct “.bin” file for firmware upgrade. 3. Wrong downloader: you should use iOptron Downloader instead of the Flash Downloader. 4. Use cp210x driver provided by iOptron. The newest version from SiLab may not work properly for iOptron’s hand controller. iOptron Corp. | 6E Gill Street | Woburn, MA 01801 USA | (781) 569‐0200 | Toll Free (866) 399‐4587 | www.iOptron.com ...
-
Page 44: Appendix F. Use A Pc To Control An Ioptron Mount
2. Install USB2COM and establish the connection between the mount and the PC (see instruction); 3. Download ASCOM platform from http://ascom-standards.org/, and install it; 4. Download iOptron ASCOM drive from iOptron website and install it; and 5. Planetarium software. Some company integrated iOptron’s products into their planetarium software, such as Voyage and The Sky X Pro. -
Page 45: Ioptron Two Year Telescope, Mount, And Controller Warranty
As a condition to the obligation of iOptron to repair or replace such product, the product must be returned to iOptron together with proof-of-purchase satisfactory to iOptron.
Need help?
Do you have a question about the SmartStarMiniTower II and is the answer not in the manual?
Questions and answers