Table of Contents
Advertisement
Advertisement
Table of Contents

Related Manuals for Swann PRO-750


Summary of Contents for Swann PRO-750
- Page 1 Meijer.com English PRO-750 Dome M750CAM190312E...
-
Page 2: Before You Begin
Before You Begin Meijer.com FCC Verification: NOTE: This equipment has been tested and found to comply with the limits for Class B digital device, pursuant to part 15 of the FCC Rules. These limits are de- signed to provide reasonable protection against harmful interference in a residen- tial installation. -
Page 3: Table Of Contents
Operating the Camera Advanced Operation Additional Functions Troubleshooting Guide Technical Specifications Warranty / Technical Support Rear Cover Quick Reference PRO-750 4” Pan, Tilt, Zoom Dome Default PTZ Configuration Default Command Address: Protocol: Pelco-D Baud Rate: 2400bps RS485 Polarity: Purple Wire... -
Page 4: Overview
Whether you wish to do this using the full complement of manual controls, or program a detailed surveillance program for the camera to run, the PRO-750 gives you all the options you need to simply and effectively monitor a large range of locations without the hassle of multiple cameras. -
Page 5: Layout Of The Camera And Ptz Controller
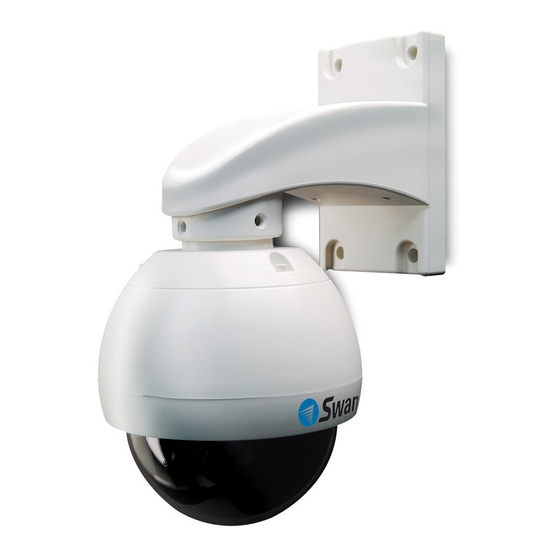
Layout of the Camera and PTZ Controller Meijer.com 1. Wall-Mount Arm For mounting the PRO-750 Dome to a wall, post or similar vertical surface. 2. Ceiling-mount Bracket For mounting the PRO-750 Dome to the underside of a ceiling or overhang. -
Page 6: Layout Of Remote Control
Layout of Remote Control Meijer.com DISP (Display) Toggles the display on the front of the PTZ Controller, showing the Command Address, Protocol and Baud Rate. PRESET (HOLD to define) Changes or accesses preset points. PATTERN (press and HOLD) Allows for the programming of lists of preset points for the camera to view in sequence. - Page 7 The PRO-750 PTZ Dome features automatic focus and exposure adjustment. As a result, you will not need to use these buttons whilst operating the PRO-750. They’ve been included on the remote so that the controller can be used for multiple PTZ systems (including ones without automatic focus and exposure adjustment) if you choose.
-
Page 8: Connecting The Camera
Connecting the Camera Meijer.com 1. After running the camera cable through the mounting arm/bracket, attach to the main plug on the camera circuit board (see opposite). 2. Connect the BNC connector and power connectors to an extension cable (optional). 3. Connect the purple and white wires to the RS485 plug, and insert the RS485 plug into the RS485 port on the rear of the controller (see opposite). - Page 9 Meijer.com 1. Connecting the Camera Cable Before mounting the camera, it is important to connect it correctly. 1. Run the cable through the mounting arm or bracket you would like to use. 2. Make sure you run the cable through starting with the camera end (not the end with the BNC connectors - they’re too big to fit).
-
Page 10: Mounting The Camera
Mounting the Camera Meijer.com NOTE: Before you begin, be sure that there are no live electrical cables in the area you wish to mount the camera. To mount the camera: After connecting the camera as described on page 8 and installing the cables as shown on page 9, place it in the desired location. - Page 11 The PRO-750 can pan a full 360º. This means that (for example) installing the PRO-750 in a tight corner is probably not an ideal utilization of its potential! A wall is a better option, as it allows 180º of view for the camera. A freestanding pole of sufficient height and integrity to reliably hold the camera securely is an ideal choice, as is the centre of the ceiling in a larger room or a warehouse.
-
Page 12: Setting The Command Address
PRO-750, we need to make sure it is using the correct Protocol and Baud Rate. If Protocol = Pelco-D these are not set correctly, the PRO-750 will not Baud Rate = 2400bps operate properly (or at all). To change the Protocol and Baud Rate: • Press and hold the SETUP button. -
Page 13: Connecting Multiple Ptz Systems
The exact details of the wiring solution will vary by environment - the following is presented only as a guide. Please Note: If you already have, or are planning on getting, a PTZ capable Swann DVR, then using the supplied PTZ controller is optional. The PTZ system can be controlled by the RS485 connection built into the DVR. -
Page 14: Operating The Camera
12 for configuring the Command Address, Protocol and Baud Rate settings. Alternately, if you have the RS485 connections to the PRO-750 attached to a PTZ capable DVR, then use the PTZ controls through your DVR (consult your DVR manual for more details). - Page 15 • For an alternate Auto-scan mode, go to Preset Point 99. Manual Cruise Mode You can program lists of Preset Points for the PRO-750 to view in order. • First, create all the Preset Points you wish to see, as detailed on page 8.
-
Page 16: Advanced Operation
Improper use of these commands may interfere with the functionality of the PTZ system. The PRO-750 PTZ dome can accept many additional commands to those already listed. As there are not enough buttons on the remote control to assign one to each function or setting applicable to the dome, they are presented and used as a series of numerical commands. -
Page 17: Additional Functions
Meijer.com Auto-Home Function The PRO-750 can be configured to automatically return to it’s master Preset Point, the “Home Point”. This is particularly useful for monitoring a door, hallway, car space or similar, where the default position of the camera should be viewing this location. -
Page 18: Troubleshooting Guide
Therefore, it doesn’t matter whether it’s something the camera sees or the camera itself that is moving, the DVR will interpret the change as movement. Turn off Motion Detection on your DVR if you are using the PRO-750 in Cruise Mode. Problem: I cannot control the PTZ features of the camera. -
Page 19: Technical Specifications
Technical Specifications Meijer.com Video Image Sensor 1/3” CCD Video Quality 700 TV Lines Number of Effective Pixels NTSC: 976 x 494 PAL: 976 x 582 Minimum Illumination 0.01 Lux White Balance Automatic Signal / Noise Ratio > 50dB Electronic Shutter NTSC: 1/60 –... - Page 20 Any unit which proves defective during the stated period will be repaired without charge for parts or labour or replaced at the sole discretion of Swann. The end user is responsible for all freight charges incurred to send the product to Swann’s repair centres. The end user is responsible for all shipping costs incurred when shipping from and to any country other than the country of origin.
Need help?
Do you have a question about the PRO-750 and is the answer not in the manual?
Questions and answers