
Summary of Contents for Sveba Dahlen AB Classic DC-1
- Page 1 860004-02 Rev.3 Classic Deck oven Type: DC-1 DC-2 DC-2E DC-3 DC-4 Operating Maintenance Installation...
-
Page 2: Data Plate
Data plate. Model designation Serial number Positioning of data plate. Connected voltage Data plate for Classic Deck Oven To obtain assistance with installation or service of the oven the oven serial number and model desig-nation must be given. Note the serial number, model designation and voltage so that they are readily available when contacting us. -
Page 3: Table Of Contents
TABLE OF CONTENTS TABLE OF CONTENTS ........3 TECHNICAL DATA . -
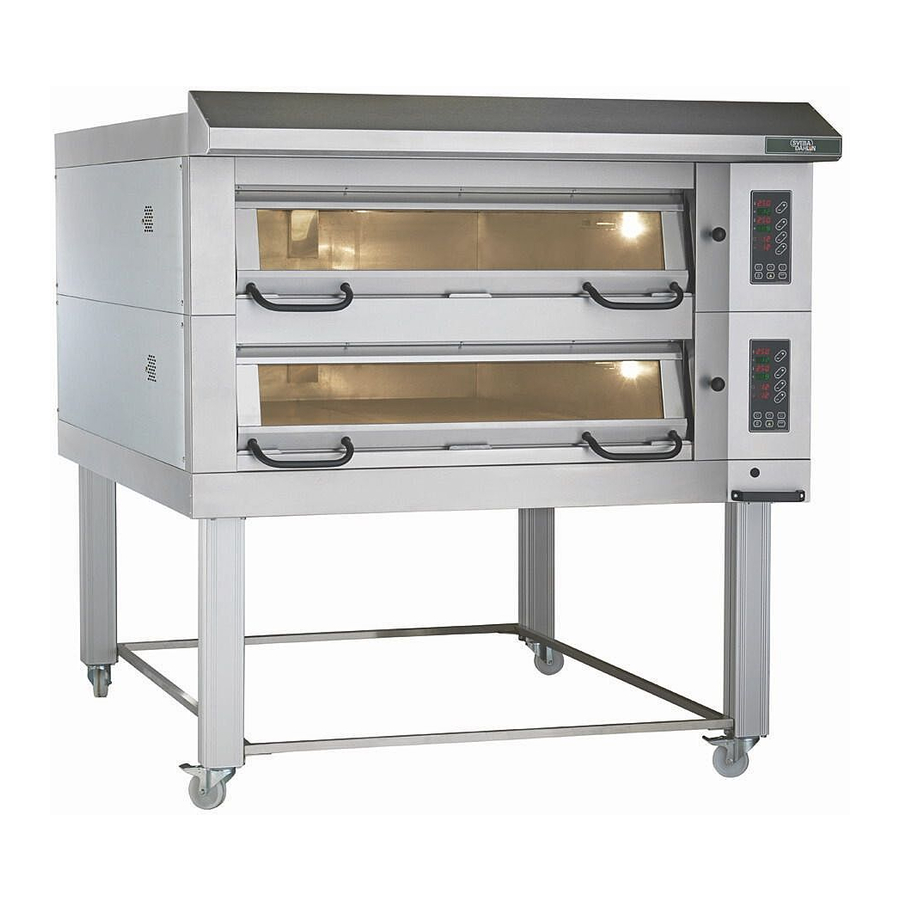
Page 4: Technical Data
TECHNICAL DATA Technical data The oven chamber is available in five widths (Fig. 2) and two heights, 160 and 220 mm. Fig. 1 shows an oven where a low oven chamber is mounted over a high one. Low and high oven chambers can be combined to form 5 decks of oven chambers. -
Page 5: Description
DESCRIPTION Design principle The deckoven is CE-approved according to EMC, LVD The deck oven is manufactured in detachable sections. The advantage of this is that the sections can be combined to suit special purposes or areas. This makes the oven easy to install. -
Page 6: Instrument Panel
INSTRUMENT PANEL Heat indicator, yellow The lamp lights when the temperature Turbo knob falls below set temperature. The lamp Max. load on top- and bottom goes off when the set temperature is elements until the thermostat breaks the reached. first time. Thermostat Regulates the temperature in the oven to the temperature which is set on the... - Page 7 INSTRUMENT PANEL Weekly timer Changing the switching function Setting the time and the day of the week Example: setting the timer for Wednesday, 3:22 p.m. Press until the correct time is shown, then change according to the above procedure. Button Function Action Setting of timer Press once Day of the week Tryck till 3.
-
Page 8: Baking
BAKING Heat controls Heating up of the oven. The Classic Deck Oven is fitted with three groups of The time it takes to heat up the oven depends on the elements which can be regulated separately. These groups setting of the heat controls. The quickest way of heating are called TOP HEATING, BOTTOMHEATING, and up the oven is to turn the three heat controls to MAX. -
Page 9: Baking - Personal Settings
BAKING - PERSONAL SETTINGS Front Bottom Temp. Bake time Product Steam heat heat heat ºC min. Table 3 Personal settings Operating Maintenance Installation CLASSIC 3:3500-2 --> 860004-02... -
Page 10: Care And Maintenance
CARE AND MAINTENANCE Brush out the oven chamber regularly from bread crumbs Do not use alkaline or abrasive detergents! and soot. When cleaning oven chamber, make sure that no rests of detergent are left after cleaning. Wipe off the door glass inside and out with a moist cloth with a little detergent. -
Page 11: Trouble Shooting
TROUBLE SHOOTING Trouble shooting In the event of a problem you should first look through the trouble shooting list below to see if you can correct the fault yourself. If this does not help contact Sveba-Dahlen’s service department. NOTE! Work on electrical components must be carried out by an authorized electrician. Fault Reason Procedure... -
Page 12: Distribution Box
DISTRIBUTION BOX Fig. 12 Distribution box 1 Overheating protection 5 Automatic fuse To get a complete disconnection, the fuse F1 of the The 3-pole fuse protects the oven elements. On the elements will also trip (see point 5 too). lower section there is also a 1-pole fuse. This is the If the overheating protection has triggered this can be oven control fuse and is common to all sections in reset by pressing the reset button with a pen. -
Page 13: Unpacking
UNPACKING Read carefully through this manual before unpacking the oven. Incorrect handling can damage the oven during transport and installation. Open the packing materials carefully so that the oven is not damaged. Inside the oven chamber there are several parts which must be used during assembly. Take these out and check with the enclosed packing list. They should include the oven legs, feet or castors, heat distribution plate, hearth grid, distance bumper, washers for cable inlets, screws and nuts. - Page 14 UNPACKING • When the oven sections are separated from each other they can be carefully lifted down and moved to the place of assembly. • Use the planks from the loading pallet and place these on the forks of the truck as spacers to protect the oven door (Fig.
-
Page 15: Assembly
ASSEMBLY BSS B10x32 BSS B10x13 B10x13 M6S 6x16 + M6M 6 BSS B10x13 BSS B10x13 M6S 8x20 + M6M 8 M6S 8x20 + BRB 8.4x17 M6S 8x20 Fig. 18 Assembly of dismantled oven. + BRB 8.4x17 Electrical work, the connection of water and ventilation, must be executed by an authorized technician. - Page 16 ASSEMBLY Heat Distrubution Plate The heat distrubution plate distributes the heat from the upper element so that even sensitive products are perfectly baked. 1 Push in the plate into the oven chamber with the long hooks first, and hang up these in the rear element support.
-
Page 17: Installation
INSTALLATION Positioning Water or steam connection Electrical connection Leave a 500 mm free space on the right-hand side of the Connection to canopy oven. This space is needed for access to the oven Ø125mm distribution box during installation and service. If the oven is fitted with built-in steam generator an additional 200 mm wide space is needed between the Fig. - Page 18 INSTALLATION Connection of water. If the oven is fitted with a built-in steam generator this Data: steam generator. (1 pcs. per oven section) must be connected to cold water. Output: 2000 W. Connection is made to the solenoid valves (figs. 25, Water consumption: approx.
- Page 19 INSTALLATION Connection of external steam. If there is a steam boiler in the bakery the oven can be connected to it. This connection is made to the steam valve on the back of the oven (Fig. 27). The oven must be of the low-pressure steam type, and have a connection pressure of approx.
- Page 20 INSTALLATION First start of the oven. Check that the overheating protection has not triggered. If necessary, reset according to section "Distribution box" point 1. Before the oven is first used it must be burned out so that • Turn the thermostat to approx. 200°C. Let the oven residual protective oil in the oven chamber disappears.
- Page 21 DOCUMENT EU-Declaration of conformity (Directive 98/37/EC, Annex II, A) Manufacturer Sveba-Dahlen AB Company SE-513 82 FRISTAD + 46 33-15 15 00 Address Phone no. Declare under sole responsibility that the Deckoven Classic model DC-1, DC-2, DC-2E, DC-3, DC-4: , are in conformity with following standards or other normative documents following the provisions in the COUNCIL’S DIRECTIVES: -of May 3 1989 ”relating to electromagnetic compatibility”...
Need help?
Do you have a question about the Classic DC-1 and is the answer not in the manual?
Questions and answers