
Subscribe to Our Youtube Channel
Summary of Contents for Mini Tec K Series
- Page 1 MTK Kit: Honda K Series Engine Conversions for Classic Minis MTK Installation Manual For Classic Minis 1959 – 2001...
- Page 2 Dear Customer, We welcome you to the Honda Powered Mini World. Thank you and Congratulations for your purchase. You can be certain that you have made a wise choice with this upgrade. This kit was designed to help put you on the right track when building your ultimate Mini.
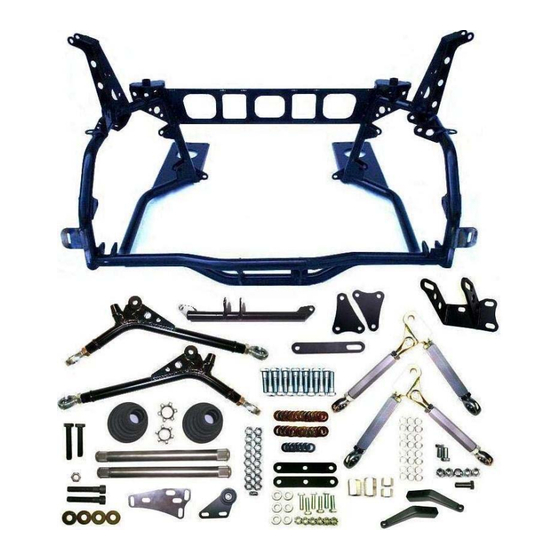
- Page 3 MTK Contents This Section contains a list and description of the parts included in the MTK Kit, and a list of parts that you will need in addition to the MTK Kit. MTK Kit Includes: MTK Subframe Upper Suspension Arms Adjustable Lower Suspension Arms Rear Transmission Stabilizer Front Stabilizer Bar...
- Page 4 Additional Parts Needed: Honda K series engine/transmission (See List on pages 15 and 16) Coil-over shocks (#511200) Front disc brake system such as; Mini Tec’s Superbrakes, Mini 8.4” disc brakes, other… Wheels with a –7mm offset to the outside (needed for turning radius clearance) or 1” wheel spacers Honda engine, ECU, and dash wiring harness’...
- Page 5 Preparation Step 1: Remove stock Mini engine and subframe from Mini. Then remove everything else in the engine compartment. Step 2: Whether you use Mini Tec’s MT Flip Front End Kit or you do an extension yourself, you will need to cut existing Mini front end after the a-panel seem to remove existing Mini front.
- Page 6 Step 3: Clean, Prepare, and Prime the cars firewall and all ruff surfaces (See Figure 1-3). Note: Add additional metal for extra stiffness to the front side of the a-panel as shown in the photo below. A guide tab on the inside of the a-panel will help align the MT Flip Front End as it closes.
- Page 7 Step 3: Cut out metal just below stock shock mount. This is needed to fit the MTK subframe (See following two photos). Your Mini should now be prepared for the installation process.
-
Page 8: Subframe Assembly
Subframe assembly *Supplied with kit Step 1: Attach upper bump stops. Mini bump stops with the single stud will work here. Step 2: Attach the subframe to the car using the two large subframe mounting bolts just like the standard Mini subframe. If your car is an earlier model and does not have these two large ¾”... - Page 9 Step 3: Drill six holes to support the bottom of the subframe using a 5/16” drill bit. Use the six supplied 5/16” bolts with plates to fasten the subframe to the car on the lower side. The plates will go inside of the car to give the floor panel extra support.
- Page 10 Installing Engine into Subframe: Step 1: Drill stock B Series Honda engine and transmission mounts to ½”. Step 2: Attach supplied transmission mount adaptor plate using the supplied hardware in the sequence that it is attached to the plate. Then attach Honda B Series transmission mount to transmission.
- Page 11 Step 5: Lower engine into subframe and attach it with the hardware provided. Step 6: Connect rear engine stabilizer to transmission as it is aligned on frame. Step 7: Connect and tighten front engine stabilizer bar as it is aligned on frame.
- Page 12 Axles: Assembly and Installation Parts needed for Assembly: *Chromoly Axle Shafts, Complete Inner Honda CV Joint Assemblies, and Complete Outer Mini CV Joint Assemblies. (See Photo Below) Step 1: Assemble Small end of axle shaft with the Mini cv joint assembly as done on a stock Mini but replace ball bearing gear with supplied gear.
- Page 13 Honda Axle End Assembly: Assemble large splinned side of axle with the Honda cv joint assembly. (See following four Photos)
- Page 14 Axle Installation: Simply slide one of the axles into the transmission and the other into the engine mid-shaft until the axles lock into place. Swivel Hubs and Brakes: Install the Swivel Hubs and Brakes as done on stock Mini. Replace Mini steering arm with the *Extended Steering Arm.
-
Page 15: Cooling System
Step 2: Attach top shock to upper strut mount. See Photo. Fuel System: Change your fuel pump to one that ranges from 32 to 48 PSI. A return line will be needed on certain models that do not have them. An inline fuel pressure regulator will also be required to set your system at 45psi. -
Page 16: Suspension Setup
Redline: 8400 rpm 2001-2006 Honda Integra Type-R (DC5) Displacement: 1998 cc Compression: 11.5:1 Power: 217 hp (220 PS, 162 kW) @ 8000 rpm Torque: 152 ft·lbf (206 N·m) @ 7000 rpm Redline: 8500 rpm 2002-2006 Honda Accord Euro-R Displacement: 1998 cc Compression: 11.5:1 Power: 217 hp (220 PS, 162 kW) @ 8000 rpm Torque: 152 ft·lbf (206 N·m) @ 7000 rpm... -
Page 17: Test Drive
- Front Camber Setting = -0.5 to -1 Degree (Less for street driving, more for racing) Check List: For your safety, please check… - That every suspension component is fastened tightly. - That the steering system is fastened properly and all nuts and bolts are secure.
Need help?
Do you have a question about the K Series and is the answer not in the manual?
Questions and answers