Table of Contents
Advertisement
Meijer.com
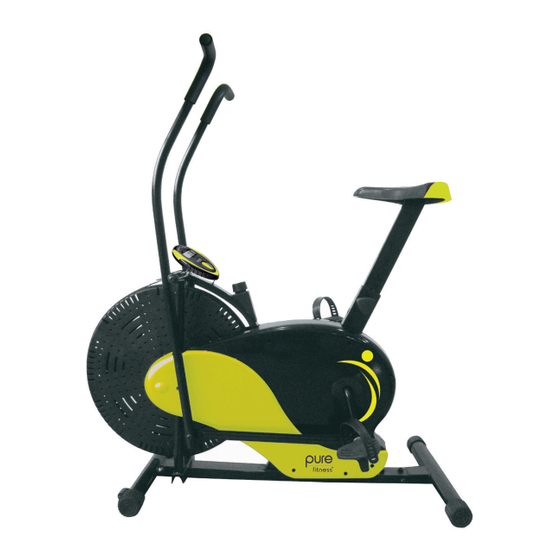
Pure Fitness Fan Bike
Model No. 8534FB
Owner's Manual
Please read all the instructions before using this product.
Consult a physician before beginning any exercise program or strenuous activity
The contents of this
package are not suitable
for children under 3 years.
Contains small parts which
may cause choking.
Pure Fitness is a Trademark of
Pure Global Brands, Inc.
Do not allow more than one person on the trainer at any time.
ADULT ASSEMBLY REQUIRED.
To ensure warranty coverage, please visit www.pureglobalbrands.com
to register your product
Advertisement
Table of Contents

Related Manuals for Pure Fitness 8534FB

Summary of Contents for Pure Fitness 8534FB
- Page 1 3 years. Contains small parts which may cause choking. Pure Fitness is a Trademark of Pure Global Brands, Inc. Do not allow more than one person on the trainer at any time. ADULT ASSEMBLY REQUIRED.
- Page 2 OWNERS MANUAL CUSTOMER SERVICE INFORMATION Thank you for purchasing our Pure Fitness™ Fan Bike. At Pure Global Brands, we want all of our customers to be completely satisfied with their purchase. Please take time to review the contents of the product you just received to make sure that all of the parts are included.
-
Page 3: Limited Warranty
All products for which a warranty claim is made must be received by Pure Fitness at one of its authorized service centers and accompanied by sufficient proof of purchase (photocopy of the original store receipt, indicating the date of pur- chase). - Page 4 Meijer.com WARNING CHOKING HAZARD – Small parts NOT for children under 3 years. Warning While every attempt is made to ensure the highest degree of protection in all equipment, we cannot guarantee freedom from injury. The user assumes all risks of injury due to use.
- Page 5 Please visit: www.pureglobalbrands.com for any important product information updates and/or additional safety warnings before assembling or using this product. Use search word: 8534FB WARNINGS – GENERAL SAFETY ADVICE Please read these instructions in their entirety before use and retain for future reference.
- Page 6 Meijer.com 8534FB EXPLODED VIEW...
- Page 7 Meijer.com 8534FB PARTS LIST NOTE: For your convenience, your Fan Bike has been partially pre-assembled. Many of the items on this list are for troubleshooting and parts identification ONLY, and will not be needed for assembly. Description Description Main Frame...
- Page 8 8534FB Meijer.com Assembly Parts/Hardware Pack 3 L/R. 17, 39. 9 L/R.
- Page 9 Meijer.com NOTE: The following instructions use the included tools: Multi-Hex Tool, Small Allen Wrench, and Large Allen Wrench. Please locate these and keep on hand to assemble. STEP 1: ASSEMBLE FRONT AND REAR STABILIZERS Locate 2x M10 Cap Nuts (32), 2x Arc Washers (31), 2x M10 Bolts (30), the Front Stabilizer Bar with Wheels (8), 4x Allen Screws (33), 4x Washers (42) and the Rear Stabilizer Bar (6) A.
- Page 10 Meijer.com STEP 2: ATTACH HANDLE AND PEDAL ASSEMBLIES For Handrail Assembly: Locate Left and Right Handlebars (3 L/R), Rotation Rod (37), 2x Small Hex Screws (47), 2x Spring Washers (45), 1x Flat Washer (49), 2x D-Shape Washers (54), and 2x Wave Washers (61) For Connection Plate Assembly: Locate 2x Connection Plates (12), 2x M8x45 Bolts (34), 2x Small Metal Bushings (41), 2x Flat Washers (42), and 2x M8 Nuts (43).
- Page 11 Meijer.com Conn. Plate Wrench Pedal Crank Lg. Bushing Lg. Bearing Washer PEDAL STEP 3: ASSEMBLE PEDALS Locate 2x Foot Pedals (9 L/R). On many models the hardware to attach the pedals will come threaded to each Ped- : 2x Large al.
- Page 12 Meijer.com STEP 3: ASSEMBLE SEAT AND MONITOR Locate Seat Cushion (17), Seat Post (39), Seat Adjustment Knob (16), and the Monitor (14). A. Remove the Hex Nuts and Washers from underneath the Seat Cushion (17). Guide the exposed bolts on the Seat Cushion underside through the 3 holes in the Seat Post (39). Place a washer against the plate on the Seat Post and secure with the Hex Nuts.
-
Page 13: Meter Instructions
Meijer.com METER INSTRUCTIONS FUNCTION BUTTONS: MODE: This button cycles through the available Displays and turns the unit ON. Press and hold this button for 3-4 seconds to reset the data values of the monitor. NOTE: When the batteries are replaced, ALL values will reset to ZERO automati- cally. -
Page 14: Training Session
Meijer.com USING YOUR FAN BIKE ALWAYS consult a physician before beginning any exercise program. Ask your doctor to evaluate your present fitness level and determine the exercise program that is most appropriate for your particular age and/or physical condition. TO USE THE FAN BIKE: Stand on the unit, making sure that each foot is securely positioned on each Pedal and that you have sure footing on the Pedal pads (Do not use this machine barefoot or with socks only.) Firmly grasp the Poles in each hand, and using the Poles only, move them back and forth so that the machine begins... -
Page 15: Warm Up/Cool Down Exercises
Meijer.com WARM UP/COOL DOWN EXERCISES WARM UP EXERCISES A successful exercise program consists of a warm-up, aerobic exercise, and a cool- down. Do the entire program at least two and preferably three times a week, resting for a day between workouts. After several months, you can increase your workouts to four or five times per week. - Page 16 Meijer.com WARM UP/COOL DOWN EXERCISES WARM UP EXERCISES CONTINUED Calf-Achilles Stretch Lean against a wall with your left leg in front of the right and your arms forward. Keep your right leg straight and the left foot on the floor; then bend the left leg and lean forward by moving your hips toward the wall.
-
Page 17: Frequently Asked Questions
Meijer.com FREQUENTLY ASKED QUESTIONS Question: “How should I clean my Fan Bike?” Answer: YOU SHOULD CLEAN THE TRAINER WITH A SOLUTION OF WARM WATER AND NON-CORROSIVE AND/OR NON-ABRASIVE SOAP. DAMPEN A RAG WITH THIS SOLUTION AND WIPE COMPLETELY DRY BEFORE USING. Question: “Is there any maintenance I need to do for my Fan Bike?”...
Need help?
Do you have a question about the 8534FB and is the answer not in the manual?
Questions and answers