Table of Contents
Advertisement
Quick Links
Advertisement
Table of Contents

Summary of Contents for ray Projector
-
Page 3: Table Of Contents
5 Connecting Equipment 9 Charging Ray 8 Specification 9 Safety and Cleaning Handling Ray Repairing Ray 10 Using the Ray USB Power Adapter 11 Important Maintenance & Operating Information 12 Regulation Compliance 13 Battery Replacement 14 Disposal and Recycling Information 15 Warranty... -
Page 4: The Ray Pico Projector
60 inch picture for excellent viewing. Installation Preparation: For best results it is advisable to learn how to correctly utilize the Ray Pico Projector and its numerous products including: Digital cameras—to show pictures to friends and family. -
Page 5: Ray Box Contents
Box Contents Please check and identify the supplied accessories. Pico Projector. 2. AC adapter with mini USB Plug—Input: 100-240V ~50-60Hz Output: 5V 2000mA. 3. Tripod 4. Audio Video Cable: 2.5mm 4-pole to 2.5mm 4-pole. 5. Audio Video Cable: 2.5mm 4-pole to 3.5mm 4-pole 6. -
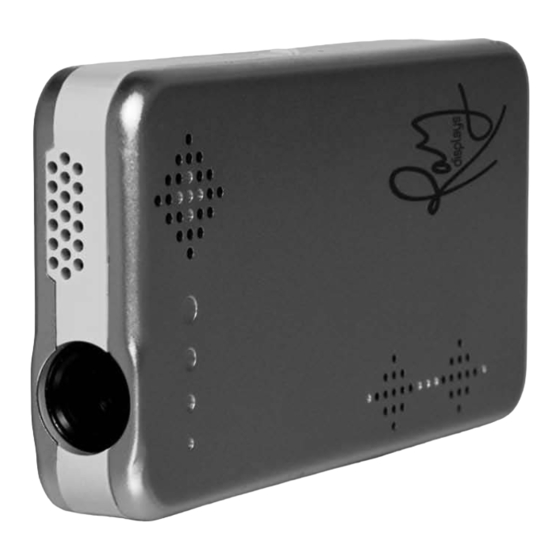
Page 6: Ray Features
Features Ray Projector Controls and Features Left Speaker Right Speaker Heat Vent Lens Focus On/Off Power/Charge Power Input TV Input Tri Pod Attachment Bottom View... -
Page 7: Getting Started With Ray
Slide the ON/OFF switch to the ON position. The Power/Charge Light will flash at a rapid rate about once every 1/2 second (approximately 120 flashes per minute). If the AC adapter is not attached and the light does not flash, the Pico Projector Battery must be CHARGED. Flashing Light... -
Page 8: Watching Videos
If the Pico Projector battery is discharged (DEAD), plug the AC Adapter into an electrical outlet and connect the mini USB plug to the Projector. The Power/Charge Light will start flashing once every second (60 flashes per minute) indicating the AC Adapter is connected to the Pico Projector. - Page 9 RCA plugs-- yellow for video and white for audio. To oper- ate the Ray, match camera or camcorder RCA connectors to the RCA cou- pler (item 7).
- Page 10 Rotate the FOCUS thumb wheel located on the side to adjust the focus of the image. Focus Audio: Ray speakers are controlled by the video player. Volume control for the speakers is located on the video player. To regulate the Ray’s volume, use...
-
Page 11: Charging Ray
Charging For best long term results always start with a fully charged Ray. Turn the Power Switch to OFF. Connect Ray to the AC Adapter. Plug the AC adapter into an electric outlet. When the Power Light flashes once per second the Ray is being charged. -
Page 12: Safety And Cleaning
Read all safety information below and operating instructions be- fore using Ray to avoid injury. Important Safety Information: To reduce the risk of injury while operating the Ray Projector, please follow all in- structions carefully Operating Safety Precautions: Handling Ray. -
Page 13: Using The Ray Usb Power Adapter
Insert the power adapter firmly into the power outlet (the power light should start flashing after a few seconds). Caution: Do not connect, disconnect or clean the Ray USB Power Adapter with wet hands. Use ONLY the Ray Power Adapter to charge the Ray. -
Page 14: Important Maintenance & Operating Information
Additional Safety Information: Ray projects video through a lens on to a screen using LED light sources. The closer an object is to the lens of the Ray, the brighter the image/light emitted from the lens. A properly connected Ray will output an image through the lens. To verify an image, hold the Ray 6 inches from a light colored surface. - Page 15 Do not leave Ray in the car, since interior temperatures in parked vehicles may exceed the desired range. When using iPod or charging the battery, it is normal for the Ray to get warm. The exterior of the Ray functions as a cooling surface, transferring heat from inside the unit to the cooler air outside.
-
Page 16: Battery Replacement
However, there is no guarantee that interference will not occur in a par- ticular installation. Turning the projector on and off can determine if it is the cause of radio and TV interference or disturbed reception. If this projector does cause interference to radio or television reception, it is advisable to correct the interference with one or more of the following suggestions;... -
Page 17: Disposal And Recycling Information
Because this product contains a bat- tery, the product must be disposed of separately from house- hold waste. When your Ray reaches its end of life, contact Ray or your local authorities to learn about recycling options E&H Innovations LLC ©... -
Page 18: Warranty
God, misuse, limitations of technology, or modi- fication of or to any part of the Ray product. This Limited Warranty is invalid if the factory-applied serial number has been altered or removed from the prod- uct.
Need help?
Do you have a question about the Projector and is the answer not in the manual?
Questions and answers