Table of Contents
Advertisement
Quick Links
Advertisement
Chapters
Table of Contents

Related Manuals for RJM MasterMind


Summary of Contents for RJM MasterMind
- Page 1 MasterMind User’s Manual RJM Music Technology, Inc.
- Page 3 MasterMind User’s Manual Version 1.4 September 22, 2009 (Corresponds to Mastermind firmware version 1.2) RJM Music Technology, Inc. 2525 Pioneer Ave. Suite 1 Vista, CA 92081 +1-760-597-9450 email: support@rjmmusic.com web: www.rjmmusic.com...
- Page 4 Copyright © 2009 RJM Music Technology, Inc. All Rights Reserved RG-16, Amp Gizmo, MasterMind and the RJM logo are trademarks of RJM Music Technology, Inc.
-
Page 5: Table Of Contents
Controls and Connectors..................................4 Front Panel..........................................4 Rear Panel...........................................4 Basic Operation ....................................5 Using the MasterMind with RJM Music Technology products .......................5 Controlling Multiple RJM Music Products ..............................5 Alternate Presets.........................................6 Instant Access Mode......................................7 Expression Pedal ....................................8 ... -
Page 7: Introduction
The MasterMind can also control standard MIDI devices - up to fourteen MIDI devices on separate MIDI channels. The MasterMind can access up to 125 presets, and can also control devices by use of the Function button and Expression Pedal input. -
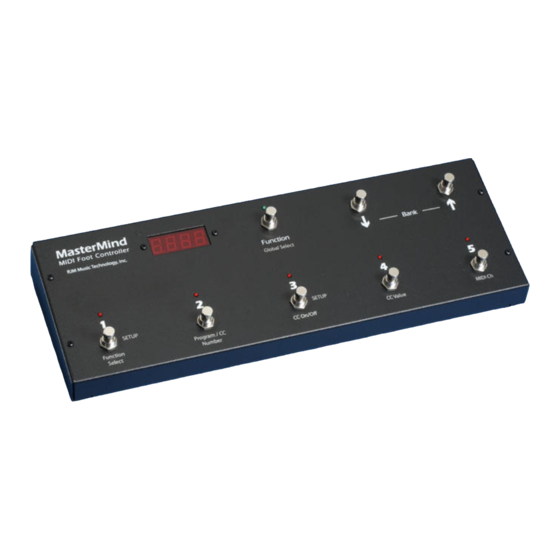
Page 10: Controls And Connectors
Rear Panel 6. Power – The MasterMind can accept power supplies of 9 to 18 volts, AC or DC. The power supply must be able to deliver at least 200mA. The connector is a standard 5.5mm/2.1mm barrel connector and can be either center negative or center positive. -
Page 11: Table Of Contents
Controlling Multiple RJM Music Products If you have multiple RJM Music products, controlling them is just as easy. Just make sure that the MIDI Thru of the first device is connected to the MIDI Input of the second device, the MIDI Thru of the second device is connected to the MIDI... -
Page 12: Alternate Presets
Alternate Presets. With this feature, you can assign a second preset to each main preset. The Function button on the MasterMind allows you to toggle between the two presets. When an Alternate Preset is active, an “A” is displayed to the left of the bank number. -
Page 13: Instant Access Mode
Instant Access Mode provides another way to control your MIDI equipment. In this mode, you have direct access to five continuous controllers – you can use the MasterMind buttons to control individual loops on a loop switcher, control effect parameters in a multi effects processor, or perform any other function that can be controlled by a continuous controller message. -
Page 14: Expression Pedal
You can also use a standard volume pedal as an expression pedal. For this you need a 1/4” Y-cable, also known as an insert cable. The stereo end of the Y cable plugs into the MasterMind and the two mono ends plug into the input and... -
Page 15: Remote Access
Remote Enable parameter on all of the MasterMinds you wish to link. Next, connect the Remote In jack of the first MasterMind to the MIDI Out of the second MasterMind, the Remote In of the second MasterMind to the MIDI Out of the third one, and so on. The first MasterMind (the only one that doesn’t have its MIDI Out jack connected to the Remote In of another MasterMind) should have its... -
Page 16: Setup Mode
If you are controlling devices made by other manufacturers or just need additional control over your settings, you can use Setup Mode to configure the MasterMind. Setup Mode is very powerful and as a result takes some time to learn, but if you spend the time to get comfortable with it, you can use it to configure the MasterMind for almost any rig. -
Page 17: Global Setup
Each Program Change destination can be set to any MIDI channel (or none). Each destination typically corresponds to one MIDI device. For example, PC1 could be set to the MIDI channel of your RJM RG-16, PC2 could be set to the MIDI channel of one MIDI-enabled effects processor, and PC3 could be set to the MIDI channel of a second MIDI-enabled effects processor. - Page 18 Turning this parameter on enables MIDI bank support for the Function key. Press 3 / CC On/Off to toggle this parameter on or off. This needs to be on if you plan to use the Alternate Preset feature with other RJM Music products, but can be...
-
Page 19: Preset Setup
Pressing Bank Up when this parameter is selected will cause the MasterMind to send its configuration data out the MIDI Out port. If the MIDI Out port is connected to the MIDI In port of another MasterMind, the data will be transferred to the MasterMind. - Page 20 (Important Note: Some MIDI devices use program numbers 1 through 128 and some use program numbers 0 through 127. If your device is one of the latter, your program numbers will be off by 1. Selecting program 1 on the MasterMind will cause the device to select program 0.
-
Page 21: Exiting Setup Mode
To exit Setup Mode, press and hold the 1 / Function Select button, then press the 3 / CC On/Off button, then release both buttons. The MasterMind will return to normal operating mode and the Setup Mode indicator will stop flashing. -
Page 22: Midi Data Transfer
You can then save this data to your computer or copy the settings directly to another MasterMind. If you wish to copy settings from one MasterMind to another, connect the MIDI Out of the transmitting unit to the Remote In of the receiving unit, then enter Global Setup, select the “Send”... -
Page 23: Specifications
Specifications Dimensions 16 (W) x 6 (D) x 2.75 (H) inches 40.6 (W) x 15.2 (D) x 7 (H) cm Weight 3.9 lbs 1.8 kg Power 9-18V, AC or DC @ 200mA 5.5mm OD, 2.1mm ID x 9.5mm barrel connector Phantom Power Accepted over pins 6 and 7 of the MIDI Out jack, same specs as above Phantom power is passed over pins 6 and 7 of the Remote In jack, current... -
Page 24: Mastermind Midi Implementation Chart
MasterMind MIDI Implementation Chart MIDI Implementation Chart v 2.0 (Page 1 of 3) Manufacturer: RJM Music Technology, Inc. Model: MasterMind Version: 1 Date: September 24, 2009 Transmit/Export Recognize/Import Remarks 1. Basic Information MIDI Channels 1-16 1-16 Channel 1 is set by default... - Page 25 MIDI Implementation Chart v 2.0 (Page 2 of 3) Manufacturer: RJM Music Technology, Inc. Model: MasterMind Version: 1 Date: September 24, 2009 Control # Function Transmitted (Y/N) Recognized (Y/N) Remarks Bank Select (MSB) Function switch default Modulation Wheel (MSB) Breath Controller (MSB)
- Page 26 MIDI Implementation Chart v 2.0 (Page 3 of 3) Manufacturer: RJM Music Technology, Inc. Model: MasterMind Version: 1 Date: September 24, 2009 Control # Function Transmitted (Y/N) Recognized (Y/N) Remarks Sustain Pedal Portamento On/Off Sostenuto Soft Pedal Legato Footswitch Hold 2...
-
Page 27: Warranty
RJM Music Technology will repair or replace the product free of charge, provided it is returned freight prepaid to RJM Music Technology with a copy of a valid receipt and RMA number. Return shipping will be paid by RJM Music Technology within the U.S.
Need help?
Do you have a question about the MasterMind and is the answer not in the manual?
Questions and answers