
Summary of Contents for Response Electronics CL6011B
- Page 1 Wireless Door Intercom Answer your door remotely from the Intercom Handset User Manual CL6011B...
-
Page 2: Table Of Contents
Contents Before you start Operation Congratulations Registration Safety Precautions Intercom Communication Unpacking Ringtone Setting Intercom Handset - Layout and Turning the Handset on/off Keys Function Intercom Handset Charger Layout Features Outdoor Station Layout Feature List Operating Range Installation Battery Installation Technical Specifications Installation Instructions Charging the Handset... - Page 3 Our range of Door Intercom System products include: CL6011BCS - Wireless Door Intercom Charging Dock Station (accessory to the CL6011 system) CL3622B - Wireless Door Intercom Telephone and Doorbell System (dual function DECT Telephone and Door Intercom) CL3622BHSC - Wireless Door Intercom Handset and Charger (accessory to the CL3622 system) CL3660UM - Door Entry System Unlock Module...
-
Page 4: Before You Start
Before you start Congratulations …on purchasing our high quality product. Please read the manual carefully before installing your system and follow all of the directions to ensure proper installation Safety Precautions To reduce the risk of electrical shock and injury, please follow these basic safety precautions before using the phone. - Page 5 Unplug this product from the wall outlet and refer servicing to qualified service personnel only. Pay attention to the polarity of the batteries, insert the rechargeable batteries in accordance with polarity symbols (this instruction is found in the installing batteries section). Use only the batteries indicated in the User Manual.
-
Page 6: Unpacking
Unpacking Once you have unpacked your door Doorbell Intercom System, make sure that all the parts shown below are available. If any pieces are missing or broken, please promptly call your dealer. Intercom Handset Intercom Outdoor Nameplate Fixing Charger Handset Station Labels x 2 Mains... -
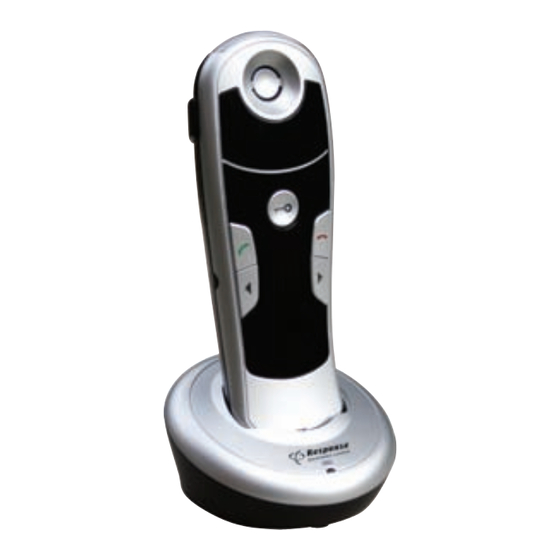
Page 7: Intercom Handset - Layout And Keys Function
Intercom Handset - Layout and Keys Function Visual ringer (orange) Power indicator (red) In use indicator (blue) Earpiece Carrying clip Unlock key Answer key End key Down key Up key Battery compartment cover Microphone Charging contacts... -
Page 8: Intercom Handset Charger Layout
Intercom Handset Charger Layout Charge pins Charge Power Jack Indicator Top View Rear View... -
Page 9: Outdoor Station Layout
Outdoor Station Layout Rear View Speaker Call button Registration button Terminal cover/seal Microphone Battery compartment cover Front View Terminals 1. 12VDC Positive input Terminals 1 and 2 are used when connecting optional power supply unit 2. 12VDC Negative input 3. Unlock control positive terminal Terminals 3 and 4 are used when 4. -
Page 10: Installation
Installation Battery Installation Intercom Handset The rechargeable Ni-MH batteries (AAA size, 1.2V, 800mAh) come with your phone. Install the batteries before use. 1 Slide the battery cover in the direction of the arrow and pull it out 2 Insert new batteries as indicated, matching correct polarity (+, -) 3 To replace the battery cover, slide the cover up until it snaps in place... - Page 11 Outdoor Station Install the two C size batteries (supplied) before using the Outdoor Station. 1 Slide the battery cover in the direction of the arrow and pull it out 2 Insert new batteries as indicated, matching correct polarity (+, -) 3 To replace the battery cover, slide the cover up until it snaps in place Notes:...
-
Page 12: Installation Instructions
Installation Instructions Handset Charger Connect the modular end of the AC power adapter to the power jack of the charger, then plug the AC adapter into a standard To AC wall AC wall outlet. outlet Outdoor Station 1 Choose a suitable location for the Outdoor Station. - Page 13 Notes: • The terminal cover seal on the rear of the Outdoor Station is used to protect the terminal screws. • Remove the cover to access the terminal screws when connecting the optional power supply or unlock module. • Remember to replace the cover prior to fixing the Outdoor Station to the fixing plate with the fixing screw.
-
Page 14: Charging The Handset
Charging the Handset Important Note: Before initial operation YOU SHOULD FULLY CHARGE THE HANDSET HANDSET for 15 hours. To charge the handset, you should place it on the charger. When you place the handset on the charger, the handset automatically turns on and the Charge indicator light illuminates while the handset is charging. -
Page 15: Operation
Operation Registration Before using the Outdoor Station, you must register it to the handset. First, hold the on the handset for 5 seconds or longer then release it. Second, press the Call button of the Outdoor Station then hold the Register key on the back of the Outdoor Station for 5 seconds or longer then release. -
Page 16: Intercom Communication
Intercom Communication When a visitor presses the Call Button on the Outdoor Station. A ring tone is heard by the host and the Visual ringer (orange) flashes. You can lift the handset and press the key to talk with the visitor. Notes: •... -
Page 17: Ringtone Setting
Ringtone Setting Ringtone Selection When the handset is in the standby mode, press the key repeatedly to select the ringtone (up to 5 types). Press once to play a ring tone, then press again to play the next one, and so on, until you have selected the ringtone you wish to use. The selected ringtone is stored automatically. -
Page 18: Features
Intercom Outdoor Handset Station 150 metres... -
Page 19: Technical Specifications
Technical Specification Frequency Range 1.88 ~ 1.90GHz Channels 120 Duplex channels Time Accuracy 0 ± 2ppm Frequency Stability < ± 50KHz Modulation GFSK Standby time 7 hours Charging time 15 hours Ambient temperature Normal: 15°C ~ 35°C, Extreme: 35°C ~ 40°C Humidity 0% ~ 90% Dimensions (mm) - Page 20 Telephone Helpline: 0845 373 1353 Local Rate Call Response Electronics Limited, Roman House, Lysons venue, sh Vale, GU12 5QF www.responseelectronics.com CL6011B Ed.2...
Need help?
Do you have a question about the CL6011B and is the answer not in the manual?
Questions and answers