Table of Contents
Advertisement
Remote Controllable 8-Channel Mic Preamp
PRE
Guide
Digidesign
2001 Junipero Serra Boulevard
Daly City, CA 94014-3886 USA
tel: 650·731·6300
fax: 650·731·6399
Technical Support (USA)
tel: 650·731·6100
fax: 650·731·6384
Product Information (USA)
tel: 650·731·6102
tel: 800·333·2137
International Offices
Visit the Digidesign Web site
for contact information
Web Site
www.digidesign.com
Advertisement
Table of Contents

Related Manuals for DigiDesign PRE

Summary of Contents for DigiDesign PRE
- Page 1 2001 Junipero Serra Boulevard Daly City, CA 94014-3886 USA tel: 650·731·6300 fax: 650·731·6399 Technical Support (USA) tel: 650·731·6100 fax: 650·731·6384 Product Information (USA) tel: 650·731·6102 tel: 800·333·2137 International Offices Visit the Digidesign Web site for contact information Web Site www.digidesign.com...
- Page 2 Copyright Warning! This guide is copyrighted ©2002 by Digidesign, a division of Avid Technology, Inc. (hereafter “Digidesign”), with all rights reserved. Under copyright laws, this guide may not be duplicated in whole or in part without the written consent of Digidesign.
-
Page 3: Table Of Contents
Changing Settings on One Mic Preamp Channel ........27 Changing Settings on Multiple PREs (or PRE Channels)......27 Mic Preamp Remote Control with Digidesign Control Surfaces. - Page 4 PRE MIDI Data ........
-
Page 5: Chapter 1. Introduction To Pre
Pro Tools offers remote control of PRE. ing or mixing medium. • Each channel features: PRE is designed especially for Pro Tools systems, • Support for microphone (XLR), line level but it can also be utilized as a stand-alone micro- inputs (1/4˝) and direct instrument (1/4˝) -
Page 6: What's Included
What’s Included About This Guide • PRE This guide provides a basic overview of PRE fea- tures and functionality, plus complete installa- • AC power cable tion instructions for using PRE as a stand-alone • PRE Guide microphone preamplifier, adding PRE to an ex- isting Pro Tools|HD system, or controlling it by other means. - Page 7 Important Notices include information that could affect your data or the performance of your system. Shortcuts show you useful keyboard or mouse shortcuts. Cross References point to related sections in other Digidesign guides. Chapter 1: Introduction to PRE...
- Page 8 PRE Guide...
-
Page 9: Chapter 2. Pre Hardware Overview And Stand-Alone Operation
PRE Hardware Overview and Stand-Alone Operation This chapter describes the PRE front and back panels, and includes instructions for using its switches, indicators, and connectors for Stand-alone mode operation. To use PRE in Remote mode (remote con- trol of PRE by Pro Tools or a dedicated control surface), see Chapter 3, “Remote Operation.”... - Page 10 DB-25 connector, press OSC, then a channel Insert. When lit (green), this LED indicates PRE is in Re- mote Lock-Out mode. In this mode, PRE is con- The oscillator is enabled through the front panel...
- Page 11 The Input Z switch sets the input impedance for meter is referenced from the clip point of the a PRE channel to 1.5 k , 15 k , or 1.5 M . amplifier (for example, –22 dB is 22 dB below the clip point of the amplifier).
- Page 12 48V back to abled. the line level device through the XLR cable and PRE’s back panel has eight pairs of send and re- eliminates unnecessary power draw when not in turn jacks for inserting external processors (such use for powering microphones.
- Page 13 –18 dB/octave. Use the high-pass filter to re- Gain” on page 14. move microphone proximity effects, hum, rum- When PRE is powered off, channel select states ble, wind, and other low frequency sounds. are stored in memory and are subsequently re- stored at power up.
-
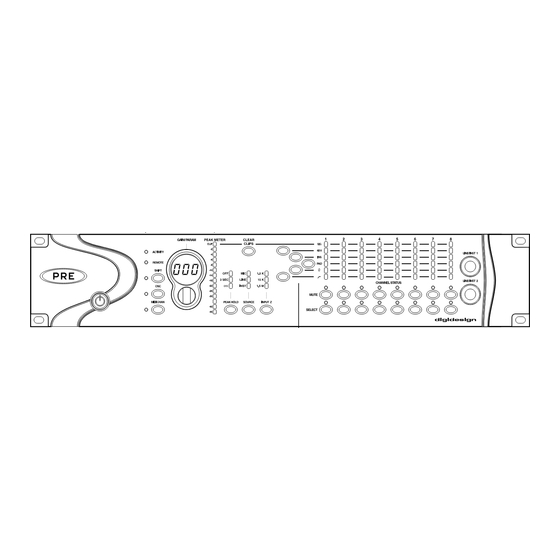
Page 14: Pre Back Panel
PRE Back Panel PRE has the following back panel connectors: Mic Inputs 1–8 Oscillator Output Line/Inst Inputs 1–8 Output Trims 1–8 MIDI In/Out/Thru Auto-switching power DB-25 Outputs 1–8 Send and Return Inserts 1–8 supply connector PRE back panel This connector can also output a fixed oscillator Mic Inputs 1–8... -
Page 15: Using Pre In Stand-Alone Mode
PRE. To daisy-chain multiple PREs, connect the MIDI Out of one PRE to the MIDI In Shift of the next PRE, and so on. You will also need to set each unit to a unique MIDI channel number User Settings Stored in Memory (refer to “MIDI Connections”... -
Page 16: Connecting Audio Sources
48V, and wait for the red light to go com- Power on PRE. pletely off, before connecting or disconnect- At power up, PRE units will default to the last ing a ribbon microphone. settings they had at power down. Plug a microphone directly into the Mic Input on the back of PRE. -
Page 17: Calibrating Pre And Other Devices
Gain/Param control (see “Adjusting Input Gain” Connect the output of the external signal pro- on page 14). cessor to the Return jack of the same PRE chan- nel. PRE channel controls can be applied to one or more channels at a time. -
Page 18: Adjusting Input Gain
0, at which point the grouped channels will mir- ror each other. To unmute a channel: Gain offsets are retained when moved as a Press Mute again. group in Stand-alone mode, but this is cur- rently not true in Pro Tools Remote mode. PRE Guide... -
Page 19: Chapter 3. Remote Operation
Preamp controls can be displayed in Pro Tools The following PRE front panel controls are not Mix and Edit windows, and you can: supported by remote control. • Remote control PRE from the Mix or Edit win- • Oscillator on/off dow. • MIDI channel assignment –... -
Page 20: Connecting Pre To A Pro Tools System
Connect a MIDI cable between the MIDI In Connecting PRE to a Pro Tools port on your PRE and the MIDI Out port on your System MIDI interface. For additional PREs, daisy-chain them by con- Audio Connections necting the MIDI Out port on the first PRE to the MIDI In port of the second PRE, and so on. -
Page 21: Configuring Oms For Your Pre
PRE to the MIDI In port of the second PRE, peripherals or interfaces. and so on. Make sure to connect the MIDI Out port of the last PRE to the MIDI In port of the Turn off your drives. MIDI interface. - Page 22 Apple SerialDMA driver when available,” then click OK. Quit OMS and select Save. Continue with “Configuring Pro Tools Soft- Connecting the PRE to the correct port or MIDI interface ware for PRE” on page 19, in the OMS Setup window PRE Guide...
-
Page 23: Configuring Pro Tools Software For Pre
From the Receive From menu, choose the PRE’s source port (this will be the MIDI device Once PRE has been configured in OMS, it can be you configured in OMS) a MIDI channel to re- declared in the Pro Tools Peripherals dialog and ceive data. - Page 24 (created in I/O Setup) which is also a physical input that the PRE channel was Additional Options in the Peripherals Dialog mapped to, the PRE controls (identified as Mic...
- Page 25 I/O Setup configuration cannot be exported or to different audio interface input channels. imported. If you have multiple PRE units in I/O setups, the To remap channels in a path: order in which the PRE paths appear corre- Drag the PRE channel to the new location in sponds to the order in which they were assigned the Grid.
- Page 26 Grid. lows you to: – or – • Reset selected path names to PRE #1, PRE #2, and so on, corresponding to the order that Marquis-select multiple channels, then drag PREs appear in the Peripherals dialog.
-
Page 27: Mic Preamps In Pro Tools Edit And Mix Windows
Select an input path from the track Input Se- densor mic, while the dynamic mic would not. lector. Make sure you choose an input that a PRE Furthermore, it is unlikely that they would have output was mapped to in I/O Setup. -
Page 28: Viewing Mic Preamps In Pro Tools
Mic Preamps, inserts, sends, and com- ments. Mic Preamp Controls The Mic Preamps view provides all the essential controls for a PRE channel in the Mix and Edit windows views, as follows. Source Switch and Input Impedance Pop-Up Menu Clicking the up/down arrows in the Mic Preamp window accesses two sets of controls. -
Page 29: Mic Preamp Windows
The Gain pop-up features a mini fader to adjust beled mic, inst, or DI) opens a Mic Preamp win- gain to the input signal on the PRE. The gain dow, an alternative to Mix and Edit window range for each input (Mic, Line, and Instru- views. - Page 30 Mic Preamp Window Controls Multiple Mic Preamp windows can be displayed Mic Preamp windows provide standard selectors simultaneously using either of the following for PRE controls and other controls in the top methods. area of the window. Close To open additional Mic Preamp windows:...
-
Page 31: Changing Settings On One Mic Preamp Channel
Typing in different values will snap you to the When working with multiple Mic Preamp chan- closest value (for example, typing in 10 will nels of one or more PRE units in Pro Tools, you snap you to +9 dB). must do all selection of Mic Preamp channels from Pro Tools. -
Page 32: Mic Preamp Remote Control With Digidesign Control Surfaces
PRE channel will be displayed in the en- tings. coder row and can be adjusted with the rotary data encoders. - Page 33 The Mic Preamp name is displayed in the Edit/Assign section on the main unit for control CHANNEL/GROUP display of the DSP of all parameters of a single PRE channel in Pro Edit/Assign section; the default Mic Preamp Tools. Multiple preamps can be adjusted if the name is PRE #1.
- Page 34 Control, BYPASS is located next to each param- eter in the DSP Edit/Assign area. To simultaneously change settings in multi- ple PRE channels, first press and hold To reset all the parameters on a channel to their SHIFT/ADD while selecting channels using...
- Page 35 (or returns Control|24 to its previous op- signed To This Channel.” eration mode). When enabled, the REMOTE MIC PRE LED is lit, and the Channel Bar Display updates with the following message: “MIC PRE.” To set input gain using Channel-Wide Gain Control mode: Press REMOTE MIC PRE.
- Page 36 To change settings in multiple PRE chan- lows: nels, first press the desired Channel Select buttons (or Shift-click track names in PRE Parameters in the Data Encoder LED Displays Pro Tools), then press and hold Parameter Names and Data Scribble...
-
Page 37: Appendix A. Specifications
appendix a Specifications Gain Range 0 dB to +69 dB, in approximately 3 dB steps. With Pad enabled, –18 to +51 dB. Input Impedance (Input Z): 1.5k ohm (low im- pedance); 15k ohm (mid impedance); 1.5M ohm (high impedance) Frequency Response: ±0.1 dB; 20 Hz to 20 kHz, @ +48 dB gain Total Harmonic Distortion + Noise <0.0005% @ 1 kHz, 0 dB gain @ 20 dB signal;... - Page 38 PRE Guide...
-
Page 39: Appendix B. Pinout Diagram For The Db-25 Connector
appendix b Pinout Diagram for the DB-25 Connector DB-25 Connector CH1_HOT CH1_COLD CH1_GND CH2_HOT CH2_COLD CH2_GND CH3_HOT CH3_COLD CH3_GND CH4_HOT CH4_COLD CH4_GND CH5_HOT CH5_COLD CH5_GND CH6_HOT CH6_COLD CH6_GND CH7_HOT CH7_COLD CH7_GND CH8_HOT CH8_COLD CH8_GND NC_1 Figure 1. DB-25 Connector pinouts Appendix B: Pinout Diagram for the DB-25 Connector... - Page 40 PRE Guide...
-
Page 41: Appendix C. Midi Controller Numbers
04h 48V 00h=off, means value. 7Fh=on X indicates the PRE’s MIDI channel minus 05h Phase 00h=off, 7Fh=on one (for example, for PRE MIDI channel 1, X = 0). 06h High-Pass Filter 00h=out, 7Fh=in 07h Mute 00h=off, 7Fh=on 09h Input Gain... - Page 42 Table 1. PRE MIDI Implementation Table 1. PRE MIDI Implementation Name Name Channel Channel 11h Input Impedance 2 00h=1.5k, 31h Input Impedance 4 00h=1.5k, 01h=15k, 01h=15k, 02h=1.5M 02h=1.5M 12h Pad 00h=out, 32h Pad 00h=out, 7Fh=in 7Fh=in 13h Insert 00h=out, 33h Insert...
- Page 43 Table 1. PRE MIDI Implementation Table 1. PRE MIDI Implementation Name Name Channel Channel 51h Input Impedance 6 00h=1.5k, 71h Input Impedance 8 00h=1.5k, 01h=15k, 01h=15k, 02h=1.5M 02h=1.5M 52h Pad 00h=out, 72h Pad 00h=out, 7Fh=in 7Fh=in 53h Insert 00h=out, 73h Insert...
- Page 44 PRE Gain Step Table Table 2. PRE Gain Steps Table 2. PRE Gain Steps Step Level dB Step Level dB PRE Guide...
- Page 45 I/O Setup after changing 22 compatibility information 2 High-Pass Filter switch configuring OMS 17 in Pro Tools 25 configuring Pro Tools software for PRE 19 high-pass filter switch and LEDs 9 connecting HPF switch and LEDs 9 analog devices 12...
- Page 46 I/O Setup mapping paths in I/O Setup 22 reset paths 22 mapping PRE outputs 20 Import Settings 23 Mic Inputs 1–8 10 inactive Mic Preamp Window switch 25 paths 22 Mic Preamp windows 25 input gain adjustment 14 controls 26...
- Page 47 Power Switch mode 5 and LED ring 5 operation 5 powering up PRE 12 Stand-alone mode 11 powering up Pro Tools system with PRE 17 switches 48V 8 Stand-alone mode 5 Clear Clips 7 HPF 9 ProControl remote operation 28...
Need help?
Do you have a question about the PRE and is the answer not in the manual?
Questions and answers