Table of Contents
Advertisement
D
C
ISC
LONE
© e
3
works
™
This manual may not be copied in any media or form without the written consent of e
The e
3
works logo is a trademark of e
II User's Manual
V1.0
V1.0
V1.0
V1.0
V1.0
I
, I
. All rights reserved.
NTERNATIONAL
NC
3
works I
, I
., registered in the U.S. and other countries.
NTERNATIONAL
NC
3
works.
Advertisement
Table of Contents

Subscribe to Our Youtube Channel
Summary of Contents for e3works DISCCLONE II
- Page 1 II User’s Manual LONE V1.0 V1.0 V1.0 V1.0 V1.0 © e works ™ . All rights reserved. NTERNATIONAL This manual may not be copied in any media or form without the written consent of e works. The e works logo is a trademark of e works I ., registered in the U.S.
- Page 2 Preface About this manual This manual is designed for use with the e works ™ LONE duplicator as easy as possible. Information in this document has been carefully checked for accuracy; however, no guarantee is given to the correctness of the contents. The information in this document is subject to change without notice.
- Page 3 Preface FCC COMPLIANCE This device complies with Part 15 of the FCC Rules. Operation is subject to the following two conditions: (1) This device may not cause harmful interference, and (2) This device must accept any interference received, including interference that may cause undesired operation. Federal Communications Commission (FCC) Statement This equipment has been tested and found to comply with the limits for a Class B digital device, pursuant to part 15 of the FCC Rules.
- Page 4 Preface NOTICES Warning: To meet FCC requirements, a shielded power cord is required in order to prevent interference. It is essential that only the supplied power cord is to be used. Use only shielded cables to con- nect I/O devices to this equipment. You are cautioned that changes or modifications not approved by the party responsible for compliance could void your authority to operate the equipment Warning: THIS PRODUCT OR SOFTWARE IS DESIGNED TO...
- Page 5 Preface Precautions When using the D II, refer to the following instructions for its LONE care: ♦ Read and follow all instructions and warnings provided. ♦ Save these instructions for future use. ♦ When servicing or replacement parts are required, ensure work is done by a qualified technician.
-
Page 6: Table Of Contents
Preface Table of Contents Chapter 1 - Introduction ............1 Supported Media Types and Formats ........2 Features ..................2 Package Contents ................ 3 A Tour of the D II ............4 LONE Using the D II Control Panel ......... 5 LONE Chapter 2 - Quick Start ............ - Page 7 Taking Care of the D II ..........23 LONE Handling CDs ................23 Appendix B - Troubleshooting & FAQ ........ 25 Troubleshooting ................25 FAQ ....................27 e3works Warranty ..............30 One Year Limited Warranty ............30 Warranty Contact Information ..........30...
-
Page 8: Chapter 1 - Introduction
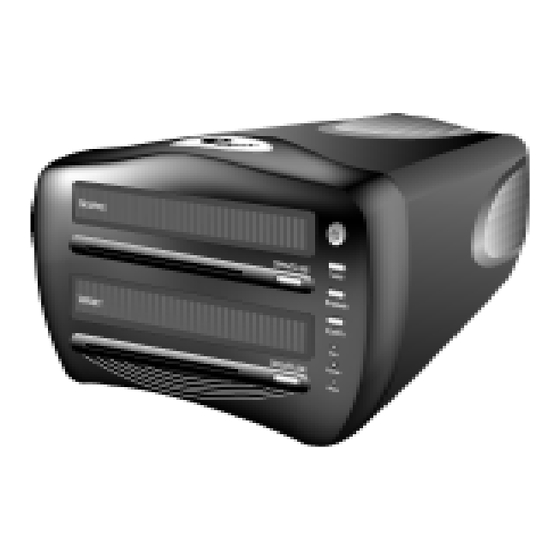
Chapter 1 - Introduction Congratulations on selecting the D II CD Duplicator. This LONE sleek and elegant device enables you to easily duplicate media such as audio, video, and data CDs using read/write and rewritable media. It provides superior CD duplication characteris- tics in a compact device. -
Page 9: Supported Media Types And Formats
Chapter 1 – Introduction Supported Media Types and Formats Your D II Media Duplicator supports all Media types and LONE formats. Refer to the following: Supported Formats Supported Media Types • • Audio CD CD-R • • Video CD CD-RW •... -
Page 10: Package Contents
Chapter 1 – Introduction Package Contents After opening the package, check the contents to ensure it contains the following components: USB D LONE RIVER URNING CD D UPLICATOR OFTWARE ’ OWER ANUAL MPORTANT PERATION USB 2.0 C ABLE Keep the packing materials in the event that you need to ship the II back for maintenance. -
Page 11: Isc Clone Ii
Chapter 1 – Introduction A Tour of the D LONE Refer to the following illustrations to learn about the major components of the D LONE OURCE RIVE (CD-ROM) Front View ARGET RIVE ONTROL (CD-RW) ANEL AC P OWER USB P Rear View RCA A UDIO... - Page 12 Chapter 1 – Introduction Using the D II Control Panel LONE The following illustration shows the control panel buttons and LEDs: OURCE DRIVE LOSE BUTTON ARGET DRIVE LOSE BUTTON The following describes the functions of the buttons and LEDs in Stand-alone Mode: BUTTON FUNCTION Press this button to turn the D...
- Page 13 Chapter 1 – Introduction MEANING FUNCTION Illuminates to indicate that the EADY Green is ready for operation. LONE Illuminates when a CD is being ECORDING Yellow duplicated. Illuminates when a duplication or ARNING recording error occurs. Refer to the Appendix for troubleshooting procedures.
-
Page 14: Chapter 2 - Quick Start
Chapter 2 - Quick Start This chapter covers using theto turn the D II off as a stand- LONE alone duplicator to make copies of your CDs. You will also learn how to connect speakers to the to turn the D II off and listen to audio LONE CDs. - Page 15 Chapter 2 – Quick Start CD duplicator (C). After the D II goes LONE through a series of self-diagnos- tics, a beep sounds and the green LED illuminates indicating EADY it is ready for operation. Press the S OURCE LOSE button (D).
-
Page 16: Using The Standard Function
S Function when a problem occurs. We TANDARD recommend that you use high quality CD-R/CD-RW discs for making duplications. If you still experience difficulties, use high quality CD discs or contact e works technical support at www.e3works.com for further assistance. -
Page 17: Erasing Cd-Rw Discs
Chapter 2 – Quick Start Erasing CD-RW Discs The D II CD-RW erase feature makes it easy to erase CD-RW LONE discs. Follow these instructions: 1. Insert the CD-RW disc into the T drive. ARGET 2. Press and hold the P button (A), and then press the button (B). -
Page 18: Connecting Stereo Speakers For Audio Cd Playback
Chapter 2 – Quick Start Connecting Stereo Speakers for Audio CD Playback The D II features RCA stereo jacks that enable you to connect LONE stereo headphones or speakers and listen to audio CDs. Refer to the following illustration to show you how to connect speakers to the jacks. Note: Only the T drive can play audio CDs. -
Page 19: Tips For Using Stand-Alone Mode Operation
Chapter 2 – Quick Start Tips for Using Stand-alone Mode Operation Refer to the following table for a quick reference in Stand-alone Mode. Stand-alone Mode Function/ Control Operation Application Button EADY ECORDING ARNING The unit is ready for use after a 25 second warm-up Power On period indicated... -
Page 20: Chapter 3 - Connecting To A Pc
Chapter 3 - Connecting to a PC The D II is ideal to use as an external CD-RW drive for your LONE PC, and is supported by Windows XP/ME/2000/98SE/98. The II features USB 2.0 connectivity, which supports transfer LONE speeds up to 480 Mbits/sec. Windows XP/ME/2000 have native USB support;... -
Page 21: Installing Usb Drivers
Chapter 3 – Connecting to a PC Installing USB Drivers Refer to the following sections for instructions on installing the USB driver in Windows XP/ME/2000/98SE/98. XP/ME/2000 INDOWS Windows XP/ME/2000 has native USB support, so you do not have to install USB drivers for these operating systems. 98SE (S INDOWS ECOND... - Page 22 Chapter 3 – Connecting to a PC 4. Click Next. You are prompted to select a Complete or Custom installation. If you want to choose which components to install, select Custom. Otherwise, select Complete. We recommend that you install all components. 5.
-
Page 23: Using Computer Mode
Chapter 3 – Connecting to a PC Using Computer Mode This section explains how to use your T drive as an external CD- ARGET RW/CD-ROM drive for your PC. Important! These Instructions Must Be Followed Carefully! Notes: • For Windows 98SE/98 operating systems, you must install the bundled USB driver before connecting the D LONE •... -
Page 24: Disconnecting The Disc Clone Ii
Chapter 3 – Connecting to a PC The PC identifies the drive. • In Windows, an icon appears in the task bar ISCONNECTING THE LONE Follow the procedures in this section to safely disconnect the II from your PC. LONE Important! Do NOT turn off the power to the D II before using the... -
Page 25: Using Nero Burning Rom Software
Chapter 3 – Connecting to a PC Using Nero Burning Rom Software In Windows, use the bundled Nero Burning Rom software to burn CDs. Nero software is a comprehensive CD burning software that enables you to create audio and video CDs, back up data to CD-R/CD-RW discs, create MPEG CDs, and even back up HDDs as protection against HDD failure. -
Page 26: Running Nero In Windows
Chapter 3 – Connecting to a PC 3. Follow the instructions on the screen to install the software. UNNING ERO IN INDOWS Follow these instructions to duplicate CDs and write data to CD-R/CD- RW discs with the D II and the Nero Burning Rom software in LONE the Windows operating system. -
Page 27: Tips For Using Computer Mode Operation
Chapter 3 – Connecting to a PC Tips for Using Computer Mode Operation Computer Mode Function/ Control Operation Application Button EADY ECORDING ARNING To switch the D from LONE Stand-alone Mode to Computer Turn to Computer Mode. (Please refer to the User's URBO Green Yellow... -
Page 28: Appendix A - Product Information
Appendix A - Product Informa tion Specifications • Maximum Reading Speed: 52X • Maximum Writing Speed: 40X • Dimension (LxWxH): 12.6x8.3x5.3 inch (320x210x135 mm) • Net Weight: 11lbs (4.7kg) • Input Voltage: 100-240VAC • Temperature: 5-45°C • Supported CD Types: CD-R/RW, Mini CD, Business-card size CD •... -
Page 29: Supported Cd Formats And Types
Appendix A – Product Information Supported CD Formats and Types Supported Formats Supported Media Types • • Audio CD CD-R • • Video CD CD-RW • • Data CD Mini CD • • Photo CD Business-card size CD • Mixed-mode CD Compatibility Supported operating systems in Computer Mode: •... -
Page 30: Taking Care Of The D Cii
Appendix A – Product Information Taking Care of the D LONE Your D II is designed to provide you with many years of LONE enjoyment and use. Refer to the following guidelines to keep the II in peak operating condition: LONE •... - Page 31 Appendix A – Product Information...
-
Page 32: Appendix B - Troubleshooting & Faq
Appendix B - Troubleshooting & Troubleshooting This section helps you troubleshoot the D II in the event you LONE have problems with the operation. Symptom 1: The D II has no power. LONE Solution: Ensure that you have correctly connected the AC power cord to the D II and to a wall socket. - Page 33 Appendix B – Troubleshooting & FAQ B. If this occurs when you close the T or S drive ARGET OURCE door, do the following: 1. Press O LOSE 2. Take the CD out and inspect it for scratches or other major imperfections.
-
Page 34: Faq
Appendix B – Troubleshooting & FAQ Symptom 5: Windows crashes or freezes when I connect the D LONE my computer. Solutions: A. Disconnect the USB cable from the D LONE B. Make sure the computer goes back to normal status. Power off the D LONE C. - Page 35 Appendix B – Troubleshooting & FAQ Question 3: After I connect the D II to my PC(Computer LONE mode), the S drive doesn’t work. Why? OURCE Answer: This product is connected to a PC through a USB cable. Therefore, only one device can be detected. When the D II is LONE connected to the PC, the default device to connect to is the T...
- Page 36 CD-R/RW than specified by the manufacturer. For example most 74- minute CD-R/RW discs can hold up to 76 minutes of audio, and 90- minute CD-R/RW discs can hold up to 99 minutes. For more technical support, contact e works at: www.e3works.com...
-
Page 37: E3Works Warranty
Warranty is valid only in the country of purchase. • works assumes no liability that may result directly or indirectly from the use or misuse of these products. Warranty Contact Information works W ARRANTY ENTER 174 Lawrence Drive, Suite C Livermore, CA 94550 www.e3works.com 1-888-839-9881... - Page 38 22-69DC201305...
Need help?
Do you have a question about the DISCCLONE II and is the answer not in the manual?
Questions and answers