
Related Manuals for Softube SSL SL 4000 E


Summary of Contents for Softube SSL SL 4000 E
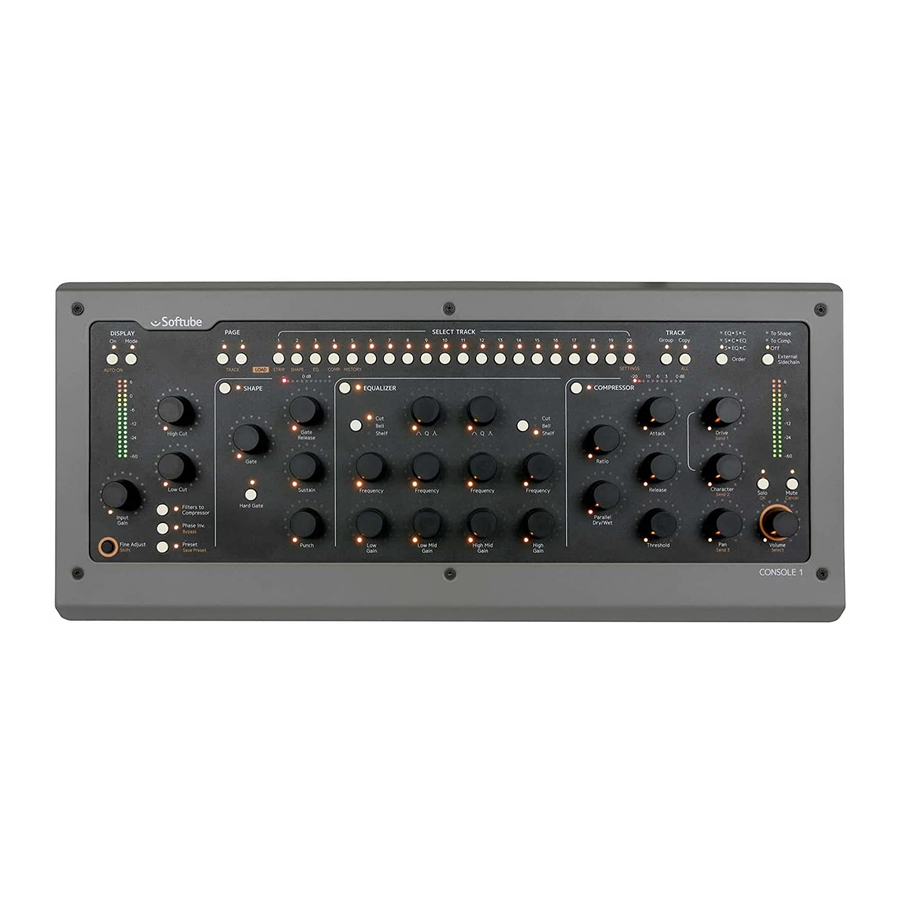
- Page 1 Console 1 User Manual User Manual Supporting VST/VST3/AU/AAX Native. Rev. Feb 11, 2014...
- Page 2 Softube User Manual © 2007-2014. Amp Room, Console 1 is trademarks of Softube AB, Sweden. Softube is a registered trademark of Softube AB, Sweden. All visual and aural references to the Valley People Dyna-mite, Trident A-Range, Tonelux and Tilt are trademarks being made with written permission from PMI Audio. The Tonelux and Tilt logo, the Valley People, Dyna-mite and associated logos, and the Trident, A-Range and Triangle logo are trademarks of PMI Audio Group, used under license.
-
Page 3: Table Of Contents
CONSOLE 1 USER’S GUIDE | Contents Introduction and overview Select All Tracks Create a Group The SSL SL 4000 E Channel Duplicate Track Settings Console 1 Compared to Traditional Mixers Load and Save Presets History Getting started MIDI Controller Mode Setting Up Your First Console 1 Session Using Console 1 Without the Hardware Input Section Automation... -
Page 5: Introduction And Overview
| Introduction and overview Softube Console 1 is a new type of audio mixer. It is used together with your favorite digital audio workstation (DAW), and just like a traditional mixing console, you can route any or all DAW tracks to Console 1 and mix them from within that system. This gives you access to Console 1’s world class sounding effects sections and lets you con-... -
Page 6: Console 1 Compared To Traditional Mixers
Solid State Logic SL 4000 E was introduced in 1980 and is to this day used in a large number of high power supply—the Con- end studios all over the world Softube’s model includes the most sought after equalizer version, the sole 1 hardware is USB... - Page 7 Console 1 such as that one, that can be purchased separately. And you can also load other Softube plug-ins into the system. See “Loading Other Channel Strips and Effects” in Chapter 6 of this manual.
-
Page 9: Getting Started
Setting Up Your First Console 1 Session When you have gone through the registration process on Softube’s web site, you are ready to set up your basic Console 1 session. You may want to save this as a template ses- sion in your DAW, so you will not have to do this for every new piece of music you start working on. - Page 10 10 | GETTING STARTED routed into the Console 1 system and back to the track If you then instantiate the Console 1 plug-in on same DAW channel. See next section for setting the the DAW track 2, this track will be assigned to Console 1’s correct track name and number.
- Page 11 CONSOLE 1 USER’S GUIDE | ton in the plug-in window. Show Knobs Click to open an interface Any time you press Solo on the Console 1 hard- that resembles the Console 1 ware, the text ”Solo safe” will appear in the On- hardware. Here, you can adjust Screen Display above any channel that has been set the settings using a computer to Solo safe.
- Page 12 12 | GETTING STARTED Load Compressor Load EQ Load Shape Load Strip History Settings Display Auto Page Up Group External Sidechain Display On Page Down Track Selector Buttons Order Display On Toggles Console 1’s On-Screen Display on and off. Hold Shift and push Display On to enter the View settings menu.
- Page 13 CONSOLE 1 USER’S GUIDE | Load Shape Selector button for track 2 (or 22, 42, 62 etc, depending on what page you are on). Hold the Shift/Fine Adjust button to select a new Shape plug-in to load into the se- lected track (if you have more than one Console 1 compatible plug-in that is suitable for the Shape section).
-
Page 14: Input Section
14 | GETTING STARTED Input Section Phase Invert Inverts the phase (polarity) of the selected channel. Input Gain Adjusts the gain of the incom- ing signal of the selected track. Preset/Save preset Calls up the Presets menu. Press this while holding Shift Input Gain meter Displays the signal level after to save the current settings as... -
Page 15: Shape Section
CONSOLE 1 USER’S GUIDE | Shape Section Shape activation Activates or bypasses the Shape section. Shape section meter Displays the level changes caused by the Shape section. Gate Sets the threshold level of the gate. Shape activation Shape section meter Gate Release Sets the release time of the gate. -
Page 16: Equalizer Section
16 | GETTING STARTED Equalizer Section EQ activation Activates or bypasses the equalizer section. EQ activation Low Band Cut/Bell/Shelf Sets the operating mode of the equalizer’s low band. Frequency Sets the operating frequency of the equalizer’s low band. Low Gain Turned clockwise from its center position, boosts the gain of the equalizer’s low band. -
Page 17: High Band
CONSOLE 1 USER’S GUIDE | the gain of the equalizer’s low mid band. High Mid Band Sets the width of the equal- izer’s high mid band. Frequency Sets the operating frequency of the equalizer’s high mid Q (Width) band. Cut/Bell/Shelf High Mid Gain Turned clockwise from its center position, boosts the gain of the equalizer’s high mid... -
Page 18: Compressor Section
18 | GETTING STARTED Compressor Section Compressor activation Activates or bypasses the com- pressor section. Gain Reduction meter Displays the gain reduction caused by the compressor. Ratio Sets the compressor’s ratio. Compressor activation Gain Reduction meter Attack Sets the compressor’s attack time. -
Page 19: Output Section
CONSOLE 1 USER’S GUIDE | Output Section Output level meter Displays the output level of the signal that will be routed Drive Sets the level of the Drive/ back to the DAW channel. distortion function. Turn fully counterclockwise to bypass. Drive Character Sets the Drive/distortion character. -
Page 21: Working With Console 1
| Working with Console 1 Console 1 has been designed to not only give you world class sound, but also extreme ease of use. Once you have everything set up, the basic workflow of Console 1 is as fol- lows Select a track by pressing the corresponding Track Selector button. •... -
Page 22: Track Selection
22 | WORKING WITH CONSOLE 1 Track Selection About CPU handling: Since Console 1 runs entirely on your computer’s CPU, a few things should be noted on the CPU usage Most importantly, Console 1’s software The DAW tracks where you have initiated the part is unusually CPU efficient, and you should be able to Console 1 plug-in will be routed to the corre- run most sessions on today’s computers It should also be sponding Console 1 track, as set in the Console 1... - Page 23 CONSOLE 1 USER’S GUIDE | the On-Screen Display turned off You still select a channel and adjust the settings the same way On the hardware, the LED rings around each knob show the current setting, so in a way, working like this resembles working on a classic analog console You can also choose to work with different types of views on the On-Screen Display, which you toggle...
-
Page 24: The Input Section
24 | WORKING WITH CONSOLE 1 The Input Section in a more creative manner—to not just clean up unwanted rumble and hiss, but to actually affect the sound source to better fit in the mix. The slope In the Input Section of Console 1, you’ll find the and character of the High Input Gain knob. - Page 25 CONSOLE 1 USER’S GUIDE | cable has been miswired and the polarity inverted. It may (or may not) also improve the result when combining two microphones that are picking up the same sound source, such as top and bottom micro- phones on a drum or several microphones on the same guitar cabinet.
-
Page 26: Shape
Softube’s own Transient Shaper. Toggle on and off instruments. the section with the button in the top left corner of the section. Turning the section on will light up... - Page 27 CONSOLE 1 USER’S GUIDE | Hard Gate The Hard Gate button toggles between two differ- ent gate behaviors. With Hard Gate engaged, the gate strictly shuts off any sound below the threshold level. With it disengaged, the gate will act as an expander. This is essentially a gate that does not completely turn off the sound below the threshold, but instead turns it down somewhat in level.
-
Page 28: Equalizer
28 | WORKING WITH CONSOLE 1 Vocals (16) Solid Sta Equalizer Input Dynamic Shape Equalizer An equalizer alters the frequency content of the 20 dB sound, giving you detailed control of the sound’s tone. The Console 1 equalizer has four parametric bands. Toggle on or off the entire section with the button in the top left corner of the section. - Page 29 CONSOLE 1 USER’S GUIDE | Equalizer Equalizer Equalizer Please note that the graphical curve displays the actual equalizer response, calculated off the modeled analog circuitry This curve may differ from the markings on the equalizer parameter functions, which is quite common for real world analog equalizers The markings may not tell you the truth about what you really do when you twist the knobs, but Console 1’s equalizer curve does! A high shelving filter...
-
Page 30: Compressor
30 | WORKING WITH CONSOLE 1 Compressor exceed the threshold), a high threshold means the compressor only affects the loudest parts of the signal. A compressor is essentially a device that acts like an automatic volume control. When the level of Console 1’s Compressor section incorporates an auto- the incoming signal rises above a certain level—the matic make-up gain, which compensates for the compressor’s threshold level—the compressor will... - Page 31 nput Dynamic Shape Equalizer Compressor 20 dB 0 dB Solid State Logic SL 4000 E exceeded the threshold High and Low Cut filters to the compressor’s Equalizer Compressor Output at its original level before sidechain instead of applying them directly on the the compressor reacts and signal (by turning on Filters to Compressor).
-
Page 32: The Output Section
32 | WORKING WITH CONSOLE 1 The Output section sibility to control how the Vocals (16) console emulation is dis- Solid State Logic SL 4000 E torting, or in other words: Dynamic Shape Equalizer Compressor Output to control the headroom of 20 dB 0 dB the console. With Drive is set a off, you will get no harmonics at all, and this part of the console emu-... -
Page 33: Understanding Solo Safe
Mute ously distorted. This is often useful to add a bit of sonic “glue” to complex sources, such as a bus with a whole instrument section or across the master bus. The Mute function silences the selected track. When Shift is pressed and held, the Mute button Pan/Balance works as a ”Cancel”... - Page 34 Understanding Solo Safe the reverb’s effects send channel to Solo Safe, you will only hear the dry signal from the soloed track and no reverb. Setting aux channels and buses in Solo Safe mode means that when you select a single track and press Solo Safe can of course also be used for single Solo, the buses will still be open and let sound tracks that you want to be heard at all times, for...
-
Page 35: Useful Functions
| Useful Functions We have now gone through the essential functions of Console 1. But there are even more useful functions to make your every day music mixing life even easier. Select All Tracks By holding All, you select all tracks at once. Any adjustment you perform while holding this affects all tracks simultaneously. -
Page 36: Duplicate Track Settings
36 | USEFUL FUNCTIONS Duplicate Track Settings grouping. Release the buttons, and perform the adjustments you would like. Press Group again, or select another track, to dissolve the group. You can duplicate track settings and copy them from one track to another—or several others. This Please note that selecting all or creating a group works can be either the entire channel strip setting, or just similarly to a VCA group on a traditional mixer This means... - Page 37 CONSOLE 1 USER’S GUIDE | 2. When the dialog window opens, press the on/ off button next to the name of the section (or sections) you would like to copy—for example the Equalizer Activate button. The dialog window now informs you that you are about to duplicate the equalizer settings of the selected track.
-
Page 38: Load And Save Presets
Load and Save Presets SELECT TYPE OF PRESET You can call up factory presets, as well as save your Factory Channel Strip Factory Shape own ones. A preset can contain the entire chan- Factory Equalizer nel strip, or one or several sections, so that you for Factory Compressor instance can create an equalizer + compressor preset. -
Page 39: History
CONSOLE 1 USER’S GUIDE | History Settings Most of today’s DAWs have an unlimited undo To access the function, so whatever mistakes you may have made Settings menu, can be undone. But this does most often not apply hold Shift and to plug-in settings. If you have gotten lost while press the track adjusting a plug-in setting, you can usually not go selector for track... -
Page 40: Using Console 1 Without The Hardware
Using Console 1 Without the Hardware Many of today’s musicians and mix engineers work with portable lap top computers, and use them in many different locations. While the Console 1 hardware is not too big or heavy to bring with you, you may not have it available at all times. For this reason, we made it possible to adjust Console 1’s settings using the computer mouse. -
Page 41: Customizing The Channel Strip
Console 1 system. These will be separately available for purchase. But you can also use all the other Softube plug-in equalizers, compressors and gates as part of a Console 1 channel. -
Page 42: Changing The Order Of The Sections
42 | CUSTOMIZING THE CHANNEL STRIP Changing the Order of the Load Plug-Ins Sections Loading Con- sole 1 compatible The default order of the Console 1 effects is as they channel strips and are laid out on the hardware and in the On-Screen effects is done by Display: first shape, then equalizer and finally holding Shift and compressor. -
Page 43: View Options
CONSOLE 1 USER’S GUIDE | A Keying Example An example of using the external sidechain for a gate: let’s assume the gate is inserted on a track with a synth pad. The synth pad plays continuously, with no interruption. But instead, we would like it to follow the pattern of the kick drum, and have the Select whether an external sidechain pad appear at every kick drum hit and disappear in... -
Page 45: Specifications, Requirements And Troubleshooting
| Specifications, Requirements and Troubleshooting System Requirements Console 1 is not yet available for Windows. Here are the system requirements for Mac OS X: Mac OS X 10.7 or newer • Screen resolution 1280x800 or larger • Any VST, VST3, AU, or AAX (Pro Tools 10.3.7, 11.0.2 or higher) compat- •... -
Page 46: Block Diagram
46 | SPECIFICATIONS, REQUIREMENTS AND TROUBLESHOOTING Block Diagram The following schematic outlines the operation of Console 1. For the sake of simplicity, the different order of the sections (EQ before Shape before Compressor, etc) are not included. Neither are stereo/mono opera- tion on dynamic’s sidechains. Shape GAIN CHANGE METER... -
Page 47: Troubleshooting
CONSOLE 1 USER’S GUIDE | Troubleshooting ports to communicate between plug-ins and the Console 1 application, which will trigger a firewall alert the first time the application is started. You Hardware Does Not Turn On need to click “Allow”, otherwise nothing will work. If you’re using a passive, non-powered, USB hub, the Console 1 may fail to power on because it is not getting enough power. -
Page 48: Hardware Specifications
48 | SPECIFICATIONS, REQUIREMENTS AND TROUBLESHOOTING Hardware Specifications Connectors: USB connector (Type B) Power Supply: USB bus powered Power: 500 mA or less Dimensions: 428 x 42 x 189 mm (W x H x D) Weight: 1.95 kg Included items: USB cable, Quick Start Guide with license code... -
Page 49: End User License Agreement
CONSOLE 1 USER’S GUIDE | xlix END USER LICENSE AGREEMENT sor according to the Agreement or otherwise. 9. The Software is installed on computer(s)/server(s) according to what is set forth in the agreement with the Licensor. his End User License Agreement ("Agreement") is a contract between you, 10. Except as provided for the Evaluation License, the license will continue either individual or single entity, and Softube AB ("Licensor"), a Swedish until it is terminated. Licensor may terminate the license if you fail to comply corporation regarding use of the accompanying software ("Software"). Please with the terms of this Agreement. You may terminate the license at any time read through this Agreement carefully before installation and use of the and for any reason. Upon termination by either party, you must delete the Software. BY ACCEPTANCE OF THIS AGREEMENT OR by installation and/or use Software from your computer and any copies thereof. of the Software (THE EARLIEST OF SUCH ACTS CONSTITUTING THE EFFECTIVE 11. Licensor warrants the media on which the Software is recorded to be free DATE OF THIS AGREEMENT), you agree to be bound by the terms and condi- tions of this Agreement. Should you not accept the terms and conditions set from defects in material and workmanship under normal use for a period of ninety (90) days from the date of purchase as evidenced by a copy of the forth in this Agreement, do not install the Software and delete the Software receipt. Licensor’s entire liability and your exclusive remedy will be replace- from your computer and any copies thereof. ment of the media not meeting the Licensor’s limited warranty and which is 1. The Software may not be used without a software license key. You may pur- returned to Licensor or an authorized representative of Licensor with a copy chase a software license key from Licensor at the terms and conditions from of the receipt. Licensor will have no responsibility to replace any media dam- time to time applied by the Licensor, which entitles you to use the Software aged by accident, abuse or misapplication. on a perpetual basis ("Perpetual License"). You may also receive a temporary software license key which is intended to give you an opportunity to test 12. The Software is provided strictly "AS IS," without warranty of any kind. ALL and evaluate the Software ("Evaluation License"). Such Evaluation License is EXPRESSED OR IMPLIED REPRESENTATIONS AND WARRANTIES, INCLUDING ANY IMPLIED WARRANTY OF MERCHANTABILITY, FITNESS FOR A PARTICULAR provided at the terms and conditions from time to time applied by Licensor. - Page 50 | END USER LICENSE AGREEMENT SOFTUBE LIMITED HARDWARE tions, whether oral or written, statutory, express or implied. As permitted by WARRANTY applicable law, Softube specifically disclaims any and all statutory or implied warranties, including, without limitation, warranties of merchantability and fit- ness for a particular purpose and warranties against hidden or latent defects. 1. Softube warrants to the end user Customer this hardware product against If Softube cannot lawfully disclaim statutory or implied warranties then to the defects in materials and workmanship for a period of one (1) year after the extent permitted by law, all such warranties shall be limited in duration to the date of the original purchase from Softube or from a channel authorized by duration of the express warranty and to the repair or replacement service as Softube, provided the hardware product is unused at the time of purchase. determined by Softube in its sole discretion. No Softube distributor, agent, or 2. If a defect exists, at its option Softube will (a) repair the product at no employee is authorized to make any modification, extension, or addition to charge, using new or refurbished replacement parts, (b) exchange the prod- this warranty. If any term is held to be illegal or unenforceable, the legality or uct with a product that is new or which has been manufactured from new or enforceability of the remaining terms shall not be affected or impaired. Except serviceable used parts and is at least functionally equivalent to the original as provided in this warranty and to the maximum extent permitted by law, product, or (c) refund the purchase price of the product. Softube is not responsible for direct, special, incidental or consequential dam- ages resulting from any breach of warranty or condition, or under any other 3. A replacement product assumes the remaining warranty of the original legal theory, including but not limited to loss of use; loss of revenue; loss of product or 90 days, whichever provides longer coverage for the Customer. actual or anticipated profits (including loss of profits on contracts); loss of the When a product or part is exchanged, any replacement item becomes the use of money; loss of anticipated savings; loss of business; loss of opportunity; Customer’s property and the replaced item Propellerhead’s. When a refund is loss of goodwill; loss of reputation; loss of, damage to or corruption of data; or given, Customer’s product becomes Softube’s property. any indirect or consequential loss or damage howsoever caused including the replacement of equipment and property, any costs of recovering, program- 4. The Limited Warranty does not apply to any non-Softube hardware ming or reproducing any program or data stored in or used with the Softube product or any software, even if packaged or sold with the Softube hardware.
- Page 52 Softube AB, S:t Larsgatan 10c, 582 24 Linköping, Sweden. www.softube.com...
Need help?
Do you have a question about the SSL SL 4000 E and is the answer not in the manual?
Questions and answers