Table of Contents
Advertisement
Advertisement
Table of Contents

Related Manuals for Izzo Golf Swami 4000


Summary of Contents for Izzo Golf Swami 4000
- Page 1 GPS Instruction Manual...
- Page 2 Mail to: IZZO golf 1635 commons pkwy macedon, ny 14502-9191 [ Please place inside envelope ]...
- Page 3 REGISTER YOUR SWAMI 4000 FILL OUT THE INFORMATION BELOW OR GO TO WWW.IZZO.COM/SWAMIREGISTRATION Name: _____________________________________________ ADDRESS: __________________________________________ ___________________________________________________ Email: _____________________________________________ Phone: ( ) ________________________________ Date purchased: ________ /_________ /_______________...
-
Page 4: Table Of Contents
TABLE OF CONTENTS Thank You for Choosing Swami 4000 ................2 Warranty ..........................2 General Description of Hardware ..................3 Screen Display Description ................3 Basic Specifications ..................4 Accessories List ....................5 Charging Description ..................6 Getting Started ........................7 Start Menu ......................7 Power Off ......................7 Using Swami on the Course ...................8... -
Page 5: Thank You For Choosing Swami 4000
Registration Card .......................18 Thank You for Choosing Swami 4000 Compact design and friendly interface allow Swami 4000 to be your best electronic caddie, which can help you to swing more strategically and manage shot distances easily. In order to ensure the best performance of the product and extend its service life, please read these instructions before using your Swami 4000. -
Page 6: General Description Of Hardware
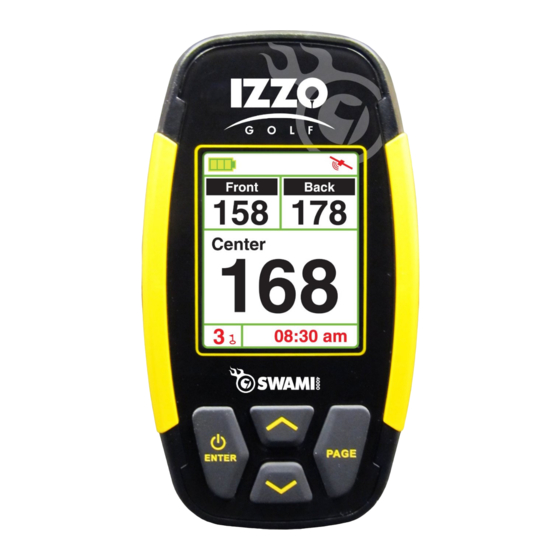
General Description of Hardware Screen Display Description Satellite Signal Battery Level Distance to the Front, Center and Back of the putting green Hole Number or Timer Time Up (forward) Key Enter / Power Key Page Key Down (backward) Key Key Description: •... -
Page 7: 1.2 Basic Specifications
1.2 Basic Specifications Number of courses stored +25,000 Worldwide Receiving chip High sensibility receiving chip Satellite Location Time Hot Start < 30 seconds (last used less than 1 hour) Warm Start < 1 minute (last used less than a few hours) Cold Start <... -
Page 8: Accessories List
Accessories List Thank you for purchasing Swami 4000. Please confirm whether your Swami 4000 contains the following items: AC charger USB Chord Belt Clip Protective Case * Should any item above be missing, please contact Izzo golf. Izzo Golf 1635 Commons Parkway Macedon, NY 14502 www.izzo.com... -
Page 9: Charging Description
It needs 4-5 hours to charge the battery after its power has been drained. • A Swami 4000 can be used for about 12 hours after charging fully. And it can be still used for 8 hours when power reduces and the battery symbol shows two bars. When the battery symbol shows one bar, it is still available for two-hour use. -
Page 10: Getting Started
Getting Started Start Menu Press and hold [ Enter ] for 3 seconds until the power is on. Three options will show on the Start Menu: Play, Settings and Power off. You can move the mark by pressing the [ Up ] and [ Down ] keys. -
Page 11: Using Swami On The Course
After you turn on your unit, select Play option from Start Menu River Run Gc and press [ Enter ] . The Swami 4000 will search for surrounding Brookwood Country Cl courses that the device supports. When the device has Green Island Gc found the courses, it will list them. -
Page 12: Electronic Score Card
Electronic Score Card Score card will provide relevant information for each hole of the golf course. Press [ Page ] key when at the Play Mode screen to Score Card access the scorecard. Information displayed by the score card Brookwood Country Cl menu is as following: •... -
Page 13: Editing Green Location
Next, stand with Swami 4000 at the point of new green location. (Example: If you are editing the front of the green, stand with the Swami 4000 at the point you wish to mark as the new front of the green). -
Page 14: Swami Settings
Time Set POWER OFF 00:58 04:21 pm Unit – Yard/ Meter Swami 4000 allows user to change distance measurements between yard and meter. Select Meter/Yard option on the Settings Setting Menu and press [ Enter ] to change the measurement. Meter/Yard (Note: Y = Yard and M = Meter). -
Page 15: Reset Round Time
Time Set ---- - 04:21 pm Backlight Control Swami 4000 can provide auto backlight off function to save power; if you don’t touch any key for a specific time period, Backlight Value screen will turn to dark automatically. Select the Backlight Backlight Setting: Control option on the Setting Menu and press the [ Enter ] key . -
Page 16: Language
French German 04:21 pm Time Set Swami 4000 will set present time zone automatically according to relevant data of GPS satellites; but you can adjust the daylight Timezone Set saving time of your location. Select Time Zone Set from the 03:45 pm Setting Menu. -
Page 17: Time Format
---- - 04:21 pm Model Info To view the Swami 4000 GPS unit model information, select Model Info from the Setting Menu screen. There you can view the (Model Model Info Number, Memory, Version, Brand and Serial number) of unit. To... -
Page 18: Caution
• SWAMI 4000 is only an auxiliary device, so we will not take any legal liability of accidents due to mistaken operation or wrong judgment by using SWAMI 4000 for measurement. -
Page 19: About Gps
3 meters. Using Conditions As Swami 4000 uses GPS, it is available only in the places that can receive satellite signals, excluding places indoor or in water. -
Page 20: Questions & Answers
QUESTIONS & ANSWERS Situations Possible Problems Solutions The device cannot A. Battery voltage is too low. A. Charge the battery. be started B. Press and hold the [ Enter ] B. You didn’t press and hold the [ Enter ] key for 3 seconds. key until the power is on.
Need help?
Do you have a question about the Swami 4000 and is the answer not in the manual?
Questions and answers