Table of Contents
Advertisement
Quick Links
Attention Customers!
Thank you for purchasing a Micca product. Should
you have any enquiries or need assistance, please
contact our technical support team before
contacting the store for assistance: email
support@miccastore.com.
Most common questions and answers regarding this
product can be found at the following FAQ:
http://content.miccastore.com/faq
Copyright © 2009-2011 Micca, Ltd. All rights reserved.
Advertisement
Table of Contents

Subscribe to Our Youtube Channel
Related Manuals for Micca mplay


Summary of Contents for Micca mplay
- Page 1 Attention Customers! Thank you for purchasing a Micca product. Should you have any enquiries or need assistance, please contact our technical support team before contacting the store for assistance: email support@miccastore.com. Most common questions and answers regarding this product can be found at the following FAQ: http://content.miccastore.com/faq...
- Page 2 Quick Start Guide IMPORTANT – If the image on the TV shows “No Signal”, looks discolored or distorted, this means the Micca MPLAY has not been set to the correct TV System mode in the settings menu. When using the MPLAY’s component video output, the player’s video out output mode must be set to HD Mode.
- Page 3 Turn off the power when the device will not be used. Do not place heavy objects on top of the player. Do not use strong solvents to clean the surface of the player such as alcohol, benzene, or thinner. Copyright © 2009-2011 Micca, Ltd. All rights reserved.
-
Page 4: General Introduction
Perfect Throughout the House The Micca MPLAY is costs less than a DVD player and is much more versatile than due to its capability to playback a wide range of video and audio formats from common storage devices. It is therefore the perfect replacement for aging DVD players. -
Page 5: Features And Specifications
II. Features and Specifications The Micca MPLAY offers the following key features and specifications 720P high definition component video output Compatible with all NTSC/PAL TVs and HDTVs, including CRT/LCD/Plasma/Projection Plays a wide range of popular media formats Fast, responsive, and easy to navigate user interface... -
Page 6: Item Checklist
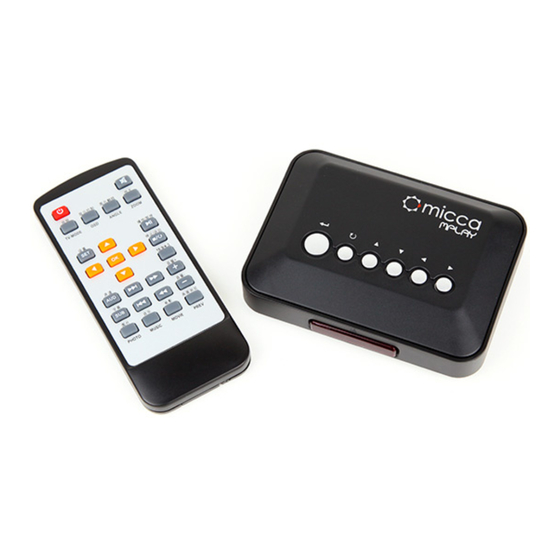
III. Item Check List Before starting, check that the following items have been included with your Micca MPLAY. If anything is missing, contact your retailer. Micca MPLAY Media Player IR Remote Control 3.5mm to 3 RCA Component Video Cable 3.5mm to 3 RCA AV Output Cable 5.0VDC AC Power Adapter... - Page 7 MPLAY Device Layout The Micca MPLAY has built-in buttons for performing basic playback controls without the IR remote control. The buttons from left to right are: Enter, Return, Up, Down, Left, and Right. These buttons serves as the same functions as the...
- Page 8 Master Power Switch – Turns the MPLAY on or off without using the IR remote control. When this switch is Off, the MPLAY cannot be turned on with the remote. When this switch is On, the MPLAY can be turned on or put into standby mode with the IR remote.
-
Page 9: Ir Remote Control
The remote is most effective when used within 20ft of the Micca MPLAY player, and within a 60-degree angle with respect to the IR remote sensor on the player. - Page 10 MPLAY on or put it into standby mode. Set this switch to off if not planning to use the MPLAY for a long time to conserve power. Make sure that the player is in standby mode before disconnecting power.
- Page 11 White Left Audio Channel The Micca MPLAY must be set to HD Mode for the component connection to output a correct signal. If the picture looks distorted, press the <Setup> button on the remote and then press the <TV Mode> button to switch between output modes until the correct mode has been selected.
- Page 12 VII. Micca MPLAY Startup When powered on, the Micca MPLAY displays a brief loading screen and then the [Home] screen. By default the [Home] screen will have the [Setup] icon plus icons representing compatible storage devices found during start up.
- Page 13 <OK> button to select it. Refer to sections for individual media types for additional information. Use the <Photo>, <Music>, and <Movie> buttons on the remote to quickly switch between media playback modes. Copyright © 2009-2011 Micca, Ltd. All rights reserved.
-
Page 14: Movie Mode
VIII. Movie Mode In Movie mode, the Micca MPLAY displays a file/folder directory on the left side of the screen, and a preview box on the right. Navigate the files and folders to locate video files you wish to play. Use the <... - Page 15 2X. Subtitle files in the .SRT or .SUB file format are supported and should be placed in the same folder as the video file. Toggles between various playback aspect ratios 16:9/4:3 Display the on screen display menu Copyright © 2009-2011 Micca, Ltd. All rights reserved.
- Page 16 Use the < > and < > buttons on the remote to enter the desired time mark. When finished, press the <OK> key on the remote to jump to the entered time mark. Copyright © 2009-2011 Micca, Ltd. All rights reserved.
-
Page 17: Music Mode
IX. Music Mode In Music mode, the Micca MPLAY displays a file/folder directory on the left side of the screen, and a playback box on the right. Navigate the folders to locate music files you wish to play. Highlight a compatible audio file and it will automatically start to play after a short delay. - Page 18 Skip forward to the next music file Pause or play the currently highlighted music file Stop playing the current music file Increase playback volume VOL+ VOL- Decrease playback volume Mute playback volume Mute Copyright © 2009-2011 Micca, Ltd. All rights reserved.
-
Page 19: Photo Mode
X. Photo Mode In Photo mode, the Micca MPLAY will locate all photos on the current storage device, arrange them in alphabetical order by folder and file name, and display all photos as thumbnails in a 3-by-5 grid. Navigate the thumbnails to locate photos you wish to view using the < >, < >, <... - Page 20 Start a slideshow beginning with the highlighted photo Display the highlighted photo full screen In picture mode, the following display controls are available while viewing a photo file full screen: View the previous photo View the next photo Copyright © 2009-2011 Micca, Ltd. All rights reserved.
- Page 21 Play/Pause, Rotate, Stop, and Zoom. With the on screen display menu visible, the following controls are available: Highlight icon to the left Highlight icon to the right Execute the highlighted viewing control command Copyright © 2009-2011 Micca, Ltd. All rights reserved.
-
Page 22: Text Mode
XI. Text Mode In Text mode, the Micca MPLAY displays a file/folder directory on the left side of the screen, and a file information box on the right. Navigate the files and folders to locate text files you wish to read using the < >, <... - Page 23 In text mode, the following controls are available while reading a text file: Jump back to beginning of file Scroll up one line Scroll down one line Start a slideshow beginning with the current picture Return to file/folder directory list Copyright © 2009-2011 Micca, Ltd. All rights reserved.
-
Page 24: File Mode
XII. File Mode In File mode, the Micca MPLAY displays a file/folder directory on the left side of the screen, and a file information box on the right. Navigate the folders to locate medial or text files you wish to playback or read. - Page 25 Highlight the next file or folder Play the highlighted file full screen The Micca MPLAY has the ability to copy or delete files from attached storage devices such as the internal hard disk drive, external USB flash drives, or SD flash memory card.
- Page 26 2. Press the <OSD> button on the remote control. The information box on the right side of the screen will prompt the user to select copy or delete operations. Copyright © 2009-2011 Micca, Ltd. All rights reserved.
- Page 27 <OK> button on the remote control to confirm copying of the selected file(s). 7. Once the copy operating has completed, the information box will display a [Finished] button; press <OK> to clear this confirmation. Copyright © 2009-2011 Micca, Ltd. All rights reserved.
- Page 28 Copyright © 2009-2011 Micca, Ltd. All rights reserved.
-
Page 29: Firmware Update
2. Copy the .img file onto a USB memory stick. Insert the USB memory stick into the Micca MPLAY player. 3. Turn on the Micca MPLAY. Select the [USB] icon and press <OK> on the remote control to bring up the [Select Media] menu. - Page 30 <TV Mode> button to switch between output modes until the correct mode has been selected. There will be a short delay when switching output modes so please wait a few seconds between presses of the <TV Mode> button. Copyright © 2009-2011 Micca, Ltd. All rights reserved.
-
Page 31: Settings Menu
The settings menu contains numerous configuration parameters that control the behavior of the Micca MPLAY during use. Below is a list of these parameters: [Language] Sets the operating language of the Micca MPLAY Available values: English, Simplified Chinese [Slideshow duration] Sets the time between pictures in slideshow mode... - Page 32 Sets the video output mode of the Micca MPLAY Available values: PAL Composite, NTSC Composite, HD Mode (720P) [Autorun] Sets the Micca MPLAY to automatically playback available video, picture, and audio files when turned on Available values: Disable, Enable [Default] When selected, resets all settings back to factory default Copyright ©...
Need help?
Do you have a question about the mplay and is the answer not in the manual?
Questions and answers