Table of Contents
Advertisement
Available languages
Available languages
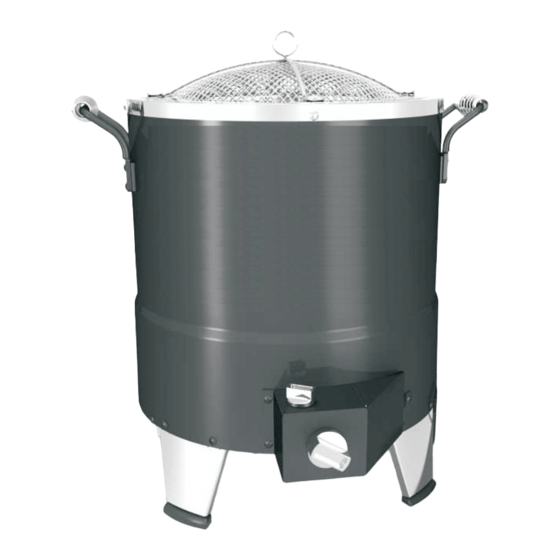
OIL-LESS TURKEY FRYER
Product Guide
Model 08101480
1600 Series
IMPORTANT: Fill out the product record information below.
Serial Number
Date Purchased
See rating label on unit leg for serial number.
CAUTION:
Read and follow all safety statements, assembly
instructions, and use and care directions before
attempting to assemble and cook.
INSTALLER/ASSEMBLER:
Leave this manual with consumer.
CONSUMER:
Keep this manual for future reference.
If you have questions or need assistance during assembly, please call
To insure your satisfaction and for follow-up service, register your appliance online at www.charbroil.com/register
The following are trademarks registered by W.C. Bradley Co. in the U.S. Patent and Trademark Office: Char-Broil®; America's Legendary Barbeque Company®; American Gourmet®; Bandera®; BrushHawg®;
CB940®; Char-Diamonds®; Char-Broil Charcoal/Gas®; DiamondFlame®; Everybody Grills®; Everybody Outside®; FastStart®; Fireball®; Firenzy®; FlavorMaster®; Grill2Go®; Grill2Go® Express®; Grill Lovers®;
H20 Smoker®; Keepers of the Flame®; New Braunfels Smoker Company®; Oklahoma Joe's®; Patio Bistro®; Patio Caddie®; Patio Kitchen®; Precision Flame®; Quantum®; Santa Fe®; Sear and Grill®; Sierra®;
Signature Series®; The Big Easy®; The Minute Grill®; Trentino®; Wild West Tradition®; and the following marks:
The following are trademarks of W.C. Bradley Co.: Commercial Series™; Designer Series™; Grill2Go® Advantage™; Longhorn™; Double Chef™; QuickSet™; Ready When You Are™; Hog and Yard Bird™; You Bring
the Party™; SureFire™; Universal Grill Parts™
TEC™ is a trademark of Tec Infrared Grills.
Protected under one or more of the following U.S. Patents: 4,989,579; 5,421,319; 5,458,309; 5,579,755; 5,996,573; 6,114,666; 6,135,104; 6,209,533; 6,279,566; 6,331,108; 6,484,900; 6,526,876; 6,595,197; 6,640,799; 6,640,803; 6,729,873; 6,739,473; 6,749,424;
6,863,100; 6,935,327; 6,951,213; 6792,935; 7,047,590; D364,535; D372,637; D373,701; D377,735; D383,035; D397,910; D405,643; D406,005; D406,009 ; D413,043; D413,229; D414,982; D415,388; D416,164; D416,441; D417,587; D417,588; D422,516;
D423,876; D428,303; D430,772; D435,396; D436,004; D438,059; D438,060; D438,427; D439,110; D442,505; D443,179; D443,354; D443,464; D447,384; D447,385; D447,909; D448,610; D448,614; D448,615; D448,616; D448,975; D449,492; D450,544;
D451,759; D454,028; D454,031; D455,205; D455,206; D456,202; D456,222; D456,223; D457,789; D458,520; D458,760; D458,802; D459,088; D459,148 D459,149; D459,161; D459,163; D459,586; D459,943; D460,312; D460,313; D460,318; D461,359;
D465,123; D465,693; D466,307; D466,439; D466,752; D473,414; D474,371; D477,498; D477,501; D477,504; D477,506; D477,746; D478,471; D478,472; D480,914; D491,410; D494,009; D494,413; D498,523; D500,359; D504,048; D530,098; D535,000; Canada:
87,743; 87,744; 97,504; 99,355; 102,037; 104,200; 2,315,567; 2,336,036; France: 010,231; 010,422; 010,590; 010,849; 1,089,646; Germany: 1,089,646; South Korea: 384,565; China: 99,127,066.5; United Kingdom: 2,099,402; 1,089,646. Other Patents Pending.
© 2008 W.C. Bradley Company
© 2008 Char-Broil, LLC
• Columbus, GA 31902 •
FOR OUTDOOR USE ONLY
Printed in China
• Assembly Instructions © 2008
Estimated Assembly Time: 1 Hour
WARNING:
Failure to follow all manufacturer's instructions could
result in serious personal injury and/or property
damage.
CAUTION:
Some parts may contain sharp edges – especially as
noted in the manual! Wear protective gloves if
necessary.
®
®
1-800-241-7548
.
08101480• 42804326 • 09-05-08
TM REVISION 00
Advertisement
Table of Contents

Related Manuals for Char-Broil 8101480


Summary of Contents for Char-Broil 8101480
-
Page 1: Product Record Information
1-800-241-7548 To insure your satisfaction and for follow-up service, register your appliance online at www.charbroil.com/register The following are trademarks registered by W.C. Bradley Co. in the U.S. Patent and Trademark Office: Char-Broil®; America's Legendary Barbeque Company®; American Gourmet®; Bandera®; BrushHawg®;... -
Page 2: Table Of Contents
TABLE OF CONTENTS DANGER Product Record Information ......1 1. Never operate this appliance unattended. For Your Safety . -
Page 3: Installation Safety Precautions
Installation Safety Precautions • Use your appliance, as purchased, only with LP (propane) gas and the regulator/valve assembly supplied. • The appliance installation must conform with local codes, or in their absence of local codes, with either the National Fuel Gas Code, ANSI Z223.1/ NFPA 54, Natural Gas and Propane Installation Code, CSA B149.1, and Propane Storage and Handling, CSA B149.2, Canadian Electrical Code, CSA C22.1... -
Page 4: Food Safety
Replacement foil tray liners • Cover appliance if stored outdoors. Choose from a variety of and other accessories can be found at www.charbroil.com. covers offered by the manufacturer. How To Tell If Meat Is Cooked Thoroughly •... -
Page 5: Use And Care
LP Cylinder Valve • A disconnected LP cylinder in USE AND CARE storage or being transported must have a safety cap installed (as shown). Do not store an LP cylinder in enclosed spaces DANGER such as a carport, garage, porch, covered Safety patio or other building. - Page 6 LP Cylinder Exchange Connecting Regulator to the LP Cylinder • Many retailers that sell this appliance offer you the option of 1. LP cylinder must be properly secured onto appliance . (Refer to replacing your empty LP cylinder through an exchange service. assembly section.) Use only those reputable exchange companies that inspect, 2.
- Page 7 Leak Testing Valves, Hose and Regulator 1. Turn control knob to OFF. 2. Be sure regulator is tightly connected to LP cylinder. 3. Completely open LP cylinder valve by turning hand wheel counterclockwise. If you hear a rushing sound, turn gas off immediately.
- Page 8 • Apartment Dwellers: WARNING Check with management to learn the requirements and fire codes for using an LP gas appliance in your For Safe Use of Your appliance and to Avoid Serious apartment complex. If allowed, use outside on the ground Injury: floor with a three (3) foot clearance from walls or rails.
-
Page 9: General Appliance Cleaning
Ignitor Lighting Burner Flame Check • Do not lean over appliance while lighting. • Light burner. Looking through viewing hole on top of appliance, you should see the flame height as shown below. Turn control 1. Turn ON LP gas cylinder. knob from ON to OFF. -
Page 10: Cleaning The Burner Assembly
Cleaning the Burner Assembly (Continued) CAUTION 7. Clean inner burner as recommended below, shown E. We suggest three ways to clean the burner tube. Use the one easiest for you. SPIDER ALERT! (A) Bend a stiff wire (a light weight coat hanger works well) into a small hook. -
Page 11: Limited Warranty
LIMITED WARRANTY This warranty only applies to units purchased from an authorized retailer. Manufacturer warrants to the original consumer-purchaser only that this product shall be free from defects in workmanship and materials after correct assembly and under normal and reasonable home use for the periods indicated below beginning on the date of manufacture*. -
Page 12: Parts List/ Parts Diagram
PARTS DIAGRAM Key Qty Description Part # Key Qty Description Part # Outer Body ..... . 55710184 Control Knob ....29101558 Inner Body . -
Page 13: Assembly
ASSEMBLY Tools required for assembly: Phillips Screwdriver (Not Supplied); Small Adjustable Wrench (Not Supplied) • Remove top cover, cooking basket and cooking pot. • Turn appliance upside down. • Attach legs to body using three #10-24 x 1/2" screws and three #10-24 Keps nuts for each leg. Insert screw through appliance body from outside, then through matching hole in leg and apply the #10-24 Keps nut. - Page 14 Your control panel in Step A may be pre-assembled. If so, skip to Step B. • Attach rotary ignitor to control panel using two #8x1/2" self-tap screws (A). • Attach round end of ignitor wire to rotary ignitor (A). • Attach valve to control panel holding valve in correct position using two #6-32x3/8"...
- Page 15 • Turn appliance upright on its legs. Push on control knob and ignitor knob (A). • If not already assembled, slide handle springs onto side handles (B). • Attach side handles to appliance body using two #10- Qty: 4 #10-24x1/2" Screw 24x1/2"...
- Page 16 • Place cooking pot and cooking basket into appliance body and place the top cover as shown. • When cooking hang top cover on handle as shown. NOTE: Before cooking on your appliance for the first time, refer to the seasoning supplement on how to prepare the appliance for cooking.
-
Page 17: Troubleshooting
EMERGENCIES: If a gas leak cannot be stopped, or a fire occurs due to gas leakage, call the fire department. Emergencies Possible Cause Prevention/Solution Gas leaking from • Damaged hose. • Turn off gas at LP cylinder or at source on natural gas systems. If cracked/cut/burned hose is cut or cracked, replace valve/hose/regulator. - Page 18 Troubleshooting (continued) Problem Possible Cause Prevention/Solution Burner will not light • Rotary knob rotates without clicking. • Replace knob. using ignitor. • Sparking between ignitor and electrode. • Inspect wire insulation and proper connection. Replace wire if insulation is broken. •...
-
Page 20: Registration Card
Please register your product online at: www.charbroil.com/register (If you register online, you do not need to send in this registration card.) PLEASE FILL OUT THIS CARD AND RETURN IT WITHIN 10 DAYS OF PURCHASE. FAILURE TO RETURN MAY AFFECT YOUR WARRANTY COVERAGE. FOR WARRANTY SERVICE PROOF OF PURCHASE WILL BE REQUIRED. - Page 21 Si tiene alguna pregunta o necesita ayuda durante el armado, llámenos al 1-800-241-7548. Para garantizar su satisfacción y para el servicio de seguimiento, inscriba su aparato en línea, en www.charbroil.com/register Las siguientes son marcas comerciales registradas de W.C. Bradley Co en la U. S. Oficina de Patentes y Marcas: Char-Broil®; America's Legendary Barbeque Company®; American Gourmet®; Bandera®;...
- Page 22 ÍNDICE DE MATERIAS PELIGRO Información de inscripción de la garantía ........1. Nunca deje desatendida esta freidora cuando Por su propia seguridad...............2 la esté usando. 2. Nunca la use a una distancia menor que 3 pies Símbolos de seguridad..............2 (1 m) de cualquier estructura, material Medidas de seguridad para la instalación........3 combustible u otro tanque de gas 3.
- Page 23 Medidas de seguridad para la instalación • Use su aparato, tal como lo compró, únicamente con gas propano y con la unidad de regulador/válvula suministrada. • La instalación de su aparato se debe realizar de conformidad con los códigos locales o, en su defecto, ya sea con la norma ANSI Z223.1/NFPA 54 del Código nacional sobre gases combustibles (o National Fuel Gas Code), la norma CSA B149.1 del Código para las instalaciones de gas natural y gas propano (o Natural Gas and Propane Installation Code), la...
- Page 24 Sustitución línea bandeja de papel de aluminio y • SÓLO guarde la freidora bajo techo si se ha cerrado el paso y desconectado otros accesorios se pueden encontrar en www.charbroil.com. el tanque de gas; retírela de la freidora y guárdelo al aire libre.
- Page 25 Válvula del USO Y MANTENIMIENTO • Los tanques de gas desconectados, tanque de gas guardados o en transporte, deben tener instalada la tapa de seguridad (como se ilustra). PELIGRO No guarde el tanque de gas en lugares cerrados Tapa de tales como cocheras, garajes, porches, patios seguridad techados y otras edificaciones.
- Page 26 Cambio del tanque de gas Cómo conectar el regulador al tanque de gas propano • Muchos comerciantes minoristas que venden este aparato, le ofrecen 1. El tanque de gas debe quedar bien fijado a la freidora. (Lea la la opción de cambiar su tanque de gas vacío mediante un servicio de sección de armado.) recambio.
- Page 27 Prueba para detectar fugas de las válvulas, las mangueras y el regulador 1. Gire la perilla de control a la posición de APAGADO (OFF). 2. Cerciórese de que el regulador esté bien conectado al tanque de gas.. 3. Abra por completo la válvula del tanque, girando la manilla en sentido contrario a las agujas del reloj.
- Page 28 Para personas que viven en apartamentos: ADVERTENCIA • Pídale al administrador que le indique los requisitos y los códigos contra incendios que corresponden al uso de aparatos a gas propano en su edificio de apartamentos. Si se le permite usarla, Para usar su freidora en forma segura y para evitar hágalo al aire libre, en la planta baja, dejando un espacio libre de lesiones graves:...
- Page 29 Cómo usar el encendedor Control de la llama del quemador • No se incline sobre la freidora cuando la esté encendiendo. • Encienda el quemador y gire la perilla, de la graduación encendido APAGADO (ON) a la (OFF) . Si observa por la mirilla ubicada en la parte 1.
- Page 30 Cómo limpiar la unidad del quemador (continuación) ADVERTENCIA Limpie el quemador interior como se indica más abajo, vea la ilustración E. Sugerimos tres maneras de limpiar el tubo del quemador. Use la que le resulte más fácil. ¡ALERTA CONTRA LAS ARAÑAS! (A) Doble un alambre rígido (un gancho de alambre para ropa sirve bien) para formar un gancho pequeño.
- Page 31 GARANTÍA LIMITADA Esta garantía es válida únicamente para las unidades adquiridas de los distribuidores autorizados. El fabricante le garantiza únicamente al consumidor-comprador original, que este producto no presentará defectos de mano de obra ni de materiales por el período indicado a continuación, contado desde la fecha de fabricación*, si se arma correctamente y se usa en el hogar, en condiciones normales y razonables.
- Page 32 VISTA ESQUEMÁTICA DE LAS PIEZAS Clave Cant. Descripción No. Pieza Clave Cant Descripción No. Pieza Parte exterior del cuerpo......55710184 Perilla de control........29101558 Parte interior del cuerpo......55710185 Tapa superior..........29101333 Aro para la parte superior del cuerpo..55710186 Unidades de las patas......29101595 Bandeja para grasa........29101337 Quemador..........55710187 Protector contra el calor......
- Page 33 ARMADO Herramientas necesarias para el armado: Destornillador Phillips (que no viene incluido), llave ajustable pequeña (que no viene incluida) • Retire la tapa, la cesta para asar y el recipiente para cocinar. • Voltee la freidora boca abajo. • Instale las patas en el cuerpo con tres tornillos No.10-24 de 1/2” y tres tuercas Keps No.10-24 en cada pata. Introduzca cada tornillo a través del cuerpo de la freidora desde la parte exterior, luego a través del orificio correspondiente de la pata y colóquele la tuerca Keps No.10-24.
- Page 34 Su panel de control en el paso A puede ser un pre-ensamblados. Si es así, vaya al paso B. • Instale el encendedor giratorio en el tablero de control con dos tornillos autorroscantes No. 8 de ½” (A). • Conecte el extremo redondo del cable del encendedor al encendedor giratorio (A). •...
- Page 35 • Pare la freidora sobre sus patas. Coloque la perilla de control y la perilla del encendedor (A). • Si aún no están instaladas, coloque los resortes en las asas (B). • Instale las asas con dos tornillos No. 10-24 de 1/2” en cada Cant.: 4 una (C).
- Page 36 • Coloque el recipiente para cocinar y la cesta en el cuerpo y coloque la tapa de la freidora es su lugar, como se ilustra. • Para cocinar, cuelgue del asa la tapa de la freidora, como se ilustra. NOTA: Le recomendamos que antes de cocinar por primera vez en su freidora, lea la forma de preparar la freidora para cocinar en el suplemento sobre el curado.
- Page 37 EMERGENCIAS: Si no se puede detener una fuga de gas, o si ocurre un incendio debido a una fuga de gas, llame a los bomberos. Emergencias Causas probables Medidas de prevención / solución Fugas de gas de • Manguera dañada. •...
- Page 38 Resolución de problemas (continuación ) Problema Causas probables Medidas de prevención / solución El quemador no se enciende • La perilla giratoria gira sin hacer clic. • Vuelva a colocar la perilla. al usar el encendedor. • Hay chispas entre el encendedor y el electrodo. •...
- Page 40 Sírvase inscribir su producto en línea, en: www.charbroil.com/register (Si lo inscribe en línea, no es necesario que envíe esta tarjeta de inscripción.) PLEASE FILL OUT THIS CARD AND RETURN IT WITHIN 10 DAYS OF PURCHASE. FAILURE TO RETURN MAY AFFECT YOUR WARRANTY COVERAGE . FOR WARRANTY SERVICE PROOF OF PURCHASE WILL BE REQUIRED.
Need help?
Do you have a question about the 8101480 and is the answer not in the manual?
Questions and answers