Table of Contents
Advertisement
Available languages
Available languages
Quick Links
WARNING:
To reduce the risk of injury, user must read and understand
the operator's manual for their paint sprayer before using
this accessory. Always wear eye protection with side
shields marked to comply with ANSI Z87.1. Failure to do
so could result in objects being thrown into your eyes,
resulting in possible serious injury. Risk of fluid injections;
do not point at people, pets, electrical devices, or the unit
itself. Turn off the paint sprayer and relieve pump pressure
before changing or adjusting accessories.
INSTALLING THE PISTOL-GRIP SPRAYER
See Figure 1.
n Screw the collar on the high pressure hose onto the pistol-
grip sprayer by turning the hose collar clockwise.
n Use an adjustable wrench to hold the nut on the pistol-grip
sprayer and another to turn and tighten the nut on hose
end and tighten securely.
INSTALLING SPRAY TIP AND NOZZLE TIP
GUARD
See Figure 2.
See paint sprayer operator's instructions for spraying, priming,
and cleaning before installing nozzle tip guard and spray tip.
Note all warnings regarding use of pistol-grip sprayer and the
possibility of injection.
n Turn lock-off thumbscrew counterclockwise to lock sprayer
trigger.
n Select spray tip and push securely into nozzle tip guard.
n Install tip saddle and tip seal into nozzle tip guard.
n Thread nozzle tip guard assembly onto sprayer and tighten
securely.
n Keep pistol-grip sprayer trigger locked when not in use.
USING THE PISTOL-GRIP SPRAYER
See Figure 3.
Always lock the pistol-grip sprayer trigger when you have
stopped spraying to prevent the sprayer from being bumped
or triggered accidentally and causing injection.
n Pull back and hold the trigger to operate the pistol-grip sprayer.
n Release the trigger to stop the flow of paint through the
nozzle.
To engage the lock-off:
n Turn lock-off thumbscrew counterclockwise.
To disengage the lock-off:
n Turn lock-off thumbscrew clockwise.
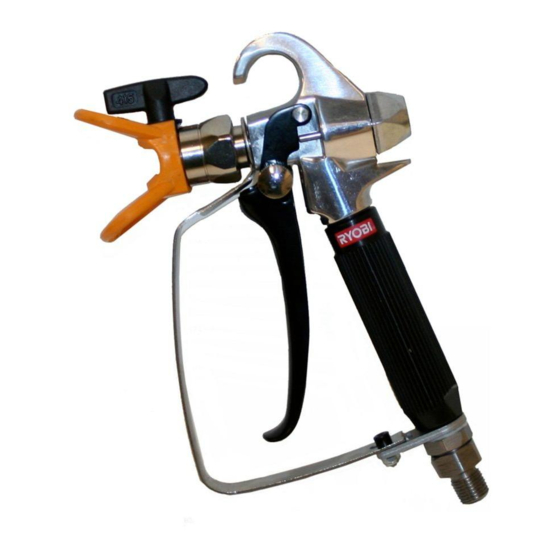
PISTOL-GRIP SPRAYER
ACR200BG
NUT
REVERSIBLE
SPRAY TIP
TIP
SADDLE
NOZZLE TIP
GUARD
SPRAY
TRIGGER
PISTOL-GRIP
SPRAYER
HOSE
COLLAR
TIP SEAL
LOCK-OFF
THUMBSCREW
LOCK-OFF
THUMBSCREW
LOCK
OFF
Fig. 1
Fig. 2
Fig. 3
Advertisement
Table of Contents

Related Manuals for Ryobi ACR200BG


Summary of Contents for Ryobi ACR200BG
- Page 1 PISTOL-GRIP SPRAYER ACR200BG PISTOL-GRIP WARNING: SPRAYER To reduce the risk of injury, user must read and understand HOSE the operator’s manual for their paint sprayer before using COLLAR this accessory. Always wear eye protection with side shields marked to comply with ANSI Z87.1. Failure to do so could result in objects being thrown into your eyes, resulting in possible serious injury.
- Page 2 CLEANING THE PISTOL-GRIP SPRAYER See Figure 4. LOCK-OFF THUMBSCREW n Turn off the paint sprayer and relieve pump pressure. FILTER n Check that pistol-grip sprayer trigger is locked off. n Remove pistol-grip sprayer from the high pressure hose using two adjustable wrenches. n Unscrew hex socket screw and lock nut to release trigger guard from plate on the base of sprayer.
- Page 3 PISTOLET DE PULVÉRISATION ACR200BG PISTOLET DE AVERTISSEMENT : PULVÉRISATION Pour réduire les risques de blessures, l’utilisateur doit lire et veiller COLLIER DU à bien comprendre le manuel d’utilisation pour leur pistolet de TUYAU FLEXIBLE pulvérisation avant d’utiliser ce accessoire. Toujours porter une protection oculaire munie d’écrans latéraux certifiée conforme...
- Page 4 n Retirer le pistolet de pulvérisation du tuyau flexible haute pression en utilisant deux clés à ouverture réglable. VIS DE BLOCAGE DE LA GÂCHETTE n Dévisser la vis creuse hexagonale et l’écrou de blocage afin de FILTRO libérer le dispositif de protection de la gâchette de la plaque se trouvant sur la base du pulvérisateur.
- Page 5 ROCIADOR CON EMPUÑADURA DE PISTOLA ACR200BG ROCIADOR CON ADVERTENCIA: EMPUÑADURA DE PISTOLA Para reducir el riesgo de lesiones, el usuario debe leer y comprender el manual del operador para su rociador de pintura COLLAR DE LA antes de usar este accesorio. Siempre póngase protección MANGUERA ocular con protección lateral con la marca de cumplimiento de la...
- Page 6 n Retire el rociador con empuñadura de pistola de la manguera de TORNILLO DE alta presión usando dos llaves ajustables. MARIPOSADE SEGURO n Desatornille el tornillo de cabeza hueca hexagonal y la tuerca de DE APAGADO FILTRO seguridad para soltar la protección del gatillo de la placa que se encuentra en la base del rociador.
Need help?
Do you have a question about the ACR200BG and is the answer not in the manual?
Questions and answers