Table of Contents
Advertisement
Quick Links
Advertisement
Table of Contents

Related Manuals for Sony SDX-420C


Summary of Contents for Sony SDX-420C
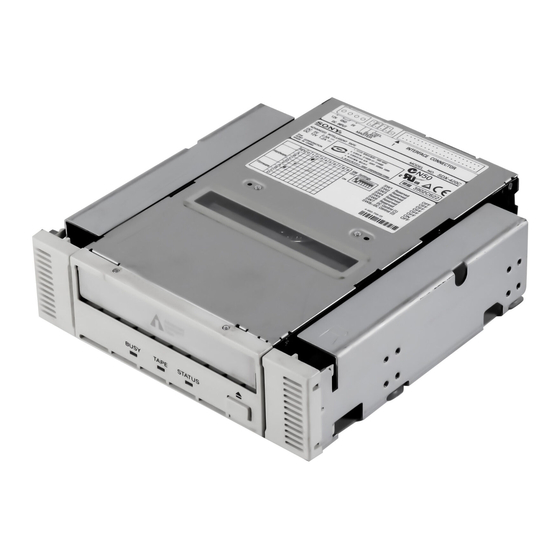
- Page 1 AIT Drive User’s Guide SDX-420C/R...
-
Page 2: Table Of Contents
This document contains proprietary Contents information which is protected by copyright. All rights reserved. No part of this Introduction ........4 document may be photocopied, Product Features ......4 reproduced or translated to another Precautions ........ 5 language without prior written consent Installation ......... - Page 3 Advanced Intelligent tape AIT (Advanced Intelligent Tape) technology. The SDX-420C/R drive achieves high data reliability through Read-After- Write, an additional level of Error Correction Code, and other features. The SDX-420C/R drive stores data on tape using a standard format called AIT and ALDC formats.
-
Page 4: Introduction
(sustained) 10.4 MByte/sec compressed * * This is assuming 2.6 : 1 compression ratio. • Supported Format : AIT-1 (SDX-420C/R) • Burst Transfer Rate 66 MBytes/sec Ultra DMA (mode 4) • Large 10 MByte Buffer Memory • 5.25” Half Height •... -
Page 5: Precautions
Precautions Installation Avoid placing the drive in a location subject to: – high humidity – high temperature – mechanical shock and vibration – direct sunlight Operation • Do not move the drive while it is operating. It may cause malfunction. •... -
Page 6: Installation
Installation Jumper Setting Master Slave Cable Select IDE Interface Connector No Connection Power Connector Jumpers Drive Setting Master 5V GND GND 12V Slave Cable Select... -
Page 7: Option Switches (Dip Switch)
Option Switches (DIP Switch) DIP Switch DIP Switch Positions Reserved (OFF) Reserved (OFF) Reserved (OFF) Reserved (OFF) Reserved (OFF) Reserved (OFF) DC Control (1) (ON) DC Control (2) (OFF) Data Compression Control DIP switch Data compression can be selected by DIP switches. Data compression is enabled while position 7 [DC Control (1)] is ON. - Page 8 Mounting Holes For 5.25" Half Height (SDX-420C/R) 15.6 0.5 mm [0.61" 0.02"] 18.4 0.5 mm [0.72" 0.02"] 35.9 0.5 mm 18.2 0.5 mm 4.7 0.5 mm [1.41" 0.02"] [0.72" 0.02"] [0.19" 0.02"] 92.71 mm 8 mm [3.65"] [0.31"] 4-3M 4-M3 6-M3(depth 2.5mm (0.10") max.)
-
Page 9: Orientation
Orientation... -
Page 10: Operation
Operation Location of 3 LEDs There are three LED indications (BUSY,TAPE and STATUS) and an EJECT button on the front panel of the unit. Front Panel (for 3.5" Standard Height) Advanced Intelligent Tape BUSY TAPE STATUS BUSY TAPE STATUS... -
Page 11: Led Indication For Drive Status
LED Indication for Drive Status The LED indicators are defined as follows. State BUSY TAPE STATUS Activity Cartridge Other None None None None None Drive Loading/Unloading None Drive Loading/Unloading Write Protected None Loaded Cleaning Tape at EOM None Loaded None Loaded None IDE/Drive... -
Page 12: Drive Operation
Using a Cleaning Cassette In case of SDX-420C/R, a cleaning function is built in the drive and hence, a periodic cleaning using cleaning cassette such as other format requires is not necessary. However, when the drive does not recover at the worst case,... -
Page 13: Emergency Tape Removal Procedure
Emergency Tape Removal Procedure Remove the drive from the chassis or enclosure to allow access to the bottom and right side of the drive. Remove the drive’s top cover. Locate the small opening in the bottom of the drive and insert the tip of a precision screwdriver so that the Threading motor shaft can be rotated. - Page 14 Return the drive to Acer for repair. 3. Cassette Compartment Motor 2. Reel Motor 1. Loading Motor...
- Page 15 tape guide surface tape guide surface detail A Cartridge Photo-1: The Initial Position of the Threading Mechanism Caution Stop rotating the motor shaft immediately, when the guide B (see detail A of Photo-1) gets to the area below the line C-C (This line is defined by 2 circular tape guide surfaces of the cartridge).
-
Page 16: Interface Implementation
Interface Implementation Supported ATA Commands ATA commands supported: – ATAPI SOFT RESET (0x08) – EXECUTE DRIVE DIAGNOSTIC (0x90) – ATAPI PACKET COMMAND (0xA0) – ATAPI IDENTIFY DEVICE (0xA1) – STANDBY IMMEDIATE (0xE0) – IDLE IMMEDIATE (0xE1) – CHECK POWER MODE (0xE5) –... -
Page 17: Specification
Specification Product Specifications Dimensions SDX-420C/R Height 41.2 mm (1.62 in) Width 149.0 mm (5.87 in) Depth 155.0 mm (6.1 in) Altitude Operating 0 to 10,000 feet Vibration Operating Swept Sine 5 to 500 Hz *0.25 G Peak 1 Octave/min. Non-Operating Swept Sine 5 to 500 Hz *0.5 G Peak 1 Octave/min. -
Page 18: Temperature And Humidity Range
Voltage Max Ripple Typical Maximum 5 V +/– 5 % 100 mVp-p 1.4 A 2.5 A SDX-420C/R 12 V +/– 10 % 150 mVp-p 0.45 A 1.2 A Suspended Particulate Less than 150 microgram/m Operating Based Sampling period 24 hours Discharge <... -
Page 19: Acer Contact
Acer Contact For further information, please contact: http://csd.acer.com.tw/... - Page 20 This document contains proprietary information which is protected by copyright. All rights reserved. No part of this document may be photocopied, reproduced or translated to another language without prior written consent of Acer. The information contained in this document is subject to change without notice.
- Page 22 • • • – – • • • • • • • • • •...
- Page 23 – – – – • • • • •...
- Page 24 Master Slave Cable Select IDE Interface Connector No Connection Power Connector Jumpers Drive Setting Master 5V GND GND 12V Slave Cable Select...
- Page 25 DIP Switch...
-
Page 26: Mm 0.61"
15.6 ±0.5 mm [0.61" ±0.02"] 18.4 ±0.5 mm [0.72" ±0.02"] 35.9 ±0.5 mm 18.2 ±0.5 mm 4.7 ±0.5 mm [1.41" ±0.02"] [0.72" ±0.02"] [0.19" ±0.02"] 92.71 mm 8 mm [3.65"] [0.31"] 4-3M 4-M3 6-M3(depth 2.5mm (0.10") max.) 9.9 ±0.5 mm [0.39"... - Page 27 10° 10° 10° 10° 10° 10° 10° 10°...
- Page 28 Advanced Intelligent Tape BUSY TAPE STATUS BUSY TAPE STATUS...
- Page 29 BUSY TAPE STATUS...
- Page 30 AIT-1 Using your fingernail, push the switch in the direction of the arrow to protect the tape from writing or accidental erasure. Return the switch to its original position to re-enable writing.
- Page 32 3. Cassette Compartment Motor 2. Reel Motor 1. Loading Motor...
- Page 33 tape guide surface tape guide surface detail A Cartridge...
- Page 34 – – – – – – – – – – – – – – – – – – – – – – – – – –...
- Page 37 http://csd.acer.com.tw/...
- Page 40 Printed in Japan 4-670-559-11 (1)
Need help?
Do you have a question about the SDX-420C and is the answer not in the manual?
Questions and answers