Axis P7216 Installation Manual
Video encoder
Hide thumbs
Also See for P7216:
- Installation manual (103 pages) ,
- User manual (61 pages) ,
- Installation manual (89 pages)
Table of Contents
Advertisement
Quick Links
Advertisement
Table of Contents

Subscribe to Our Youtube Channel
Related Manuals for Axis P7216


Summary of Contents for Axis P7216
- Page 1 INSTALLATION GUIDE AXIS P7216 Video Encoder...
- Page 2 Search by product, category, or phrase Every care has been taken in the preparation of this • report problems to Axis support staff by logging in to document. Please inform your local Axis office of any your private support area inaccuracies or omissions.
- Page 3 (RoHS). China This product complies with the requirements of the legislative act Administration on the Control of Pollution Caused by Electronic Information Products (ACPEIP). Contact Information Axis Communications AB Emdalavägen 14 223 69 Lund Sweden...
-
Page 5: Axis P7216 Video Encoder
AXIS P7216 Video Encoder Safety Information Read through this Installation Guide carefully before installing the product. Keep the Installation Guide for future reference. Hazard Levels DANGER Indicates a hazardous situation which, if not avoided, will result in death or serious injury. -
Page 6: Safety Instructions
Battery The Axis product uses a 3.0 V CR2032 lithium battery as the power supply for its internal real-time clock (RTC). Under normal conditions this battery will last for a minimum of five years. Low battery power affects the operation of the RTC, causing it to reset at every power-up. A log message will appear when the battery needs replacing. -
Page 7: Installation Steps
Installation Guide This Installation Guide provides instructions for installing AXIS P7216 Video Encoder on your network. For other aspects of using the product, see the User Manual available at www.axis.com Installation Steps 1. Make sure the package contents, tools and other materials necessary for the installation are in order. -
Page 8: Led Indicators
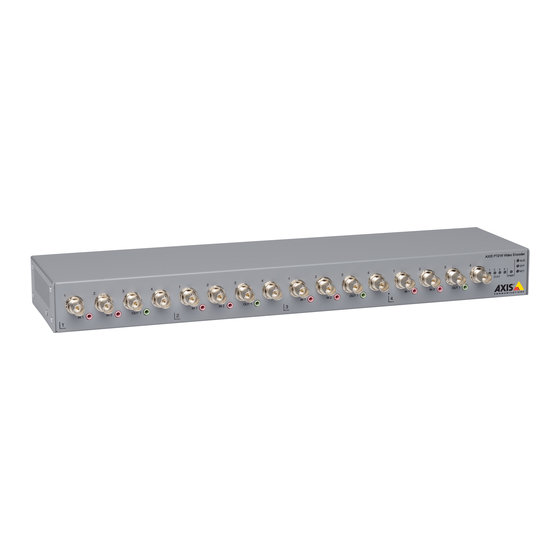
AXIS P7216 Video Encoder Network connector SFP Network connector RJ45 Auxiliary connector RJ45 (maintenance) Card slot (microSD) x4 I/O terminal connector x4 RS-485/422 connector x4 Control button x4 Protective earth Video input connector BNC x16 Network LED RJ45 Network LED SFP... - Page 9 Control button - The control button is used for: • Resetting the product to factory default settings. See page 14. • Connecting to an AXIS Video Hosting System service or AXIS Internet Dynamic DNS Service. For more information about these services, see the User Manual.
-
Page 10: Specifications
RS-485/RS-422 connector - Two 2-pin terminal blocks for RS-485/RS-422 serial interface used to control auxiliary equipment, e.g. PTZ devices. Specifications Operating Conditions The casing of AXIS P7216 is not approved for outdoor use. The product may only be installed in indoor environments. Product Temperature... - Page 11 AXIS P7216 Video Encoder Connectors I/O terminal connector 6-pin terminal block for: • Digital Input • Digital Output • Auxiliary power and ground (GND) Function Notes Specifications Ground Max load = 250 mA 3.3 V DC Can be used to power auxiliary equipment.
- Page 12 AXIS P7216 Video Encoder must be connected in parallel with the load, for protection against voltage transients. I/O configured as input I/O configured as output Power connector DC power input 2-pin terminal block for power input. Use a limited power source (LPS) with either a rated output power limited to £100 W or a rated...
-
Page 13: Install The Hardware
Install the Hardware Mount the video encoder The AXIS P7216 is supplied with a mounting kit containing brackets. The unit can be mounted in a rack or on a wall. After removing the existing 4 screws, attach the mounting brackets to the video encoder at an angle suitable for installation in a standard 1U 19”... -
Page 14: Auxiliary Connector
6. Check that the indicator LEDs indicate the correct conditions. See LED Indicators, on page 8 Auxiliary Connector The AXIS P7216 is equipped with an additional RJ45 network connector. The purpose with this connector is to simplify maintenance work on the AXIS P7216 that requires connection to a computer. -
Page 15: Further Information
Further Information The User Manual is available at www.axis.com Visit www.axis.com/techsup to check if there is updated firmware available for your network product. To see the currently installed firmware version, go to Setup > About. Visit Axis learning center www.axis.com/academy for useful trainings, webinars, tutorials and guides. - Page 16 Installation Guide Ver. M1.8 AXIS P7216 Video Encoder Date: May 2013 © Axis Communications AB, 2013 Part No. 50452...
Need help?
Do you have a question about the P7216 and is the answer not in the manual?
Questions and answers