
Subscribe to Our Youtube Channel
Summary of Contents for ACME LIGHT AND EASY LED-0808
-
Page 1: User Guide
LIGHT AND EASY LED-0808 User Guide Please read these instructions carefully before use... -
Page 3: Table Of Contents
CONTENTS 1. Features ....................3 2. General Instruction.................. 4 3. Overview ....................5 3.1 Front View ..................... 5 3.2 Rear View ....................6 4. Operation Guide ..................6 4.0 Channel Asignment……………………………………………………..…6 4.1 Store Saved Colours ................8 4.2 Delete Saved Colours ................7 4.3 Program Chase .................. -
Page 4: Features
1. Features 1. Light and Easy is a user friendly LED controller. 2. Designed to work on all 8-Channel LED lighting fixtures 3. Control up to 64 channels of 8 LED groups 4. 8 individual buttons for selecting 8 groups of lighting fixtures 5. -
Page 5: General Instruction
2. General Instruction Please read the user manual carefully, as it includes important information regarding details of operation, maintenance, and technical data. Keep this manual with the unit for future consultation. WARNINGS! Avoid any inflammable liquids, water or metal objects entering the unit. ... -
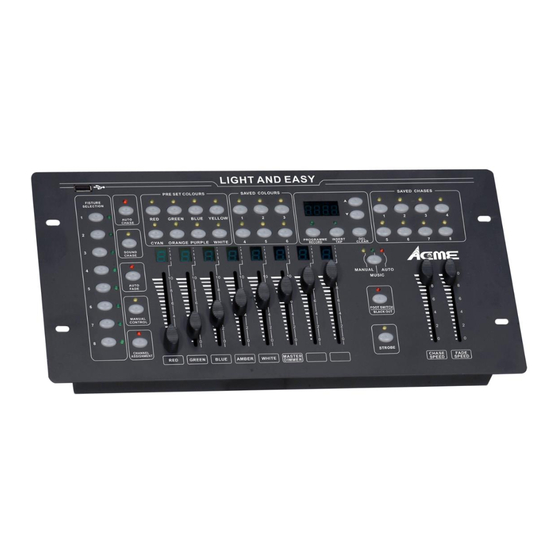
Page 6: Overview
3. Overview 3.1 Front View 1. FIXTURE SELECTOR 1-8 use to select fixtures 2. AUTO CHASE To run the chase automatically 3. SOUND CHASE Run the chase to the music 4. AUTO FADER 5. MANUAL CONTROL Press the button, you can turn to Manual control 6. -
Page 7: Rear View
Turn on the power, the controller access to the last control status of LED-0808 or CA-8F. Press BLACKOUT/FOOT SWITCH button to switch to LED-0808 or CA-8F control. Follow functions will be available under LED-0808 controlling. Saved colour, 4 banks, each bank with 6 saved colour 1、CP1.1-CP4.6... -
Page 8: Channel Asignment
chase step 3、ST01-ST32 data 4、D000-D255 chase speed (the interval time between two steps) 5、0.1 /08.8 (1) one digital after radix point: the unit is second 21.30 /60.00 (2) Two digital after radix point: the digital before radix point is minutes, and the digital after radix point is seconds. -
Page 9: Store Saved Colours
Pressing the PROGRAM/REC button, the all LED indicator flash for 3 times and then go out indicating that has already stored in it successfully. Repeat steps 3-5 to assign all other color for the channel of the assigned lights. Note: The value of the fader is 0 to 8, and then 1 to 8 means the channels which you will assign for the fixtures. -
Page 10: Delete Saved Colours
6 Press SAVED COLOURS button, all LED indicator flashing for 3 times and then go out, the corresponding LED flashing indicating that has already stored successfully (when the LED indicator off, means there is null color saved). 7 Repeat steps 2-6 to store more saved color. 8 Hold PROGRAM/REC button for 3 seconds to exit programming mode, the LED indicator above PROGRAM/REC will be off. -
Page 11: Insert Step To Chase
indicating that one step has stored successfully ( it will show “NULL” and do not store if all outputs are ”0” ). 5 Repeat steps 3-4 to store more steps, each chase 32 steps maximum, it will show “FULL” when up to 32 steps. 6 Repeat steps 2-5 to store more chases. -
Page 12: Delete Step From Chase
6 Press PROGRAM/REC button, all LEDs flashing for 3 times and then go out indicating it succeed in inserting one step. 7 Repeat steps 3-6 to insert more steps, 32 steps maximum, exceeding this it will show “FULL”. 8 Hold PROGRAM/REC button for 3 seconds to exit programming mode, the LED indicator above ROGRAM/REC will be off. -
Page 13: Factory Reset
All LEDs flashing for 3 times and then go out, the corresponding LED indicator off indicating deleted successfully. 3 Repeat steps 2-3 to delete more chases. 4 Hold PROGRAM/REC button for 3 seconds to exit programming mode, the LED indicator above PROGRAM/REC will be off. 4.7 Factory Reset Be careful, factory reset will delete all the settings! 1 Turn off the power. -
Page 14: Run Chase
3 Press saved colour1-6 button to run SAVED COLOURS. 4.10 Run CHASE Be sure there are CHASES stored. Press CHASE 1-8 buttons to run CHASE directly, the correspond LED will be on. If you choose more than one CHASE at a time, then the first correspond LED will be on and others will flashing (1Hz), all the CHASE will cycle run one by one. -
Page 15: Run Pre Set Colours
4 Press UP/DOWN button to adjust the sound sensitivity, the CHASE will run to the music. C. Auto mode 1 Insure the LED above BLACK OUT button is off. 2 Press CHASE 1-8 button,the display will show the present CHASE. 3 Press MANUAL/MUSIC/AUTO button to choose Auto Mode, the AUTO LED on indicating Auto Mode. -
Page 16: Over Control
1 Insure the LED indicator above BLACK OUT is off. 2 Press AUTO CHASE button, the LED indicator above it on indicating that has switched to the Auto Mode. 3 Press PRE SET COLOUR1-8 button, all the CHASE will run one by one circularly. -
Page 17: Strobe
LED-0808. 4.15 Foot Switch (CA- 8F) LED-0808 can work with CA-8F, when the CA-8F connected with the LED-0808, hold the BLACKOUT/FOOT SWITCH button for 3 seconds and the LED indicator above it flashing that means the CA-8F has already been activated. -
Page 18: Update By Usb Driver
When pressing the MODE button till to the indicator beside it goes out. Then you press the FUNCTION button, all the fixtures’ channels will be on 255. That means all light up. When you activate the CA-8, all the function buttons on the LED-0808 are deactivated, except the master dimmer. CA-8F 4.16 Update by USB drive... - Page 19 and the controller will exit the upload mode. 4.18 Download the files to the controller from the USB memory 1. Insert the USB memory to the controller. 2. Hold button and Bank Down MANUAL/MUSIC/AUTO button at the same time to enter into the download mode.
- Page 20 Technical Specification Power Input ....…………………….……..…...9-12 DC min 300mA DMX Output ....………………..3/5 pin DMX outpur and RJ45 port Dimensions.....………………..……….280 x 170 x 66 mm Weight......……........1.8 kgs Innovation, Quality, Performance...
Need help?
Do you have a question about the LIGHT AND EASY LED-0808 and is the answer not in the manual?
Questions and answers