Table of Contents
Advertisement
LIMITED WARRANTY
Oceanic warrants that this product shall be free from defective electrical components and leaks or cracks
due to defects in materials or workmanship for a period of twelve months from the date of purchase.
If a defect is shown, Oceanic will, at Oceanic's sole discretion, either repair or replace the product without
charge. No cash refunds will be made. This warranty is provided solely to the original consumer
purchaser of the product and may not be transferred or assigned.
This warranty does not apply to damage resulting from accident, misuse, abuse, lack of reasonable care,
failure to follow safety and installation instructions, use of the product with non-standard electrical
service, or any other defect not resulting from defects in the electrical components of the product or
defects in materials or workmanship. This warranty will not be effective unless and until the Oceanic
product is shown to have been used in accordance with the safety and installation instructions
accompanying the product, including the requirement that the product be placed on a flat, level surface
designed to support the product.
THIS CONSTITUTES OCEANIC'S ENTIRE WARRANTY AND OCEANIC MAKES NO OTHER
WARRANTIES, WHETHER EXPRESS OR IMPLIED, WITH RESPECT TO THE PRODUCT. OCEANIC
SPECIFICALLY DISCLAIMS ANY AND ALL IMPLIED WARRANTIES, INCLUDING, WITHOUT LIMITATION,
WARRANTIES OF MERCHANTABILITY AND FITNESS FOR A PARTICULAR PURPOSE.
IF OCEANIC CANNOT LAWFULLY DISCLAIM IMPLIED WARRANTIES UNDER THIS LIMITED
WARRANTY, ALL SUCH WARRANTIES, INCLUDING WARRANTIES OF MERCHANTABILITY
AND FITNESS FOR A PARTICULAR PURPOSE ARE LIMITED IN DURATION TO THE DURATION
OF THIS WARRANTY.
OCEANIC IS NOT RESPONSIBLE FOR DIRECT, SPECIAL, INCIDENTAL OR CONSEQUENTIAL DAMAGES
RESULTING FROM ANY BREACH OF WARRANTY OR CONDITION, OR UNDER ANY OTHER LEGAL
THEORY. OCEANIC EXPRESSLY DISCLAIMS ALL ALLEGED DAMAGES FOR LOSS OF AQUATIC LIFE,
PERSONAL INJURY, AND/OR PROPERTY DAMAGE.
Some states and provinces do not allow the exclusion or limitation of incidental or consequential
damages or exclusions or limitations on the duration of implied warranties or conditions, so the above
limitations or exclusions may not apply to you. This warranty gives you specific legal rights, and you may
also have other rights that vary by state or province.
Oceanic shall not have any obligations under this warranty unless the owner notifies Oceanic in writing
of any alleged defect(s) within 30 days of discovery of the defect(s). Any notice to Oceanic must be
delivered by United States or electronic mail to one of the following addresses:
U.S. Mail
Oceanic Systems
5401 W. Oakwood Park Drive
Franklin, Wisconsin 53132
Electronic Mail
customerservice@oceanicsystems.com
Oceanic shall be allowed a reasonable period of time to investigate any warranty claim and to perform
any testing Oceanic deems necessary to determine the cause of the defect. This warranty shall be
interpreted under the laws of the state of Wisconsin.
For additional information regarding this limited warranty, please contact us at the addresses above,
or call us at 800-255-4527.
®
Owner's Manual
Advertisement
Table of Contents

Summary of Contents for Oceanic BioCube HQi
- Page 1 If a defect is shown, Oceanic will, at Oceanic’s sole discretion, either repair or replace the product without charge. No cash refunds will be made. This warranty is provided solely to the original consumer purchaser of the product and may not be transferred or assigned.
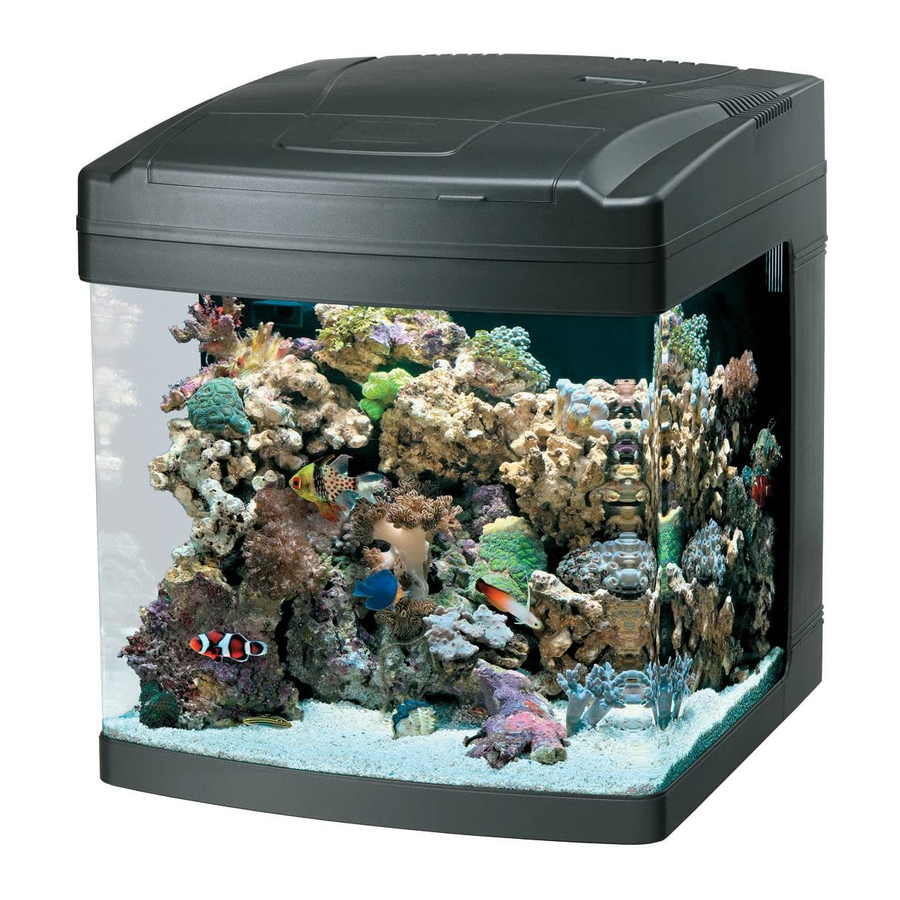
- Page 2 Page 4 Important Safety Instructions Net Volume: 26 Gallons Page 6 Grounding Dimension: Page 7 BioCube HQI Assembly and Setup Instructions 20"l x 20.75"w x 19.25"h Page 18 Aqualight HQI Assembly and Setup Instructions Lighting: Page 26 BioCube HQI Maintenance...
- Page 3 IMPORTANT 10. If an extension cord is necessary, a cord with a proper rating should be used. A cord rated for less amperes or watts than the appliance rating may overheat. Care should be taken to arrange the cord so that it will not SAFETY INSTRUCTIONS be tripped over or pulled.
- Page 4 GROUNDING BioCube HQI ASSEMBLY AND SETUP INSTRUCTIONS Grounding Setup: Grounding Installation: This appliance should be grounded to minimize The green-colored ground terminal (screw, and the possibility of electric shock. This appliance the like) extending from the adapter must be is equipped with an electric cord having...
- Page 5 BIOCUBE HQI PARTS DIAGRAM BIOCUBE HQI PARTS IDENTIFICATION Part # Description Item # Left Filtration Cover Right Filtration Cover Glass Canopy Filter Cartridge 82105 Overflow Tray Output Elbow Attachment Flexible Tubing Water Pump 82007 Output Discharge Nozzle BioCube Glass Aquarium...
- Page 6 PROTEIN SKIMMER DETAILED DIAGRAM PROTEIN SKIMMER PARTS IDENTIFICATION Part # Description Collection Cup Lid Collection Cup Reaction Chamber Top Suction Cup Airstone Reaction Chamber Assembly Airline Tubing 7' Air Pump Inline Air Flow Valve Check Valve...
- Page 7 BIOCUBE PROTEIN SKIMMER SETUP BIOCUBE PROTEIN SKIMMER SETUP (con't) Protein Skimmer Assembly FIGURE C2 (Figure C1) Protein Skimmer Placement 1. Insert airline tubing into air pump using (Figure C2) end that has just 6" before the inline air flow valve. 1.
- Page 8 BIOCUBE FILTER SETUP BIOCUBE FILTER STARTUP SAFETY: Filter Startup Operation INITIAL FIGURE C5 FILL LEVEL (Figures C5 and C6) 1. Turn off all switches and unplug all power cords from outlet or power source before FIGURE C4 1. Add substrate, rocks and décor performing maintenance.
- Page 9 (Figure C7) the refugium in chamber 2 (Figure C9). 1. Locate window on the back of the BioCube HQI. Live macroalgae and live rock in the 2. Clean area around the illumination window...
- Page 10 Aqualight HQI AQUALIGHT HQI PARTS DIAGRAM ASSEMBLY AND SETUP INSTRUCTIONS...
- Page 11 AQUALIGHT HQI PARTS ASSEMBLY AND MOUNTING IDENTIFICATION WARNING: FIGURE B1 1. This fixture is for use over covered aquariums only. Part # Description 2. Always turn fixture off and unplug ballast Aqualight Lighting Hood power cord before adjusting fixture or Lamp Holder replacing lamps. Let the fixture cool down before handling.
- Page 12 AQUALIGHT ADJUSTMENTS BALLAST AND COOLING FAN SETUP SAFETY: FIGURE B4 IMPORTANT SAFETY NOTES: FIGURE B7 1. Turn off switch, unplug ballast power Extension Adjustment 1. Make sure to follow the fixture and HQI cord and allow fixture to cool down MALE FEMALE ballast connection instructions in their...
- Page 13 OPERATION LAMP REPLACEMENT Startup Operation SAFETY: FIGURE B10 1. Make sure all connections are completely 1. Turn off all switches and unplug all power attached and secure. cords from outlet or power source before performing maintenance. 2. Make sure that all switches are in the off position before plugging in power cords 2.
- Page 14 BIOCUBE MAINTENANCE BIOCUBE MAINTENANCE (con't) WARNING! Monthly Maintenance FIGURE C12 (Figures C12–C14) 1. Make sure all switches are in the off position and unplug power cords from power source 1. Replace used filter cartridge by tilting the or outlet before performing maintenance. filter back from one end of the overflow tray, then pulling out.
Need help?
Do you have a question about the BioCube HQi and is the answer not in the manual?
Questions and answers