Table of Contents
Advertisement
Quick Links
User Manual - Flashlight DVR
The descriptions included are subject to minor change without notice.
PACKING LIST:
1 Flashlight DVR x 1
2 USB Cable x 1
3 CD x 1
4 Adapter x 1
5 Rope x 1
6 Lithium Battery x 1
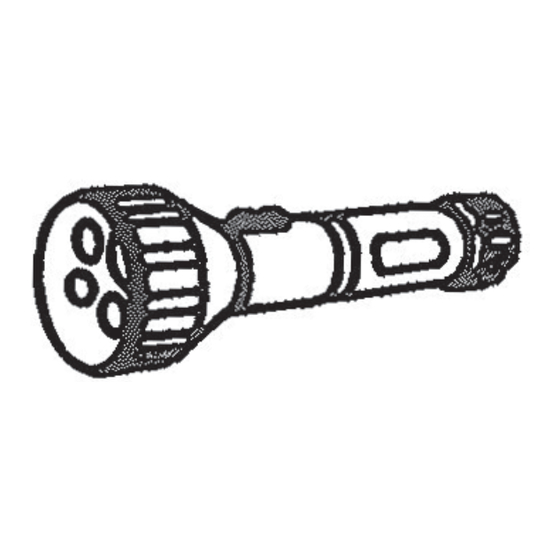
STRUCTURE:
Bright LED
Low-Light LED
Low-Light LED
DIAGRAM OF OPERATION:
Install Lithium Battery:
Unscrew the handle of flashlight DVR. Install the Lithium battery into
the handle. Screw the handle of flashlight DVR back on.
Charging the Battery:
Remove the waterproof plug. Connect the power adapter to the
flashlight DVR. The indicator light will be green while charging and
turns off after fully charged.
Setting Date and Time:
If you find that the date/time of the video does not match your local
date/time, the following steps will allow you to change the date and
time:
1.
Connect the Enforcer Flashlight DVR to the computer with the
USB cable. Open My Computer and you will see the USB Mobile Disk
folder icon.
2.
Insert the CD in to the CD-ROM drive.
3.
Open the CD, copy the "getsystemTime.exe" file to the Mobile Disk
folder in the in the DVR Flashlight.
4.
Once the "getsystemTime.exe" file is copied to the Mobile
Disk folder, double click "getsystemTime.exe", the system will
automatically update the date and time.
Use as a Flashlight:
Press the Light button once, bright LED light; Press again, low-light
LED lights; Press a third time to turn off the LEDs.
Version No.: 1.5
These photos are for reference only. Please refer to actual product.
Indicator (Built-In)
Record/Stop Button
Lens
1
4
Light Button
Handle
USB Socket
2
3
5
6
Charge Indicator
Waterproof
Power Socket
Plug
Advertisement
Table of Contents

Related Manuals for ENFORCER The Enforcer

Summary of Contents for ENFORCER The Enforcer
- Page 1 If you find that the date/time of the video does not match your local date/time, the following steps will allow you to change the date and time: Connect the Enforcer Flashlight DVR to the computer with the USB cable. Open My Computer and you will see the USB Mobile Disk folder icon.
-
Page 2: Specifications
Press the Record/Stop button to start recording and once again to stop recording. The indicator light is a flashing blue light while recording. • Make sure the button of the Enforcer Flashlight DVR is on top during recording, otherwise the video files will not display correctly •...
Need help?
Do you have a question about the The Enforcer and is the answer not in the manual?
Questions and answers