
Related Manuals for Firstech CM6300


Summary of Contents for Firstech CM6300
- Page 1 CM6300 Alarm System MODEL: RF-2W900FM-5PT Firstech, LLC. 21903 68th Ave S. Kent, WA 98032 Phone. 888-820-3690 Fax. 206-957-3330 Please visit www.firstechonline.com for additional installation resources Version 7.11...
-
Page 2: Table Of Contents
Alarm System www.firstechonline.com | www.compustar.com CM6300 Install Guide Table of Contents CM6300 Introduction Kit Contents Installation Basics Remote Programming Routine Placement and Use of Components Common Procedures Wiring Descriptions Option Programming Tables Option Menu Descriptions Special Option Groups 1 & 2... - Page 3 Alarm System www.firstechonline.com | www.compustar.com CM6300 Install Guide Copyright 2012 Firstech, LLC. Page 3...
-
Page 4: Introduction
DAS sensor (FT-DAS) The remote(s) and antenna are modular and are not specific to the control modules. You have the ability to pair almost any Firstech remote(s) and antenna receiver to the CM6300. This includes all 4 and 6 pin antennas. -
Page 5: Installation Basics
Supports 4 Pin and 6 Pin Antennas The CM6300 supports both Firstech 4 Pin and 6 Pin antennas. This will work with all new RF kits as well as the current ones. Do not have antennas plugged into both ports on the CM6300 as the remotes will not function properly. -
Page 6: Remote Programming Routine
Alarm System www.firstechonline.com | www.compustar.com CM6300 Install Guide Remote Programming Routine CM6300 IMPORTANT: Any and all remotes must be coded to the control module prior to performing any and all operations. STEP 1: Activate programming mode by manually turning the vehicle’s key between the Ign On and Off (or the Acc &... - Page 7 Alarm System www.firstechonline.com | www.compustar.com CM6300 Install Guide Placement and Use of Components CM6300 RPS Touch and RPS (Remote Paging Sensor) The RPS is an optional feature. The car call/RPS feature uses a small sensor that is mounted on the inside of your windshield.
- Page 8 Alarm System www.firstechonline.com | www.compustar.com CM6300 Install Guide Placement and Use of Components CM6300 2 Way LCD remote paging To page a 2 Way LCD remote just tap the ‘Red Circle’ twice. Touch Panel Sensitivity To change touch sensitivity open the driver’s door, hold the button on the back of the RPS Touch until the LEDs go out.
- Page 9 Alarm System www.firstechonline.com | www.compustar.com CM6300 Install Guide Placement and Use of Components CM6300 STEP 5: The LED on the RPS will confirm your first number by flashing BLUE slowly. Once the LED begins to flash rapidly in BLUE, enter your second number by repeating step 4.
- Page 10 OFF - 1.5 Degree Tilt OFF - 3 Inch Movement Adjusting DAS Shock Sensitivity (CM6000 or CM6300) STEP 1: Turn the ignition to the ‘on’ position. STEP 2: 2 Way remotes-hold buttons 1 and 2 (Lock and Unlock) for 2.5 seconds. You will get two parking light flashes.
- Page 11 Alarm System www.firstechonline.com | www.compustar.com CM6300 Install Guide FT-EZGO Setup The FT-EZGO from Firstech will unlock/disarm the vehicle when in range. It will also lock/arm and unlock/ disarm the vehicle when you press the button on the EZ100-R. Installing The FT-EZGO STEP 1: Flash your CM6 Series control module for FT-EZGO compatible firmware.
-
Page 12: Common Procedures
Every 2 Way LCD Firstech RF kit includes an optional thermister, which must be plugged into the 2 pin port of the control module for use. This plug is blue on the CM6300. The use of the thermister allows the 2 Way remote to display the vehicle’s interior temperature on the remote LCD (liquid crystal display) IMPORTANT:... -
Page 13: Wiring Descriptions
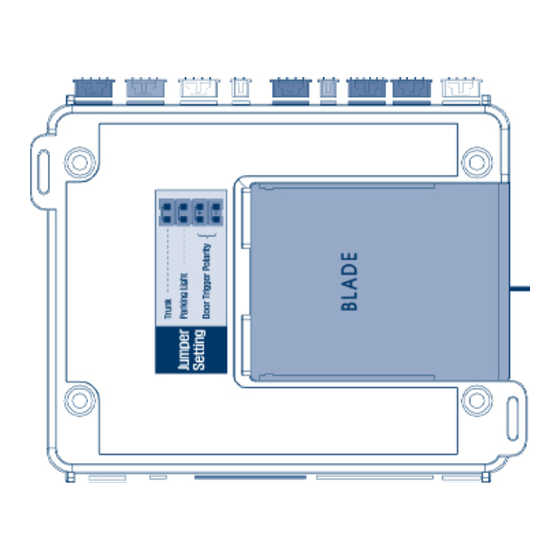
IMPORTANT: Install diagrams are not included and must be downloaded from www.idatalink.com/ compustar. When flashing the Blade you can use the Y-Cable OP500 end and not CM4 Series end. ADS and Firstech recommends using the 4 pin RS232 cable to avoid confusion. Cartridge must be removed to flash the control module firmware. - Page 14 Alarm System www.firstechonline.com | www.compustar.com CM6300 Install Guide Connector 1 (CN1), 4-Pin Pin 1 Red - Constant 12V positive (+) power input. This wire must be connected. The proper vehicle wire will test (+) 12V at all times while the key is in the off position, the on position and during crank.
- Page 15 Alarm System www.firstechonline.com | www.compustar.com CM6300 Install Guide Connector 3 (CN3) , 20 Pin Blade Connector - New Generation This connector is used only if you are installing a Blade-AL or Blade-TB. The wiring harness for this connector also comes with the Blade cartridge. Please refer to the Blade install guide for wire description.
- Page 16 Alarm System www.firstechonline.com | www.compustar.com CM6300 Install Guide Pin 11 Black [POC 5] – Auxiliary 2 250mA negative (-) output. This is an optional output that will provide a programmable output to trigger sliding doors, power windows or whatever other features you’d like.
- Page 17 Connector 6 (CN6), 4-Pin (RS 232 Data Port) This connector is used for updating control modules via www.compustar.com. You must also use this port to flash Blade bypass modules. This port provides simple connectivity of Fortin and iDataLink bypass modules.
- Page 18 Alarm System www.firstechonline.com | www.compustar.com CM6300 Install Guide Connector 7 (CN7), 4-Pin to 4-Pin or 6-Pin (Pre-wired Antenna Cable) Connect your antenna cable to this port. You can only use 4 to 4 pin or 4 to 6 pin antenna cables. 6 to 6 Pin antenna cables do not work.
- Page 19 Alarm System www.firstechonline.com | www.compustar.com CM6300 Install Guide Connector 11 (CN11), 2-Pin (Pre-wired LED) Note: Do not mistake for Thermister port. Pin 1 Black - L.E.D negative (-) ground. Pin 2 Black/White- L.E.D. 3V positive (+) output. Connector 12 (CN12), 4-Pin (Pre-wired RPS) Pin 1 Black - Negative (-) ground.
-
Page 20: Option Programming Tables
FT-EZGO Unlock 1-14 Unlock Trunk Output Timing 1 sec 2 sec 3 sec 4 sec 1-15 Option Group 2 Not Available in CM6300 Option Group 3 Optional Setting Optional Setting Optional Setting Feature Default Setting - I - II - III... - Page 21 Alarm System www.firstechonline.com | www.compustar.com CM6300 Install Guide Option Group 3 Continued Optional Setting Optional Setting Optional Setting Feature Default Setting - I - II - III - IV On Lock, Unlock, and On Double Lock and Horn Output On Double Lock Only...
-
Page 22: Option Menu Descriptions
Alarm System www.firstechonline.com | www.compustar.com CM6300 Install Guide Special Option Group 1 Feature Setting Value (Seconds) AUX1 output time 1 ~ 100 AUX2 output time 1 ~ 100 AUX3 output time 1 ~ 100 AUX4 output time 1 ~ 100... - Page 23 Alarm System www.firstechonline.com | www.compustar.com CM6300 Install Guide 1-04 Double Pulse Unlock - If enabled, this option will cause the system to double pulse the lock, unlock or both lock and unlock outputs. This can be used for vehicles that need two pulses to unlock or relock the doors.
- Page 24 3-06 Factory Alarm Option- This feature is default to on, when set to option 2 the security features of the CM6300 will be deactivated leaving the keyless features functional. 3-07 Siren Duration (Upon Alarm Trigger) - This option changes the time that the siren sounds during alarm trigger.
- Page 25 Alarm System www.firstechonline.com | www.compustar.com CM6300 Install Guide 3-11 Auxiliary settings – The Auxiliary settings adds five additional independent auxiliary outputs for a total of seven with this option turned on. Special Option Group 1 allows for independent timing of these outputs.
- Page 26 2 Way. It will beep several times for 5 seconds, every 50 seconds, 3 times and flash the battery indicator on the remote. When you query the remote or unlock/disarm the system the remote will display the voltage of the vehicle’s battery. Options 3 and 4 are not available with CM6300. Copyright 2012 Firstech, LLC.
-
Page 27: Special Option Groups 1 & 2
Alarm System www.firstechonline.com | www.compustar.com CM6300 Install Guide Special Option Groups 1 & 2 CM6300 IMPORTANT: The OP500 is required to change settings in Special Option Groups 1 and 2. Special Option Group 1 Aux 1 Output Timing – Option 4-01 must first be set to setting 4. This special option allows a specific output duration for Aux 1 to be programmed. - Page 28 Alarm System www.firstechonline.com | www.compustar.com CM6300 Install Guide At the end of menu 4, if diesel mode or auxiliary setting functions were enabled – or if any of the auxiliary outputs were set to “Program”, the duration of these settings can now be adjusted.
- Page 29 Alarm System www.firstechonline.com | www.compustar.com CM6300 Install Guide How to Program Options on 2-Way Remotes with Separate Lock and Unlock Buttons Lock + Unlock for 2.5 Hold Trunk Tap Key Tap Lock Tap Unlock Tap Key Option seconds then Lock + Unlock...
- Page 30 Alarm System www.firstechonline.com | www.compustar.com CM6300 Install Guide How to Program Options with 2-Way Remotes with Roman Numerals (1 + 2) for 2.5 seconds then Option Tap Button 4 Tap Button 1 Tap Button 2 Tap Button 3 Tap Button 4 Menu 1 (1 + 2) for 2.5 seconds...
-
Page 31: Troubleshooting
On the brain, how do I set the auxiliaries? A: Auxiliary 1 through 5 are defaulted on with the CM6300. Although you must have an Option Programmer (OP500) to change the outputs to a specific time. Secure auxiliary (option 4-05) will prevent these outputs from triggering without doing query first. -
Page 32: Technical Support Contacts
I’m using the RPS Touch but my LED’s and Secure Valet LED does not flash. A: The CM6000 and CM6300 LED and Secure Valet LEDs will not work when using an RPS Touch. This is a hardware limitation. The RPS 2 will work with LEDs and Secure Valet.
Need help?
Do you have a question about the CM6300 and is the answer not in the manual?
Questions and answers